Blog Series Overview
- Angular for beginners
- The building blocks of an Angular app
- Angular’s Data Layer
- Observables: Reactive with RxJS
- No Angular SPA without routing
The last two articles in this series successfully completed the topic of reactive programming using the JavaScript library RxJS. We learned what observables are and how we can subscribe and unsubscribe from data streams. For our application, unsubscribing is especially important. Otherwise, data will continue to be sent via the data streams, even long after our receiving component has been destroyed. We can also manipulate the data before it reaches our component with the help of pipeable operators like map and filter. For this, RxJS provides a whole set of transformation, filter, combination, and utility operators that help us develop with data streams.
Finally, we looked at the big topic of state management and stored our application’s title in a state. For this, we needed another construct from the RxJS library: the Subject Observables and Observers. This allowed us to store data from a component into the subject and receive the data again at another point with the data stream. We encountered the issue that simple RxJS subjects send data directly, regardless of if a component subscribes to the associated data stream. This can lead to timing problems when receiving the data. But the BehaviorSubject or ReplaySubject helps us handle the issue. Both subject types have the special feature of storing at least the last sent value and sending it again if a component subscribes to the data stream afterward.
In our application, we’ve already developed individual components for the list view and list item view. These are directly displayed when the application starts, as we’ve inserted our BookComponent into the AppComponent. In most applications, a user is taken to an overview area first rather than directly to a list display of assorted data. For implementation, we need a HomeComponent, which we’ll display first instead of the BookComponent.
> ng generate component home
This component should be part of the AppModule and exchanged with the BookComponent in the AppComponent template:
<app-header></app-header>
<app-home></app-home>
After recompiling, we notice that our book list is no longer displayed. To see both views in the applications, we can manually manipulate the browser’s DOM and keep adding a different component to the ViewContainer. But this principle has its weakness, mainly because of its complexity and that the state cannot be persisted. This is where the principle of routing comes into play. We call routing the loading of areas in the application depending on the state. The router is the service that manages the Angular application’s state. At runtime, it automatically exchanges the loaded components.
In this article, we want to make multiple views simultaneously available and implement a detailed view of a book with the help of routing. The user should be able to access all components with URLs, as we know from conventional web applications. Further clickable links are added to the application to help the user navigate our application.
Routing in a SPA
We can develop Single Page Applications (SPAs) with Angular. The concept of an SPA states that there is only one HTML page—the index.html page. Initially, this is empty, and all content is loaded into the page at runtime with JavaScript. When the view or page is changed, the page usually isn’t hard reloaded. Consequently, the index.html is loaded into the web browser at the beginning and is never reloaded during the session.
From a user experience perspective, this has some advantages. For instance, the user does not permanently see the page refresh when they interact with the application and only want to reload data from the backend. But at the same time, this idea leads to new challenges when navigating with the browser. For instance, how do you synchronize the browser’s BACK and FORWARD button navigation with the state of the application? Fortunately, all modern browsers implement the HTML5 History API. This provides a technical foundation for interacting with our Angular application using a service—the Angular router—to synchronize at runtime. As developers, we don’t have to deal with the exact implementation and synchronization.
The following steps are needed to make the best use of the Angular router:
- Configure routes: each URL is assigned to a component
- Import the Angular routing module into our application
- Determine where our components should be displayed
It also makes sense to give the user buttons or clickable links that they can use to navigate to the URLs assigned to a component. This item isn’t included in the enumeration as it’s not mandatory for a successful routing implementation in an Angular application.
iJS Newsletter
Join the JavaScript community and keep up with the latest news!
Configure routes
In our application, we want to display a specific view and a specific component, when a specific URL is called. This route definition contains the assignment of a URL to the component that will be displayed. In Angular, this is defined in an object:
const route = { path: 'home', component: HomeComponent }
The URL path is specified in the path property and the corresponding component in the component property. It’s important that the URL path is specified without a preceding slash. Once we call our application with the URL localhost:4200/home, the HomeComponent component is loaded. Usually, there’s more than one route in an application. We’ll create these in an array. For this, the Angular package @angular/router provides us with a corresponding data type (Listing 1).
import { Routes } from '@angular/router'

const routes: Routes = [
  { path: 'home', component: HomeComponent },
  { path: 'about', component: AboutComponent },
]
Once all the routes are defined and the components are mapped to them, we need to register the array in our application. Routes are defined centrally and apply to a feature in the application. Currently, our application has two features: app and book. We’ll take a look at how the route definition is divided by features a little later in the article. For now, all routes are registered in AppModule (Listing 2).
import { HomeComponent } from './home/home.component';
import { RouterModule, Routes } from '@angular/router';

const routes: Routes = [
  {path: 'home', component: HomeComponent},
]

@NgModule({
  declarations: [...],
  imports: [
    ...
    RouterModule.forRoot(routes),
  ],
  bootstrap: [ AppComponent ]
})
export class AppModule {
}
We’ll register our route definitions using the imported RouterModule from the @angular/router package. A lot of routes are defined in an Angular application and our AppModule gets bigger as the array grows. As a result, it’s considered best practice to create an extra mini-module that’s used for defining the routes of a feature (Listing 3).
import { NgModule } from '@angular/core';
import { RouterModule, Routes } from '@angular/router';
import { HomeComponent } from './home/home.component';

const routes: Routes = [
  {path: 'home', component: HomeComponent},
]

@NgModule({
  imports: [RouterModule.forRoot(routes)],
  exports: [RouterModule]
})
export class AppRoutingModule {
}
This way, we remove all imported data types and route definitions from our AppModule and only import the AppRoutingModule. This looks a bit awkward at first, but it makes sense at second glance. The AppRoutingModule mini-module creates a self-contained routing with our self-defined routes and makes this module available to the outside. The advantage of this procedure is that the routing’s entire configuration with all necessary dependencies is encapsulated in the mini-module. The Angular CLI already lets you generate an AppRoutingModule when creating a new Angular project (Fig. 1).

Fig. 1: Creating AppRoutingModules
Alternatively, we can use the –routing option when creating the project. With the help of routing, we want to navigate to different views of our application. We’ve already defined the route for our HomeComponent. For our second step, we need another route for the BookComponent:
const routes: Routes = [
  { path: 'home', component: HomeComponent },
  { path: 'book', component: BookComponent },
]
But what if the user doesn’t address a specific route, the root route with the root URL /? To provide the application with this info, we’ll also need to create a route definition for the URL:
const routes: Routes = [
  { path: '', redirectTo: '/home' pathMatch: 'full' },
  { path: 'home', component: HomeComponent },
  { path: 'book', component: BookComponent },
]
The specified path is empty. So, the root URL should be assigned there. Apart from that, we have the option of either displaying a component or redirecting to another URL. In this example, that would be /home.
The pathMatch: ‘full’ property has also been added. This way, we specify that this route only applies when / is called, but not when the URL is simply a prefix of another.
Now our applications have registered all important routes. One small problem that we may encounter is if a component isn’t displayed if a user enters the wrong URL. The best practice here is to create a PageNotFoundComponent and display it for every route that hasn’t already been assigned to another component.
const routes: Routes = [
  ...
  { path: '**', component: PageNotFoundComponent },
]
You can specify strings and regular expressions In the property path. The expression ‘**’ means—as you can already guess—that for each URL, the assigned component should be displayed. The order of the route definitions is very important. If the route with the path ** is set at the beginning, the URLs /book and /home are also forwarded to the PageNotFoundComponent.

Displaying components
With the route definitions, we’ve determined which component should be loaded when calling which URL. So far, the Angular router doesn’t have any info about where it should load or display the components. Components are included and displayed in a template using their selector. Currently, our template includes two components for the AppComponent: the HeaderComponent and the HomeComponent. Instead of statically writing the HomeComponent into the template, we want to dynamically load it, just like the BookComponent.
For this, there is the RouterOutlet directive. It’s a placeholder and is dynamically replaced by the router with the loaded component. Now, we’ll insert this into our template instead of the HomeComponent:
<app-header></app-header>
<router-outlet></router-outlet>
The basic building blocks for navigating in our Angular application are now set. If we compile our application and call it with http://localhost:4200, we’ll see in the browser’s address bar that the URL was automatically redirected to http://localhost:4200/home. The familiar HomeComponent is still displayed. If we manually enter http://localhost:4200/book in the address bar, we’ll see our book list again (Fig. 2). The headline remains permanently visible. The requested component is integrated below it.
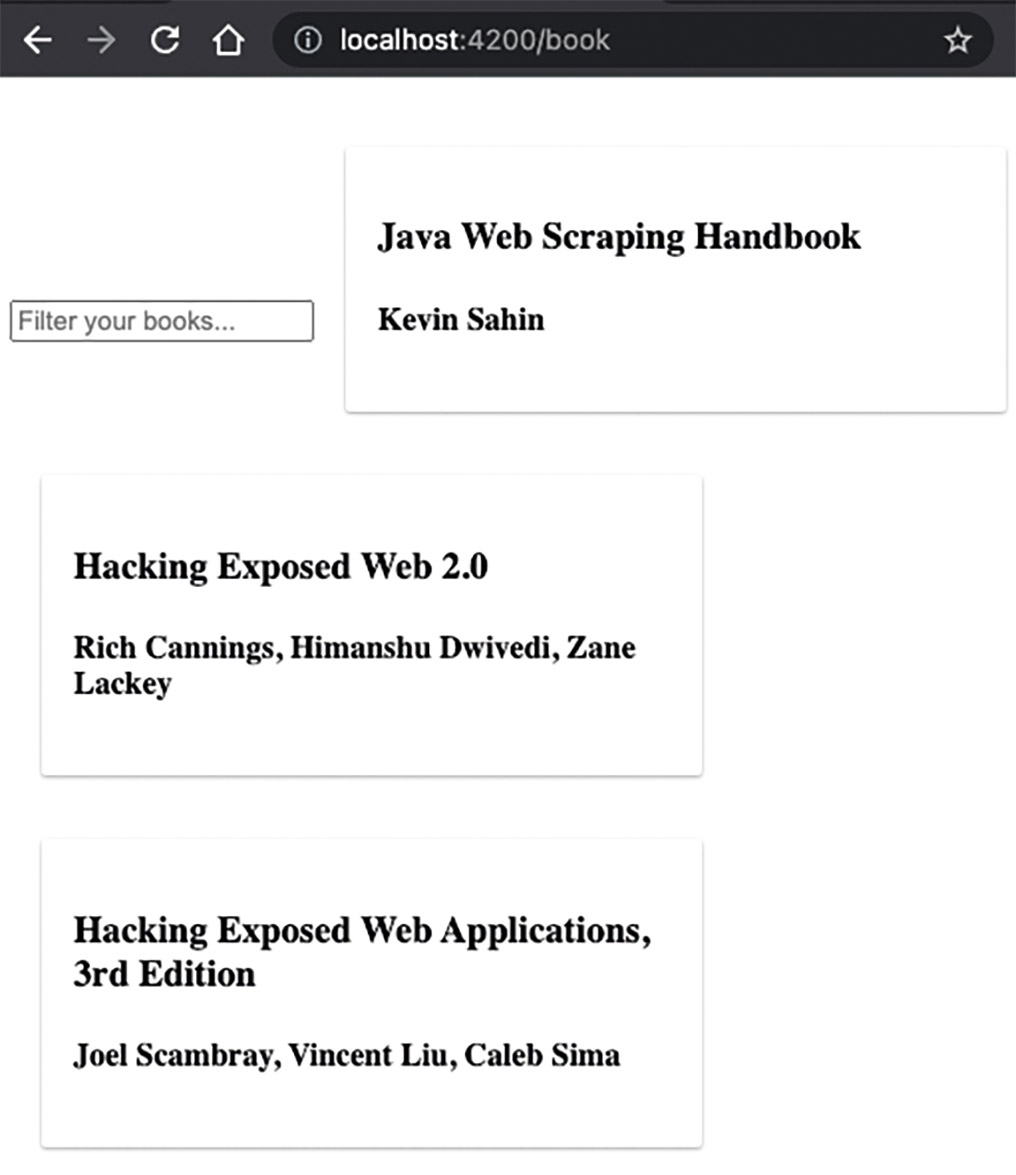
Fig. 2: Displaying the book list with routing
Navigation in the application
The Angular router now processes a called URL and loads the corresponding component into the RouterOutlet. Mind you, routing is only nice if it has clickable links in the application. We already know the HTML tag <a>. Inside the tag, we can set a URL in the href attribute and then we’re done. Unfortunately, this variant has some disadvantages. When you click the link, it automatically triggers a browser refresh. This is the kind of behavior we want to avoid in an SPA, since we always want to display the new component without reloading the page.
Therefore, Angular brings its own tool for linking: the RouterLink directive. We can use this directive instead of the href attribute. When the link is clicked, the router is automatically told to load a new route. The rest of the application remains. Here, we can set the value of the directive with two different notations:
<a routerLink="/book">Books</a>
or
<a [routerLink]="['/home']">Books</a>
The attribute notation is always handy when we just want to pass a static string. But if we have several parameters that we want to combine into one URL, then using the array variant makes sense. Here, we can also only use the RouterLink for internal links. If we want to link to an external web page, then we still have to rely on the href attribute because the browser should handle the link. Now, we add a NavigationComponent to our application in the AppModule. Each provides a clickable link to the book list and a clickable link to the HomeComponent.
<ul>
  <li><a routerLink="/home">About</a></li>
  <li><a routerLink="/books">Books</a></li>
</ul>
Of course, we can’t forget to include the new component into our AppComponent using the selector. If we’d like, we can style the NavigationComponent as we want. After looking at our browser once more, we see that our application now includes a navigation bar (Fig. 3). The view also changes depending on which link we click.
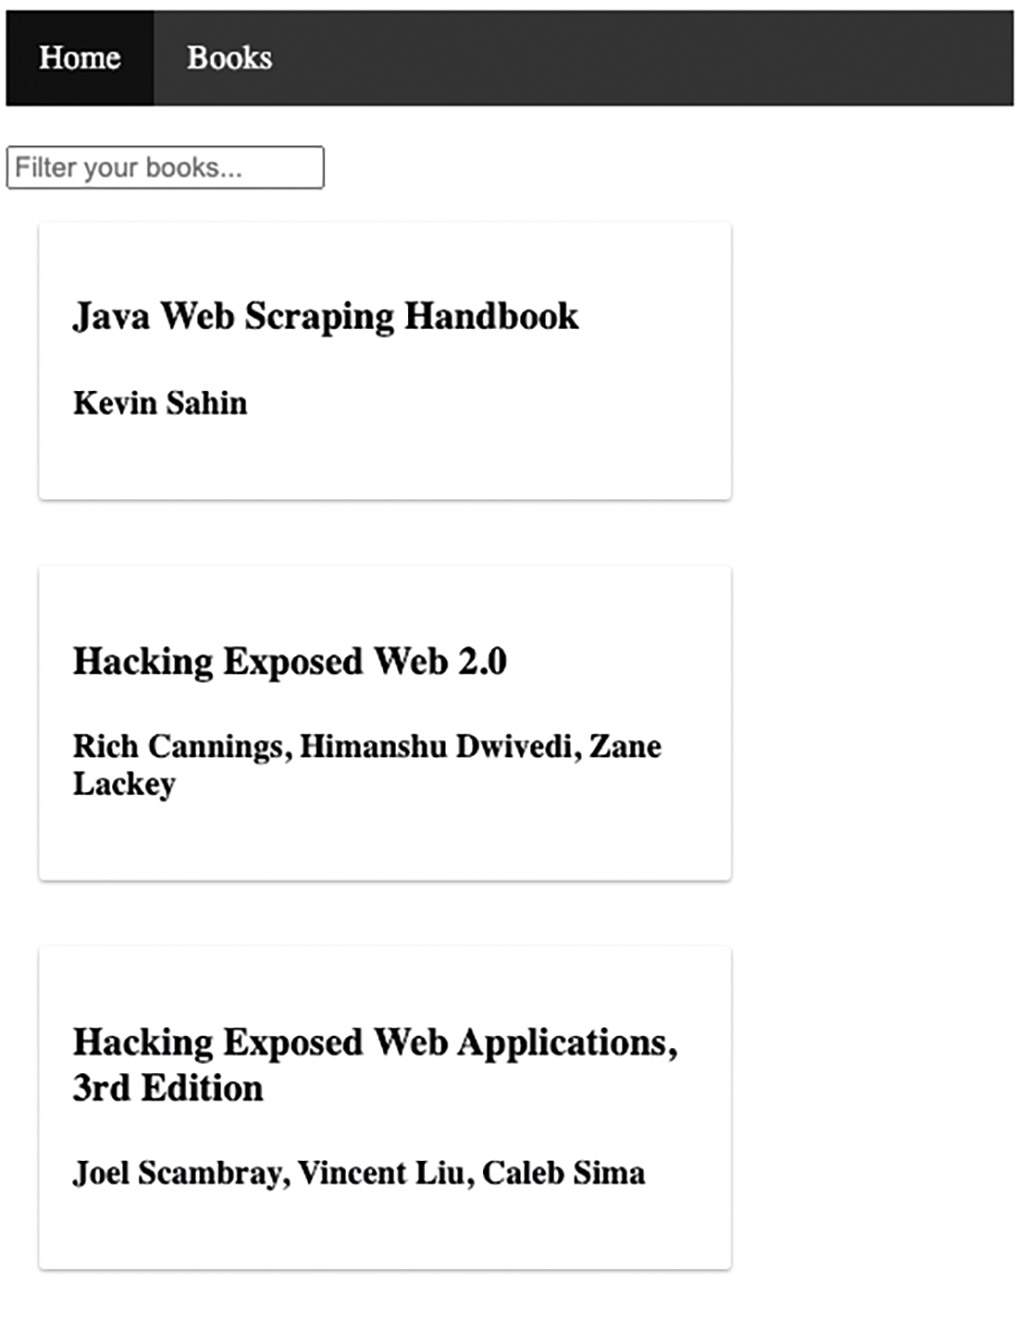
Fig. 3: Navigation bar
Application with styled navigation component
To see which link is currently active, we should also highlight the respective active element. Angular already provides the necessary tools for this. With the RouterLinkActive directive, we can assign a CSS class to be applied to the element whose link is currently active. When a link is disabled, Angular automatically removes that CSS class and adds it to the new element, which then becomes active:
<ul>
  <li><a routerLinkActive="activeClass" routerLink="/home">About</a></li>
  <li><a routerLinkActive="activeClass" routerLink="/books">Books</a></li>
</ul>
But in some cases, we’d like to switch routes programmatically. For example, if a user tries to visit a route but must log in first. In the absence of authentication, we can have the user programmatically navigate to a /login URL and an associated LoginComponent. For this, the Angular Service Router provides the navigate() method. In order to use this service, we need to inject it into the constructor as usual (Listing 4).
import { Router } from '@angular/router';

@Component({...})
export class NavigationComponent {
  constructor(private readonly router: Router) {
  }

  goToBookList() {
    this.router.navigate(['/book']);
  }
}
The navigate() method’s argument is always an array of route segments for the destination URL. We know this from the RouterLink directive. In addition to navigate(), there’s also the navigateByUrl() method which receives only a string as an input parameter. We can only use these methods for routes in the application, but not on links to external pages.
iJS Newsletter
Join the JavaScript community and keep up with the latest news!
Route parameters
So far, we’ve defined all routes statically and called them using links. In many use cases, we still want to pass values in the URL. For instance: if we want to see an item’s detailed display. No one would think of creating a route configuration for all IDs that navigate back to the same component. We want to define this ID as a generic placeholder within the URL as a URL segment. For this, we’ll use parameters. Once called, they can be assigned any value. In order to use route parameters, we must follow some steps again:
- Configuration of routes with parameters
- Pass parameters when calling the route
- Read out parameters again within the component
Using the route parameters, we want to implement a detailed view of our application’s books. For our first step, let’s create a component that we can use to configure the routers with the parameter:
> ng generate component book/book-detail
Since this is a detailed view of our books, this time we’ll add the component back to our BookModule. Now, we return to our AppRoutingModule and adjust the routes. We need to define which router the parameter should be passed. For this, we need to expand the path and add a placeholder for the parameter. The name can be freely chosen and must start with a colon. This placeholder tells the router that a parameter is passed in the URL path at this point.
{path: 'book/:isbn', component: BookDetailComponent},
Since our book already has a unique ID—the ISBN—it makes sense to name the route parameter too. To test if the corresponding path has already been addressed, we can make a manual entry of the URL in the address line. For example, if we navigate to /book/11821, we can see it switch to the BookDetailComponent.
For our second step, we’d like to move away from having to manually type in the address bar and create a clickable link to our BookDetailComponent with the RouterLink directive. For this, we insert a button into the template of our BookCardComponent and set the parameters for the RouterLink using an array:
<h3>{{ bookEntry.title }}</h3>
<h4>{{ bookEntry.author }}</h4>
<button [routerLink]="['/book', bookEntry.isbn]">Details</button>
Now all of our books in the list have a clickable button that lets us navigate to our BookDetailComponent as many times as we want, but with a different URL segment each time. But if we made a wrong configuration in our route definition or if we mistyped in the RouterLink directive, the error message in Figure 4 tells us that the Angular router cannot find a suitable route to our requested URL.

Fig. 4: Error message in case of incorrect route configuration
For our last step, we need to read the parameter from the URL inside the BookDetailComponent. This will give us the specific ISBN and we can send it to our backend to receive a single book’s data. We can request the router’s current state, such as the URL, using the ActivatedRoute service. After injecting the service into our components using the constructor, we gain access to the paramMap property (Listing 5).
import { Component, OnInit } from '@angular/core';
import { ActivatedRoute } from '@angular/router';

@Component({...})
export class BookDetailComponent implements OnInit {
  constructor(private readonly route: ActivatedRoute) { }

  ngOnInit(): void {
    this.route.paramMap.subscribe(console.log);
  }
}
This property gives us all of the route parameters with a data stream. This means that as soon as we subscribe to this property, we can get an object that we can then read our ISBN with (Fig. 5).
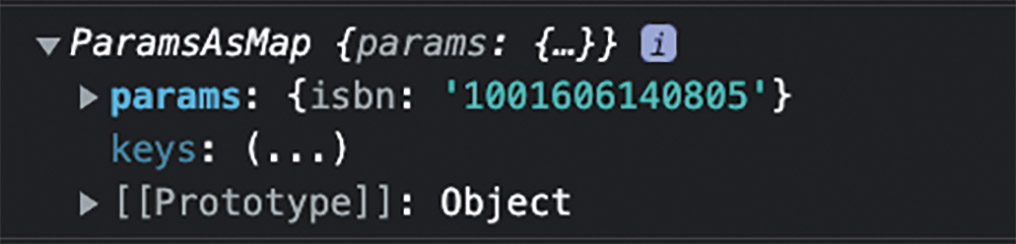
Fig. 5: The paramMap object with our ISBN
In order to use the ISBN for an HTTP request to our backend, first we have to extend our BookApiService with a corresponding function (Listing 6).
export class BookApiService {
...
getByIsbn(isbn: string): Observable&amp;lt;Book&amp;gt; {
return this.http.get&amp;lt;Book&amp;gt;(`http://localhost:4730/books/${isbn}`);
}
}
Again, we receive the individual book with a data stream that we must subscribe to in the BookDetailComponent. If we add reading the ISBN from the paramMap together with the call to our BookApiService, we get the full implementation of our component’s ngOnInit() function (Listing 7).
book$: Observable&lt;Book&gt;;
ngOnInit(): void {
this.book$ = this.route.paramMap.pipe(
switchMap(params =&gt; {
const isbn = params.get('isbn') ?? '';
return this.bookApiService.getByIsbn(isbn);
})
);
}
We use the get() method to receive the value of the route parameter isbn. In theory, the parameter can be undefined, so we can also use the JavaScript nullish coalescing [1] feature to set a default value if the method returns a null or undefined. Then, we call the method getByIsbn() on our BookApiService and pass the ISBN. The whole construct is nested with an RxJS operator that we haven’t seen yet: switchMap() [2].
As mentioned previously, paramMap is a property to whose data stream we need to subscribe to in order to receive data. Then, we call a BookApiService method, which gives us the result as a data stream. We’d need to subscribe to this data stream again, and would have nested, subscribed data streams. We should avoid this and remedy it with RxJS flattening operators like switchMap().
The way it works is quite simple. Using switchMap, we subscribe to one data stream, but then switch to another, called an inner data stream. So we also need to return an Observable as a data type. By definition, a new Observable is required, which we can now subscribe to. Because of this, we can also assign the entire construct to a component field declared with the type Observable<Book>. Now we just need to subscribe to this data stream with the help of the AsyncPipe in the template. Unsubscribing is the big advantage here. The AsyncPipe will automatically unsubscribe once the component is no longer displayed and is destroyed. You can see a book entry’s complete detail view in Figure 6.
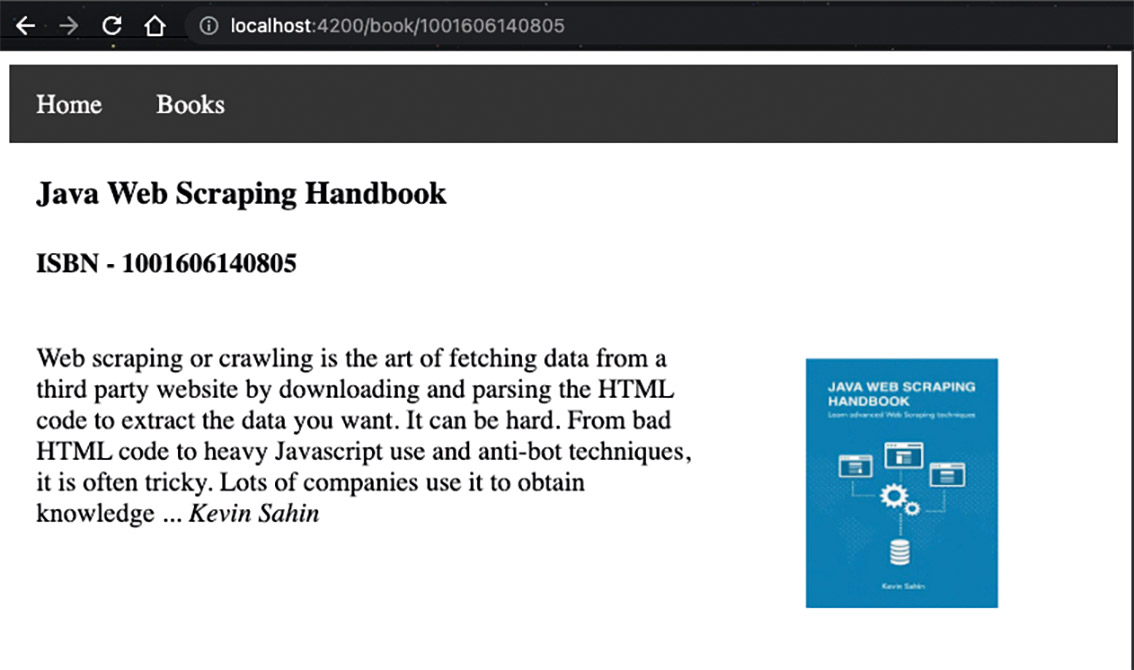
Fig. 6: A book’s detailed view
Lazy Loading
In terms of initial load time, it’s important to keep the initial size of the compiled JavaScript bundle small. So let’s turn our attention to the last important routing-related topic: asynchronous reloading of Angular modules. Our application is organized in modules. Currently, we have only two: the AppModule and the BookModule. But let’s imagine that our application has twenty modules. All twenty modules are imported into our app module and are completely loaded from the server every time our application is launched, even if users most likely won’t use all of the features in one session.
In terms of user experience, it’s unappealing if users have to wait until the entire application is loaded. Especially for slow internet connections, this can add several seconds and tempt the user to close the application. If needed, Angular offers the convenient possibility to dynamically reload several smaller bundles, instead of one big bundle at runtime. This concept is called Lazy Loading. Of course, the prerequisite for this is that we’ve already built our application modularly and split it into several feature modules. This way, Angular can reload exactly the modules it needs, keeping the initial bundle small.
Although there’s a lot going on behind the scenes, implementation is quite simple. We just need to add a property to our route definition: loadChildren(). As the name suggests, this reloads child routes for the specified path. Then these routes are appended to the path. But this also means that our BookModule needs its own RoutingModule with defined routes. More on this later. The modules are compiled during the build, but are packaged in a separate bundle. This bundle is only loaded asynchronously from the server when one of the routes is requested. First, let’s look at the route definition in our AppRoutingModule (Listing 8).
const routes: Routes = [
  { path: '', redirectTo: '/home', pathMatch: 'full' },
  { path: 'home', component: HomeComponent },
  {
    path: 'book',
    loadChildren: () => import('./book/book.module').then(m => m.BookModule)
  },
]
All route definitions belonging to a component from the BookModule have disappeared. We will define these again in a BookRoutingModule (Listing 9).
const routes: Routes = [
  {path: '', component: BookComponent},
  {path: ':isbn', component: BookDetailComponent},
]

@NgModule({
  imports: [ RouterModule.forChild(routes), ],
  exports: [ RouterModule ]
})
export class AppRoutingModule {
}
As mentioned previously, when the URL /book is called, all child routes are now loaded and appended to the existing URL. Therefore, we register the routes using the forChild method. As a rule, an application can have only one registration of routes with the forRoot method, and always in the corresponding AppModule or AppRoutingModule. Since the child routes are already attached to the existing URL /book, we can omit this URL segment in the route definition of the child routes.
Finally, we need to import the BookRoutingModule into our BookModule and remove the latter from the AppModule’s imports array. From now on, we will be reloading it asynchronously. Once our application is compiled, we call it again in the browser. Looking at the NETWORK tab in our browser’s Developer Tools [3], we see that a JavaScript bundle src_app_book_module_ts.js is reloaded once we click on the link for our book view. Consequently, our initial bundle no longer contains the code for the BookModule and can now be loaded faster (Fig. 7).
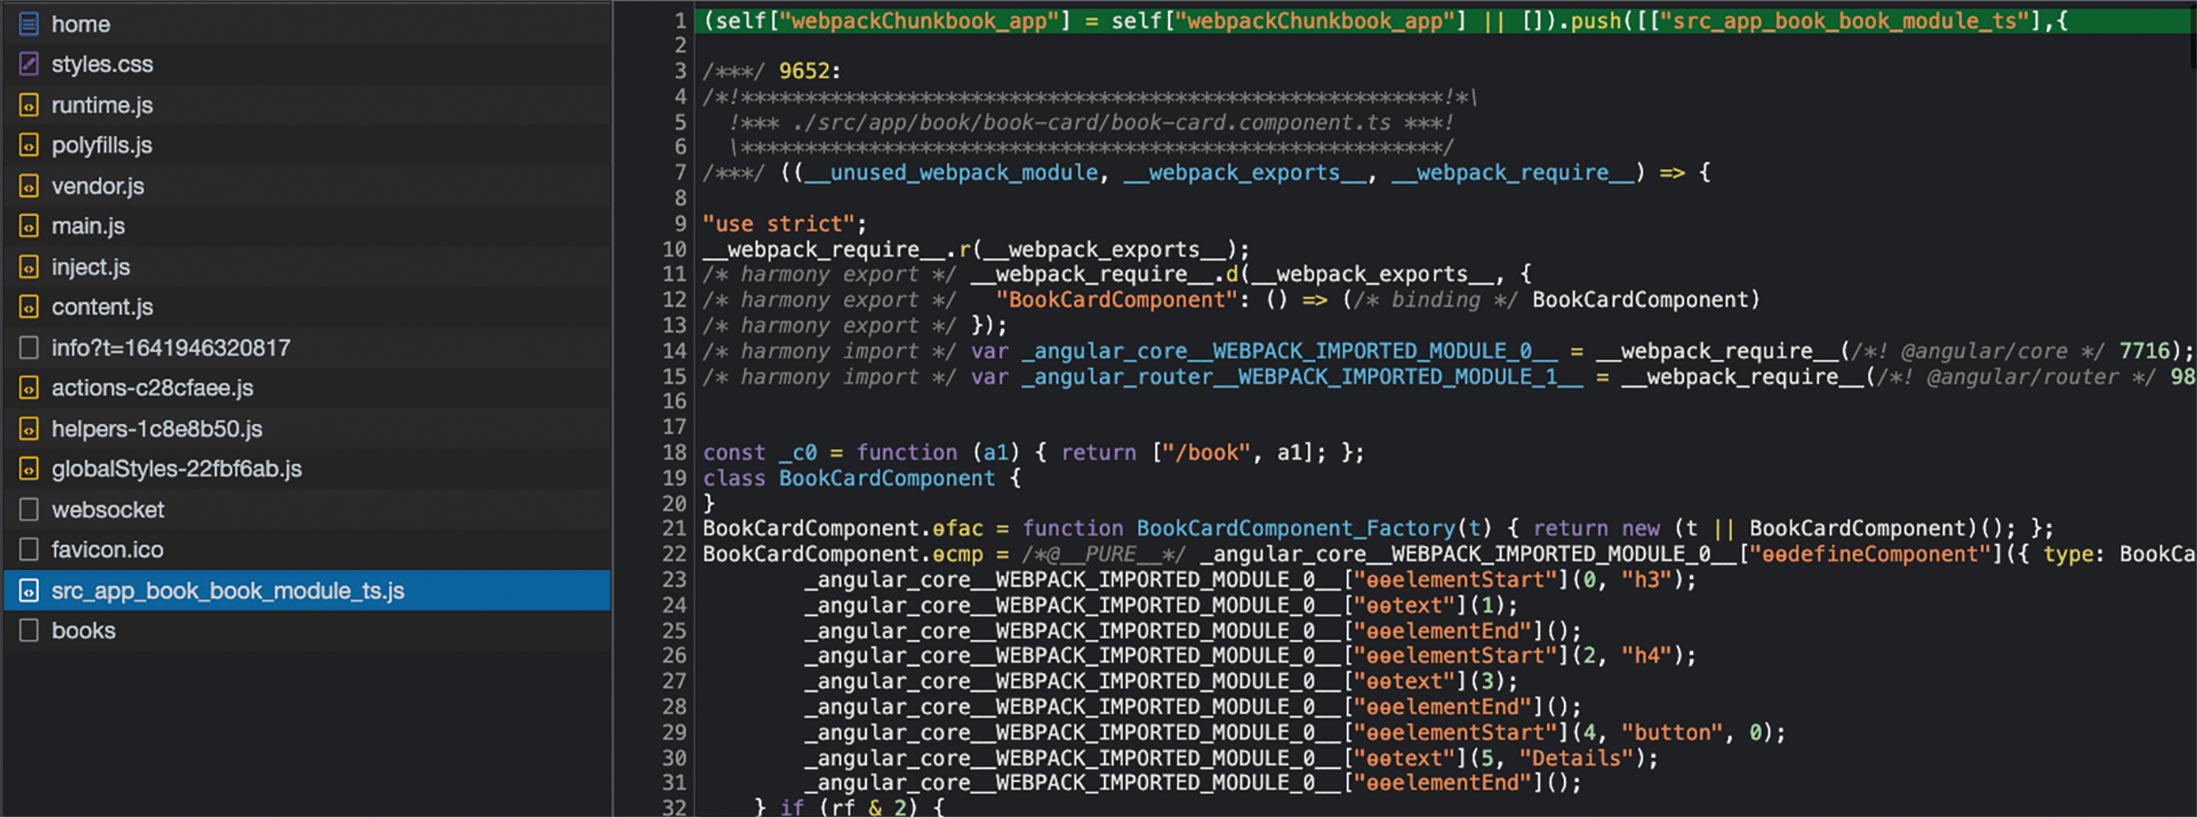
Fig. 7: Asynchronous reloading
Conclusion and outlook
In this article, we gained insight into routing in an Angular application. We learned that three steps are always required: route definition, importing the RoutingModule, and including the RouterOutlet directive for displaying the loaded component. For a better user experience, it’s important that we insert navigation in our application with the RouterLink directive. The RouterLinkActive directive also helps us highlight the active element.
Route parameters serve as a generic placeholder for implementing an entry’s detailed view. The parameters are marked with a colon in the path and in the route definition. They are read with the help of the ActivatedRoute service. The flattening operator switchMap helped us resolve nested data streams by switching to the inner data stream, which is then returned. This lets us elegantly subscribe to the BookApiService data stream with the AsyncPipe.
One of the best practices for an Angular application is the asynchronous reloading of Angular modules. We achieve this by adding a loadChildren property in the route definition. This keeps the initial bundle lean so we only load the bundles of the respective modules that we really need.
In the meantime, our application has grown quite a bit. However, we’re still missing the creation of a book that includes HTTP requests to our backend. First, we have to learn how to create forms in Angular. We’ll deal with this topic in the next article.
After understanding how to build simple forms in Angular, we’ll dive deeper into dynamically creating individual controls and learn how to validate forms and provide relevant feedback to users.
Links & Literature
[2] https://www.learnrxjs.io/learn-rxjs/operators/transformation/switchmap