Blog Series Overview
- Angular for beginners
- The building blocks of an Angular app
- Angular’s Data Layer
- Observables: Reactive with RxJS
- No Angular SPA without routing
In Part 2, we already learned about the most important basic building blocks of an Angular application. We learned how to use properties and event binding to exchange data between a parent component and a child component. An Angular pipe also helps us transform the data that will be displayed in our UI. You can also implement your own pipes in addition to the ones that Angular already provides. We took advantage of this to implement filtering for our books in our sample project—an app for managing books.
In the last part, we learned about structural directives. This allowed us to iterate over our book list and generate a separate HTML node for each list entry. In the process, we learned about terms like container component and what we call dumb components. Our book.component.ts is our container component, since it holds the book list as a condition:
books = [{ title:’Moby Dick’, author: ‘Herman Melville’}, {…}, {…}]
But as you can imagine, creating the data statically in a component isn’t useful. This is because it’s very difficult for a component that isn’t a direct child or parent component to access this data. So we need a way to access data from a central location: a separate service.
A service is an essential part of the data layer of any Angular application. Just like a component, the service is a simple TypeScript class, for now. It can provide functions and data that can be called by Angular components.
In the following, we’ll mainly focus on the concepts of an Angular Service. We’ll learn how to use a service within a component, and by doing that, we’ll take a closer look at the basic mechanisms of dependency injection in an Angular application.
Inversion of Control
A service is nothing more than a TypeScript class. For example, we could simply create a new book-api.service.ts and implement a function there that would return the book list (Listing 1). To use this service, we could create an instance of this class in our component (Listing 2).
Listing 1
export class BookApiService {
  books = [{ title:'Moby Dick', author: 'Herman Melville'}, {...}, {...}];
  getAll(): Book[] {
    return this.books;
  }
}

Listing 2
import { Component } from '@angular/core';

@Component({
  ...
})
export class BookComponent {
  private bookApiService: BookApiService;
  constructor() {
    this.bookApiService = new BookApiService();
  }
}
Unfortunately, this approach leads to some difficulties. Creating dependencies directly causes increasingly cluttered code that’s difficult to maintain. For example, if we make adjustments to the constructor of our service, then we have to adjust all components that use the service too.
Another problem is that each component holds its own object instance. This means that if four components need our BookApiService as a dependency and create it themselves as an object, four instances of the service will also end up in the application.
In our particular use case, we just want to get a book list, so this is not a problem. But, we’ll also encounter cases where a component passes data to the service and then all components will be expected to receive this updated data. Of course, this won’t work if each component has a different instance.
Both problems can be avoided by handing over responsibility for creating dependencies to a higher-level entity. In our specific case, this means that no component will be allowed to create a service with the keyword new anymore. Instead, the Angular framework will take care of creating the instances.
iJS Newsletter
Join the JavaScript community and keep up with the latest news!
This principle is also called Inversion of Control (IoC). The responsibility for creating an object is reversed and is no longer imposed upon the component. The component only requires its dependencies, which are automatically provided by Angular. For this purpose, Angular implements the Dependency Injection design pattern. It is also referred to as injecting all dependencies into the components. If you want to learn more about Inversion of Control and Dependency Injection, you can read Martin Fowler’s articles [1].
The two questions we now face are:
- How do I request a dependency in the component?
- How do I register my dependencies in an Angular application?
Request dependencies in a component
To request a dependency within a component, we use what is called constructor injection. That means that we tell Angular which dependencies we need by defining the required classes as arguments in the component’s constructor (Listing 3).
Listing 3
import { Component } from '@angular/core';

@Component({...})
export class BookComponent {
  private bookApiService: BookApiService;
  constructor(bookApiService: BookApiService) {
    this.bookApiService = bookApiService;
  }
}
By specifying the TypeScript type BookApiService, Angular recognizes that the component needs the instance of this class. Angular looks for this instance in all the dependencies already registered and then returns it accordingly—but more on this later.
Within the constructor, we then assign the obtained instance to a property so that we can use the service for all components. There is also a short TypeScript form that provides exactly the same result with a few lines of code (Listing 4).
Listing 4
import { Component } from '@angular/core';

@Component({...})
export class BookComponent {
  constructor(private readonly bookApiService: BookApiService) {
  }
}
Specifying the visibility modifier (public or private) automatically creates a matching property within the component class and assigns the instance to the BookApiService class.
Additionally, it’s useful to provide the property with a readonly keyword, which makes sure that you don’t accidentally overwrite the bookApiService property within the component.
Creating a service
In the next step, we’ll create an Angular service in our project using the Angular CLI. Since this service provides us with the book list, it makes sense to create it in a services folder below the books folder:
> ng generate service book/services/book-api
This creates the book-api.service.ts file; its contents are shown in Listing 5.
Listing 5

import { Injectable } from '@angular/core';

@Injectable({
  providedIn: 'root'
})
export class BookApiService {
  constructor() { }
}
As mentioned earlier, a service is a simple TypeScript class. Here, we meet another decorator: Injectable. In order to inject a dependency like our BookApiService into another class via constructor injection, the class needs this decorator. Additionally, our service—like every class—also has a constructor. If needed, this can also inject dependencies.
If we add a getAll function to the service, which now returns the book list, we get it in our component. To do this, we need to inject BookApiService into our BookComponent (Listing 6).
Listing 6
@Component({
  ...
})
export class BookComponent implements OnInit {
  books: Book[];
  constructor(private readonly bookApiService: BookApiService) {
    this.books = this.bookApiService.getAll();
  }
}
When we start our application again, we don’t see any visual changes (Fig. 1). However, this time the books are loaded by the BookApiService in the background. So far, the books are only available there statically – in a property. But our goal is to get them to a backend via an HTTP request.

Fig. 1: The books are loaded from the service
For dependency injection to work via the constructor, Angular needs to know which classes are available—in other words, which instances have been registered in Angular.
But we were already able to use our service as a dependency without consciously registering it. How did that work?
Register dependencies
Each dependency must be registered in an Angular application. This is called providing a service. There are two ways to register or provision a service:
- a service registers itself independently or
- a service is registered directly and explicitly within a module.
Let’s look at both ways and their advantages and disadvantages.
The service registers itself
In this concept, introduced in Angular version 6, a service registers itself within its Injectable decorator. Let’s look at this decorator in our service again (Listing 7).
Listing 7
import { Injectable } from '@angular/core';

@Injectable({
  providedIn: 'root'
})
export class BookApiService {
  ...
}
Here you’ll notice that the decorator contains an object with the providedIn property. When creating a service with the Angular CLI, providedIn always has the value ‘root’ – a reference to the application’s root injector. This means that this service is registered within the EntryModule—in our case the AppModule—and can already be requested by all components without any further steps.
This is also why we could already execute our application without any problems and still have the books displayed in the application. If we remove the entire object inside the Injectable decorator, then we receive the error message seen in Figure 2.

Fig. 2: Angular could not find a provider for our service
This message tells us that a component requests a dependency, but Angular can’t find it anywhere. It also directly tells us which dependency we forgot to register in our application: “No provider for BookApiService”.
In addition to the value ‘root’, the providedIn property can take on further values; however, these don’t play a role in our small application. The exact description of the values can be found in the official Angular documentation [2].
Register dependencies explicitly in a module
Another way to make dependencies known in an application is to explicitly provide them within a module. In the first part of this series we already learned about the ngModule Decorator. The providers property was also explained, which I will now discuss in more detail (Listing 8).
Listing 8
import { BookApiService } from './book/services/book-api.service';

@NgModule({
  declarations: [AppComponent],
  imports: [BrowserModule],
  providers: [BookApiService],
  bootstrap: [AppComponent]
})
export class AppModule { }
If we enter a class explicitly in the EntryModule (our AppModule)—as seen in the example here—the dependency is also registered there. This is called explicit registration. On the surface, this isn’t any different from the variant where a service registers itself using the providedIn property. But the latter variant has a significant advantage: services that register themselves are tree-shakable providers. To understand this in more detail, we need to take a short excursion into the topic of tree shaking.
All application components that are never needed are removed during compilation and so, they don’t end up within the initial JavaScript bundle. This principle, which exists in more than just Angular, is called Dead Code Elimination or Tree Shaking in programming.
With this background knowledge, let’s consider both variants: If a service is never needed in a component, a reference to our service still exists in the variant of explicit registration within the module. This means that the service is compiled and delivered with the JavaScript bundle. If a service registers itself independently in a module, then there’s no reference to the class until it’s requested by a component. Because of this, the Tree Shakable Provider concept is considered the best practice and is already set as an example for us, since the Angular CLI creates the Injectable Decorator directly during service generation.

Services for Singletons
If a service is registered within a module, an instance of this service class is placed in an injector object of the module. These instances are called singletons. A singleton is a design pattern that ensures that exactly one object of a class exists. This is just the thing for our application, as we may want to pass data from one component to the service and make sure that it can also be read by another component. For this, both components need the same instance of a service: a singleton.
When applied to our application, this means that exactly one instance of our BookApiService exists (in the RootInjector object) and can be requested by all components declared or imported in our AppModule. Let’s take a look at this structure again in our application tree (Fig. 3).
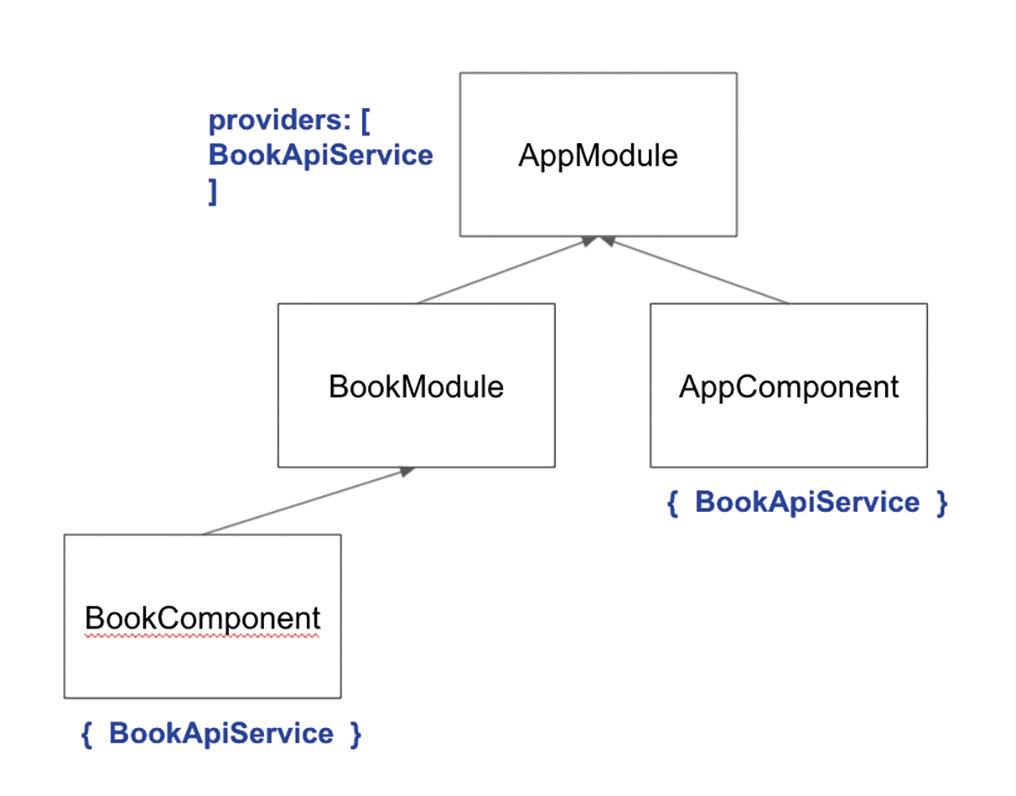
Fig. 3: Both components request the BookApiService
Assume that both the AppComponent and the BookComponent request the BookApiService. Then both get the same instance. So far, so good. But unfortunately, we can take this to the point of absurdity by explicitly registering the BookApiService in the Injector object of the BookModule too (Fig. 4).
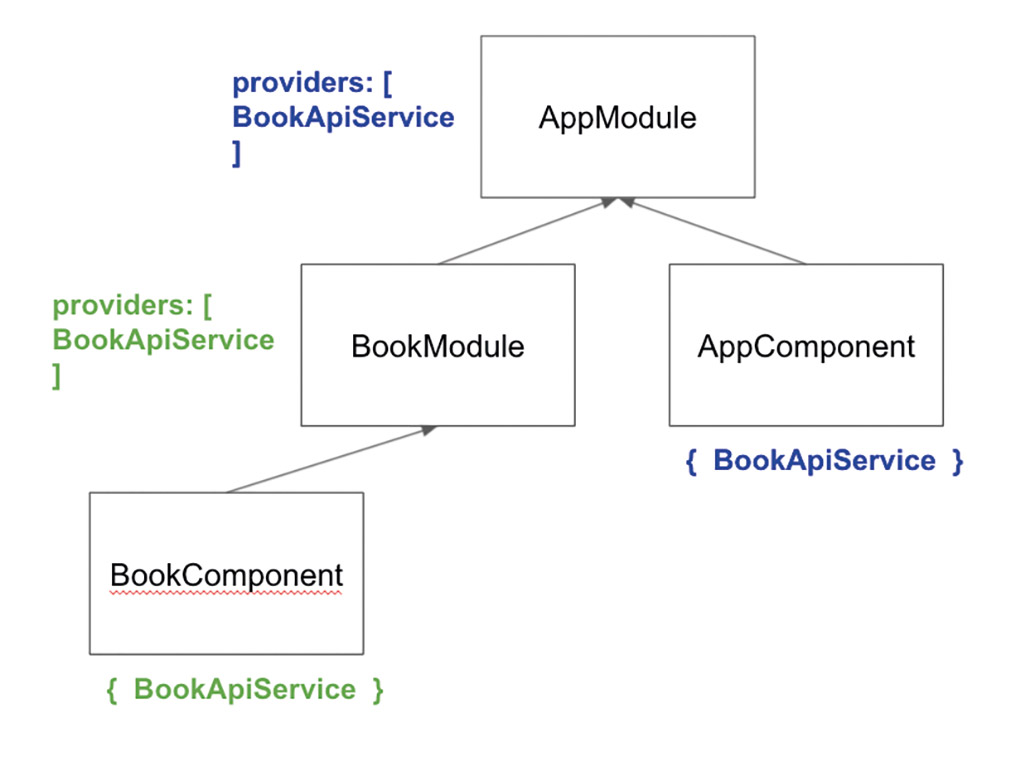
Fig. 4: Both components get different instances
Here we have the dilemma that our BookComponent declared inside of the BookModule receives the instance registered inside the BookModule while our AppComponent still gets the instance of the AppModule. So, we are dealing with the problem of different instances again.
Of course, there are use cases where it makes sense for various components in an application to receive different instances of a service. But it’s better to register all services within the RootInjector object of the application only.
Now that we understand how Angular regulates an application’s dependencies, it’s time to hit the books using an HTTP request from a backend.
Connecting a server backend
At the moment, our data is available statically in our BookApiService. In practice, this data is fetched from a server backend—usually via HTTP—and processed. To do this, first, we need a backend. Fortunately, we don’t have to write this ourselves. We can rely on an npm package: the bookmonkey-api [3].
We can install this backend with the help of npm and after successful installation, we can start it using a simple command:
> npm install -g bookmonkey-api
…
> bookmonkey-api
Now we should see the output “JSON Server is running on port 473” on our console. The bookmonkey-api provides us with different interfaces:
- retrieve books
- retrieve a specific book
- create a book
- delete a book
- edit a book
We can view the documentation for these interfaces at http://localhost:4730 (Fig. 5).

Fig. 5: Interface documentation for our backend
For example, we can see that by calling the URL http://localhost:4730/books we receive a long list of books (Fig. 6).
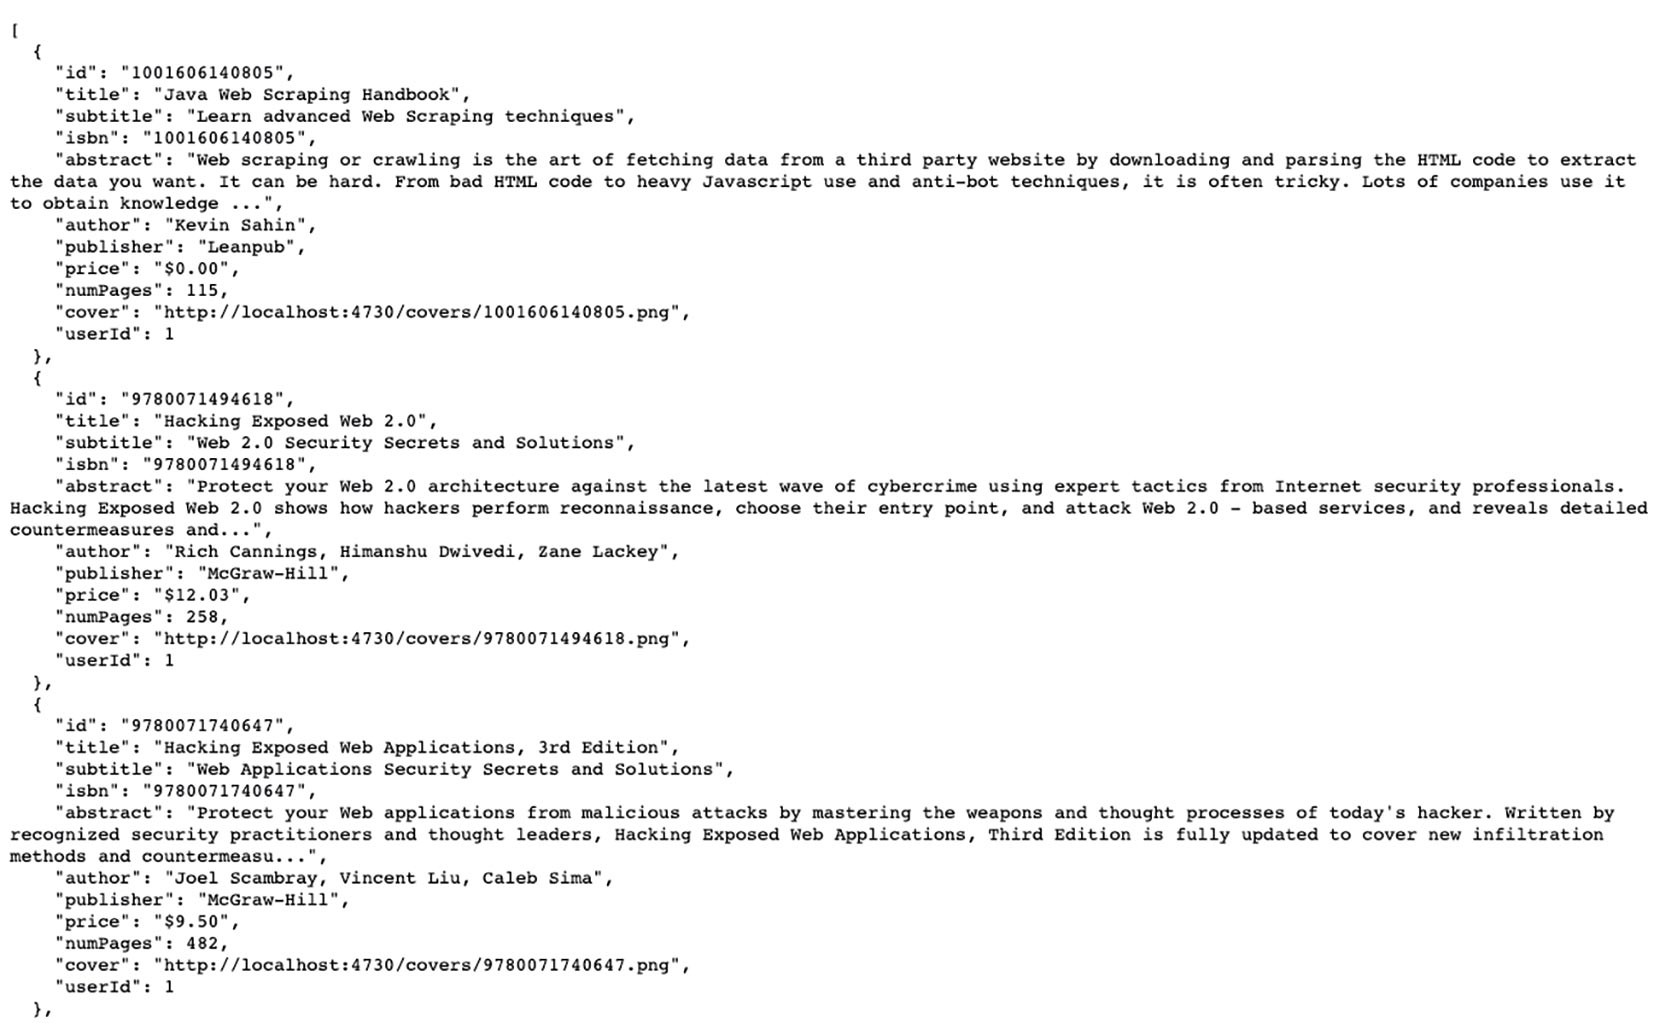
Fig. 6: Book list sent from the backend
This URL must now be addressed within our Angular application. For this, Angular provides the HttpClient.
HttpClient
The basic principle of a single page application is to dynamically reload data at runtime and render it in HTML with JavaScript. Unfortunately, the problem is that HTTP requests have to be sent asynchronously since it’s impossible to guess how long the request will take to process on the server side and it blocks the user’s interactivity with the browser if you wait synchronously for the server’s response.
Several solutions to this problem have already been developed in the world of web development, including the browser’s implementation of an XMLHttpRequest, which can be used to send AJAX requests.
For HTTP communication, Angular abstracts this interface and provides a separate module: the HttpClientModule. This hides complexity and ensures the correct use of the XMLHttpRequest. Additionally, the module returns the server’s response in a special data type: the Observable.
Next time, we’ll look at observables in detail, so here’s just a quick introduction: an observable is an object that provides a stream of data from a source. Anyone who is interested in this data stream can subscribe to it and receive the data.
Observables are part of the widely-known RxJS library [4]. Angular uses RxJS functions internally in many places. For example, many of Angular’s services return a result as a data stream—an observable—that the developer can subscribe to within a component. So does the HttpClient, which we use to send an HTTP request to our backend.
For this, first we need the HttpClientModule, which is imported as a dependency into our AppModule (Listing 9).
Listing 9
import { HttpClientModule } from '@angular/common/http';

@NgModule({
  ...
  imports: [
    BrowserModule,
    HttpClientModule,
    BookModule
  ],
  ...
})
export class AppModule { }
This module provides us with the HttpClient, which we can now request with the constructor injection into our BookApiService class (Listing 10).
Listing 10
import { Injectable } from '@angular/core';
import { HttpClient } from '@angular/common/http'

@Injectable({
  providedIn: 'root'
})
export class BookApiService {
  constructor(private readonly http: HttpClient) {
  }
}
The HttpClient provides us with various functions that we can use to directly send an HTTP request to a backend. Figure 7 shows a good overview of all functions.
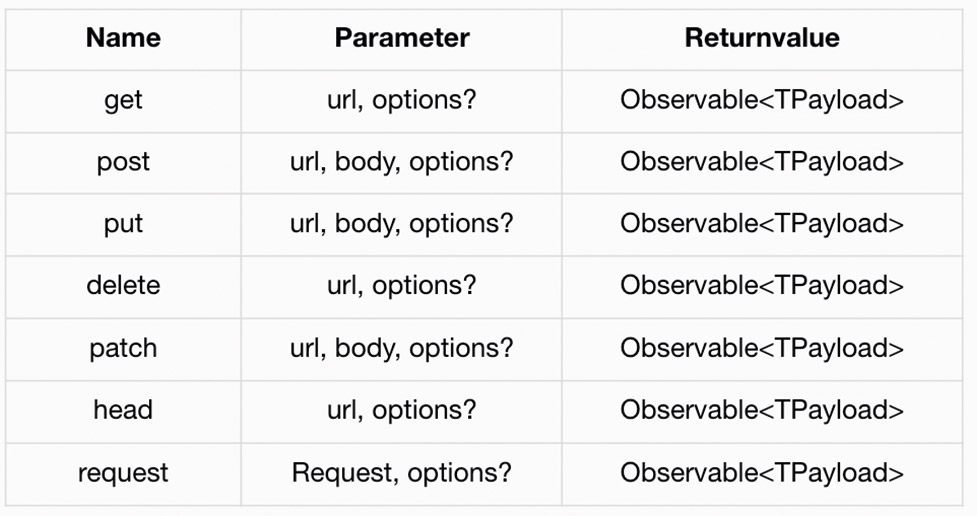
Fig. 7: HttpClient interface
The url parameter is a string with the URL that will be queried. The body parameter can be used to send data to the backend. Additionally, configurations can be sent with each HTTP request to the backend with the options parameter. This allows HTTP headers to be set within the HTTP request that will be sent, for instance.
TPayload is the data type we expect as the response. The HttpClient returns the server’s response as a data stream. We receive our books directly with this data stream. Then we implement the getAll function as shown in Listing 11.
Listing 11
@Injectable({
  providedIn: 'root'
})
export class BookApiService {
  constructor(private readonly http: HttpClient) {}
  getAll(): Observable<Book[]> {
    return this.http.get<Book[]>('http://localhost:4730/books');
  }
}
The HttpClient provides us with a get() function that we can use to send an HTTP request to the specified URL. We simply forward the observable that we get as the return value of this function to the components interested in this request’s response so they can subscribe to it themselves.
iJS Newsletter
Join the JavaScript community and keep up with the latest news!
Subscribing to a data stream
After changing the return value of our getAll() function, we receive an error in our BookComponent. Now we have to subscribe to the returned Observable. An Observable already provides us with the appropriate function for this: subscribe().
subscribe(next: (value: T) => void, error: null | undefined, complete: () => void): Subscription;
This function can be given up to three functions:
- next: This function is called as soon as data is sent via the data stream.
- error: All errors that occur during the subscription can be handled in this function.
- complete: If the sender terminates the data stream, code can still be executed within this function.
We can also see that the function gives us a subscription as a return value. We need this so we can unsubscribe from the data stream again. This is usually done as soon as a component is “destroyed” and is no longer displayed in the application.
To realize this, Angular provides components called lifecycle hooks. Let’s take a look at two of them: OnInit and OnDestroy. They are implemented as interfaces within a component class. This lets us execute code as soon as a component initializes (right after calling the constructor of the class) or just before a component is destroyed. It’s common to subscribe to data streams within the OnInit lifecycle hook (Listing 12).
Listing 12
export class BookComponent implements OnInit {
  books: Book[];
  constructor(private readonly bookApiService: BookApiService) {
  }
  ngOnInit(): void {
    this.bookApiService.getAll().subscribe(
      (books: Book[]) => this.books = books
    );
  }
}
The implementation of the OnInit interface takes place in the ngOnInit function. There we call the subscribe() function and pass a function that should be executed as soon as data is supplied via our data stream. Naturally, the data is our book list, which we then assign to the property of the class.
This books property is still bound to our template. So once the backend sends the books as a response to our Angular application, it provides the observable via a data stream from our component.
Now, if we start our application again, we will see that the book list has changed: Now all books that the backend delivers to us are displayed (Fig. 8).

Fig. 8: Displaying the books that the backend provides
Last but not least, we must take one important precaution: unsubscribing our data stream.
Memory Streams
If we forget to close the data stream, the observable will continue sending data with the stream. However, if there is no receiver at the end of the stream because the components no longer exist, then the data ends up in the browser’s ether, leading to memory leaks. This pressures us to always unsubscribe our data streams.
This can be done in a number of different ways, which the next article in this series will discuss in detail. Let’s implement the “simplest” approach first. As mentioned earlier, the subscribe() function returns an object of the subscription type, which we store in a property of the class (Listing 13).
Listing 13
import { Subscription } from 'rxjs';

@Component({..})
export class BookComponent implements OnInit {
  books: Book[];
  subscription: Subscription;
  // ...
  ngOnInit(): void {
    this.subscription = this.bookApiService.getAll().subscribe(
      (books: Book[]) => this.books = books
    );
  }
}
Now we implement the interface OnDestro. We get access to a function that’s executed before the component is destroyed. It’s the perfect time to unsubscribe a data stream (Listing 14).
Listing 14
@Component({..})
export class BookComponent implements OnInit, OnDestroy {
  //...
  ngOnDestroy(): void {
    this.subscription?.unsubscribe();
  }
}
This is done by calling the unsubscribe() function. Of course, it should only be called if a subscription exists at all. In theory, it’s possible that a runtime error occurred during the data stream’s creation and subscription, and the already open connection wasn’t created in the first place.
Conclusion
This article showed how Angular regulates dependencies within an application. We learned about two variants: explicit registration in a module and the Tree Shakable Provider. We saw that the latter variant is always preferable, as it only gives us a reference to the class when it’s actually required by a component. This allows the dependency to drop out of the generated JavaScript bundle if necessary. Finally, we learned how to send HTTP requests to a backend using the HttpClient, and gain insight into data streams.
The topics of the fourth part of this series will be: a comprehensive introduction to data streams, RxJS and RxJS operators we can use to transform and filter data over the data stream, and how to properly subscribe and unsubscribe from data streams.
Links & Literature
[1] https://martinfowler.com/articles/injection.html
[2] https://angular.io/api/core/Injectable
[3] https://www.npmjs.com/package/bookmonkey-api
[4] https://rxjs.dev