Create simple desktop applications with Electron and React
Creating platform-independent desktop applications is not really a walk in the park. A Windows application created with Visual Studio cannot be used under Linux. Therefore, for a long time now people have been looking into options to implement an application once (write once), and then be able to provide it for different operating systems without substantial additional effort (run everywhere). Electron [1] is yet another attempt to solve this problem. In this article, we’ll look at how an application using Electron and React can be implemented and deployed to various operating systems.
Platform independent programming
Ever since computers have started to be programmed in text form, there has been a desire from the programmer’s point of view to be able to run a program written once for a particular computer on a different computer as well. The reason is obvious: if the algorithm is formulated correctly for a particular problem, doing the work just once to run the program in different environments should be enough. This was not the case in the early times of programming when only machine-level programming (machine language or assembler) was available, as these programming techniques did not allow a solution or algorithm to be formulated independently of the execution environment or the actual machine. The solution to this problem was the introduction of higher-level programming languages. These languages allowed programmers to formulate algorithms largely independent of the specific execution environment. To make the programs executable, translators, compilers and interpreters were introduced.
A typical compiler language is C. C was originally developed to write operating systems that would be able to run on different computer architectures. A C compiler translates the machine independent C code into machine code that can be executed by the specific machine. If the program is to be made available for another machine, it must first be recompiled using the compiler for this particular machine. The translation is therefore done before the program is executed.
Interpreters work differently. An interpreter is a program that runs on the target machine and translates machine-independent code into machine code at runtime. The source code for the interpreter can be high-level code (like BASIC or scripting languages such as Python and Perl), or pre-compiled code (as in the case of the Java Virtual Machine, which executes Java byte code previously generated using a compiler). In principle, code written in an interpreter language works on all machines on which a corresponding interpreter is available (as long as the language and the interpreter are standardized).
If we speak of platforms these days, we do not refer only to specific machine architectures, but rather classes of environments that share software in addition to hardware properties. In most cases, a platform will be identified by the hardware and associated operating system used. Accordingly, platform-independent programming in this context means providing the software for various operating systems. To access special functionality, such as GUI elements, an RTE (Runtime Environment) is usually required to provide these functions for the respective platform. For code provided in an interpreter language, the RTE may also include the interpreter.
Electron Basics
When programming HTML and JavaScript applications for a browser, the browser itself becomes the execution environment. Because most operating systems have browsers that are largely compatible, deploying applications based on this technology is easy. The applications are automatically executable across operating systems. That’s one of the reasons for which web technology is appealing for writing applications.
However, execution in the browser also has its disadvantages. Users of desktop operating systems are accustomed to being able to use specialized applications for specific purposes. As concerns the use of browser applications, we see the following differences:
- The applications can be started, stopped and positioned independently of each other and by the browser.
- Applications can have their own properties, such as a fixed window size.
- Switching between the applications takes place via tools of the operating system, such as ALT + TAB or the Windows task bar.
- The applications run as independent operating system processes and can also be terminated in isolation in the event of an error.
Working with dedicated desktop applications seems to be much more convenient for users based on the points listed above. In addition, the browser can be used for what it is still mainly used in many cases, namely for online navigation and research, and it is therefore not blocked by the presentation of other applications.
Electron now makes it possible to deploy web-based applications as desktop applications. The technology has meanwhile become quite mature; for example, the editor Atom [2] and Microsoft Visual Studio Code [3] are based on it. Node.js and Chromium are used as a base.
To create an Electron application, you must first have a web application which is subsequently transformed into a desktop application using a special processing step. From the outside, this looks similar to using a compiler, but it works a bit differently. JavaScript code, HTML code and a Chromium browser are bundled together here to create an executable file that can be launched like any other desktop application. At startup, the runtime environment (browser component) is first started within a native operating system window, and the web application is run in it. This means:
- The frame of the application window is specified by the operating system or by the window manager used, along with the associated controls for closing the window, etc.
- The content of the application window is determined by the application code implemented in JavaScript, HTML, and CSS. It is largely independent of the operating system used.
We will now show an example of how you can specifically transform a web application into an Electron desktop application.
Case study
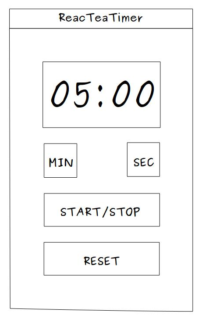
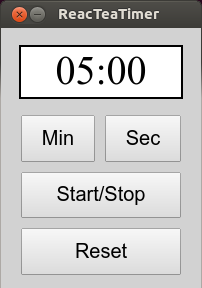
To keep the example simple, let’s put together a very simple application: a tea timer, or a small short time meter as it is used in many households. It has
- a digital display showing the remaining time in mm:ss format, i.e. two digits each for minutes and seconds,
- two buttons to increase the set time, one for the minutes (MIN), and one for the seconds (SEC)
- a button that starts or stops the countdown (START/STOP), as well as
- a button (RESET) to reset the set time.
We will use React to develop our application and so we will call it “ReacTeaTimer”. Fig. 1 shows a mock-up of the application to be developed.
Implementation
As mentioned, our application is to be based on React. So we start by creating a React project:
mkdir sandbox
cd sandbox
create-react-app react-t-timer-app
As the development machine, we will use a Linux computer running Ubuntu 16.04. If you are working with a different operating system, some adjustments may be necessary, so you may need to omit the sudo command before other commands. Then we will switch to the newly created directory and delete the content of the src directory:
cd react-t-timer-app
rm -rf src/*
The skeleton of our project is ready now. Now we have to give it some content. Listing 1 contains the JavaScript source code of our application.
Listing 1
import React from 'react';
import ReactDOM from 'react-dom';
import './index.css';

class ReacTeaTimer extends React.Component {
componentDidMount(){
document.title = "ReacTeaTimer"
}

render() {
return (

<div className="outer_frame">

<div className="display_frame">

<div className="timer_display">
{this.state.time}
</div>

</div>


<div className="key_panel">

<div className="min_sec">
<button className="lean_button" onClick={() => this.incMins()}>
Min
</button>
<button className="lean_button" onClick={() => this.incSecs()}>
Sec
</button>
</div>

<button className="wide_button" onClick={() => this.startStopTimer()}>
Start/Stop
</button>
<button className="wide_button" onClick={() => this.reset()}>
Reset
</button>
</div>

</div>

);
}

constructor(props) {
super(props);
this.state = {
time: "05:00",
lastTime: "05:00",
timerRunning: 0,
alarmRunning: 0
};
this.ac = new AudioContext()
}

updateModel(event) {
this.setState({});
}

parseTime() {
const [minStr, secsStr] = this.state.time.split(":");
const mins = parseInt(minStr, 10);
const secs = parseInt(secsStr, 10);
return [mins, secs];
}

incMins() {
let [mins, secs] = this.parseTime();
mins += 1;
const time = this.padZeros(mins) + ":" + this.padZeros(secs);
this.setState({time: time, lastTime: time});
}

incSecs() {
let [mins, secs] = this.parseTime();
secs = (secs + 1) % 60;
const time = this.padZeros(mins) + ":" + this.padZeros(secs);
this.setState({time: time, lastTime: time});
}

reset() {
this.setState({time: "00:00", lastTime: "00:00", timer: 0});
if (this.state.timerRunning === 1) {
this.setState({timerRunning: 0});
clearInterval(this.state.timer);
}
}

decTimer() {
let [mins, secs] = this.parseTime();
if (secs > 0) {
secs -= 1;
}
else if (secs === 0) {
if (mins > 0) {
secs = 59;
mins -= 1;
}
else {
this.stopTimer();
this.beepOneMinute();
}
}
const time = this.padZeros(mins) + ":" + this.padZeros(secs);
this.setState({time: time});
}

startTimer() {
this.setState({timerRunning: 1});
this.setState({timer: setInterval(this.decTimer.bind(this), 1000)});
}

stopTimer() {
clearInterval(this.state.timer);
this.setState({timerRunning: 0});
}

startStopTimer() {
if (this.state.alarmRunning) {
this.setState({alarmRunning: 0, time: this.state.lastTime});
}
else {
if (this.state.timerRunning === 0) {
this.startTimer();
}
else {
this.stopTimer();
}
}
}

padZeros(number) {
let result = String(number);
result = result.padStart(2, "0");
return result;
}

beepOneMinute() {
function beep(){
let v = this.ac.createOscillator();
let u = this.ac.createGain();
v.connect(u);
v.frequency.value = 1760;
v.type = "square";
u.connect(this.ac.destination);
u.gain.value = 0.5;
v.start(this.ac.currentTime);
v.stop(this.ac.currentTime + 0.2);
}

let interval = undefined;
let startTime = new Date().getTime();
this.setState({alarmRunning: 1});
function beepBody() {
beep.bind(this)();
let currTime = new Date().getTime();

if ((currTime - startTime > 60000) || (this.state.alarmRunning === 0)) {
clearInterval(interval);
}
}
interval = setInterval(beepBody.bind(this), 400);
}
}

ReactDOM.render(
<ReacTeaTimer/>,
document.getElementById('root')
);
The import statements for the React libraries and stylesheet are where you need to declare the ReacTeaTimer class which implements the React component for the presentation of the timer. The componentDidMount() method sets the title as “ReacTeaTimer” when the component is initialized. The render() method returns the page to be displayed in React syntax, as is customary in React. It consists of the following:
- a framework for the entire application (outer_frame),
- an element contained within for the frame around the display (display_frame),
- one more element contained in a display_frame for the actual display (timer_display),
- parallel to display_frame, an element for the buttons (key_panel),
- this includes min_sec button elements in a special element for entering minutes (“MIN”) and seconds “SEC”), as well as
- two buttons “START/STOP” and “RESET, parallel to the min_sec nodes.
Own callback functions are defined here respectively for each of the buttons using the onClick attribute. Apart from that, the render() method essentially only defines the structure of the page here.
The layout is implemented using the stylesheet described below. In addition, the following applies:
- The constructor() method sets the time to be currently displayed time and the last set time last time each at five minutes and zero seconds.
- parseTime() is a helper method that uses the internal time representation in the format “mm: ss” as a string to determine the number of remaining minutes and seconds as numbers and return them as a pair (minute, second).
- incMins() is the callback function for the minute button, increasing the minutes by 1 each time.
- Analogously, incSecs() is the callback function to increase the seconds, with the difference that in the case of a carryover (once 60 seconds are reached), the minutes are also increased by 1.
- The reset() method restores the initial state and at the same time deactivates the interval function for counting down.
- decTimer() is used to count down the timer by one second, reducing the seconds and in the case of a carryover, also the minutes by 1 as needed. When the timer has expired, it is stopped and the beepOneMinute() method is called to play an acoustic signal.
- startTimer() starts the timer. In addition, every one thousand milliseconds, via an interval timer timer, the decTimer() method is called.
- stopTimer() stops the timer again by clearing the interval timer.
- The padZeros() helper method converts a numeric value for the number of minutes or seconds into a string of length 2 filled with leading zeros.
The beepOneMinute() helper method contains two internal functions. beep() simply creates a tone that is 0.2 seconds long. beepBody() checks with each call whether one minute (60,000 milliseconds) has already passed since the first call. If this is the case, the interval timer will be deleted for the output of the signal via beep(). At the end of beepOneMinute(), an interval timer is
defined that starts beepBody() every 400 milliseconds. Last but not least, calling ReactDOM.render() causes the ReacTeaTimer component below the rootNode to be hooked into the DOM. We save the file as index.js in the src folder.
Listing 2 contains the corresponding stylesheet. We will not go into any detail here. We should not however that we are working with fixed sizes here, so the height of the body element is fixed to 260 pixels. The reason for this is that our future Electron application should also be given a fixed window size for the sake of simplicity.
Listing 2
html,body {
height: 260px;
margin: 0px;
padding: 0px;
overflow: hidden;
}
.outer_frame {
width: 200px;
height: 280px;
background-color: lightgray;
display: grid;
grid-template-rows: auto auto;
justify-items: center;
}
.display_frame {
width: 160px;
height: 50px;
color: black;
border: 2px solid;
text-align: center;
margin: auto;
display: grid;
grid-template-rows: auto;
}
.timer_display {
font-size: 40px;
background-color: white;
}
.key_panel {
width: 160px;
height: 160px;
display: grid;
grid-gap: 10px;
grid-template-rows: auto auto auto;
}
.min_sec {
display: grid;
grid-template-columns: auto auto;
grid-gap: 10px;
}
.lean_button {
font-size: 20px;
}
.wide_button {
font-size: 20px;
}
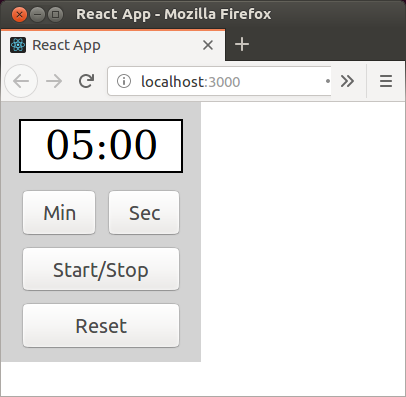
We will save this file in the src directory under the name of index.css, This completes the implementation of the actual application. We can test it in the browser now: npm start. This opens a tab with this address in the browser: http://localhost:3000/, which displays the application. Figure 2 shows a screenshot of the running application in Firefox.
Electronifying the application
Once the browser application has been implemented, the next step is to turn it into an Electron application. First we create a statically optimized build from the server application. To do this, we first adapt the beginning of the package.json file:
{
"name": "react-t-timer-app",
"version": "0.1.0",
...
and add a homepage attribute, so the file starts like this:
{
"name": "react-t-timer-app",
"homepage": ".",
"version": "0.1.0",
...
This causes paths in references to be generated as relative to the index.html file generated during the build. Without this configuration, paths would be generated relative to the server root directory, which we do not want in this case since we are creating a static build. That happens using npm run build.
This results in an optimized build of the application located in the build subdirectory. To distribute our application, all we would need to do now is transmit this directory along with its contents. On another computer, this directory would then have to be copied somewhere, and by opening the contained index.html using a JavaScript enabled browser, the application could be executed there without modification. So, we’ve already implemented a platform-independent browser application.
What we want to achieve, however, is an application that presents itself as a separate window independently of the browser in the target platform. To do that, we first need to install the Electron infrastructure. This is done by running npm install –save-dev electron in the react-t-timer-app directory previously created by running create-react-app.
Then we copy the contents of the main.js file from https://github.com/electron/electron-quick-start/blob/master/main.js in a file of the same name below src (Listing 3). Then we adapt the Create
Window() function by adjusting the width (width) and height (height) to the content of our CSS file, and fixing the window size (resizable: false). Setting the true value for useContentSize causes the window size to be calculated such that the contained web page fits into the inner area of the window (without the frame). The actual window size is a little bit bigger then, because the dimensions for the window frame are added. In addition, we set the show attribute to false, which results in the window not being displayed first of all. That way you prevent the display from flickering because the window frame is displayed before the contents are completely loaded.
Listing 3
function createWindow () {
//Create the browser window.
mainWindow = new BrowserWindow({
width: 200,
height: 260,
resizable: false,
useContentSize: true,
webPreferences: {
nodeIntegration: true
},
show: false
})
To make sure the window becomes visible after the content is loaded, we insert an event handler that causes the window to appear after the ready-to-show event is received.
mainWindow.once('ready-to-show', () => {
mainWindow.show()
})
In addition, we change the line mainWindow.loadFile(‘index.html’) to mainWindow.loadFile(‘build/index.html’).
Now we still have to adapt the package.json file. Below dependencies, we add a main attribute which defines the entry point for the Electron application, and the we supplement a script to start Electron using Electron:
"main": "src/main.js",
"scripts": {
"start": "react-scripts start",
"build": "react-scripts build",
"test": "react-scripts test",
"eject": "react-scripts eject",
"electron": "electron ."
},
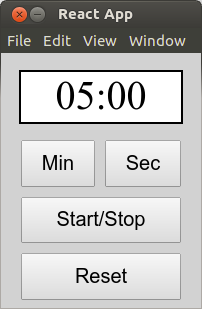
This completes the preparations, and we can start the application using npm run electron.
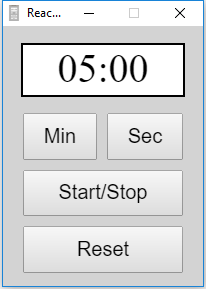
Figure 3 shows the application window (on an Ubuntu system with Gnome). The frame of the window has a fixed unchangeable size, Gnome-typical menus, and the usual Gnome controls for closing and minimizing the application. The document title “ReacTeaTimer” is displayed as the window title. The application can be closed again via the window control, the ALT + F5 key combination or by pressing CTRL + C in the npm command line.
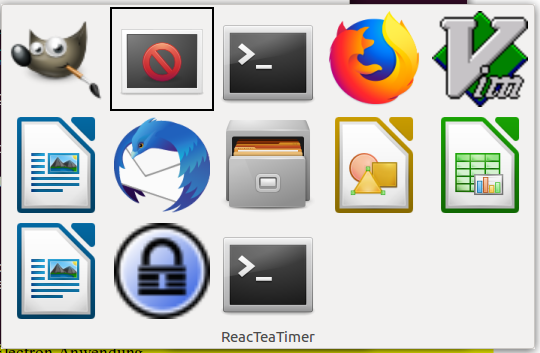
However, we still have some display elements missing: in the task bar (here we only see a generic icon and the name of the application), as well as in the window overview which you see when you press ALT + TAB to switch the application. Only a prohibition sign appears there (Fig. 4).
That’s why we will add the following structure below the react-t-timer-app folder
assets/
icons/
mac/
win/
png/
The icon files for the different operating systems should be stored in the mac. win and png subdirectories:
- mac: (for Apple) in .icns format
- win: (for Windows) in ico format
- png: (for Linux) in .png format
Accordingly, we will store an image for the display (teatimer.png) in the png folder. To make sure the display of the file works under Linux, we still need to make an adjustment in main.js (Listing 4).
Listing 4
...
var path = require('path')
function createWindow () {
//Create the browser window.
mainWindow = new BrowserWindow({
width: 200,
...
show: false
icon: path.join(__dirname, '../assets/icons/png/teatimer.png')
})
So we additionally import the path library and set the icon attribute in the dictionary that will transmit the createWindow() explicitly to the relative path to this file.
Providing the application
To generate a native package now, we need to install another tool. In this case, we will use electron-packager [4]. To this end, we call sudo npm install electron-packager –save-dev -g from the react-t-timer-app directory. After the installation is complete, we can create an executable via the command line:
electron-packager . ReacTeaTimer --overwrite --platform=linux --arch=x64 -- prune=true --out=release-builds
We can now switch to the release-builds/ReacTeaTimer-linux-x64/ directory and start the executable using ./ReacTeaTimer. You can see the result in Figure 5. The application is displayed without the menu bar from the npm run.
As Figure 6 shows, the correct preview image is now also displayed when the window is switched.
For Windows, a build can be triggered using this command:
electron-packager . ReacTeaTimer --overwrite --asar --platform=win32 --arch=ia32--icon=assets/icons/win/teatimer.ico --prune=true --out=release-builds
If you copy the release-builds/ReacTeaTimer-win32-ia32 directory to a Windows machine, the program can be started by double-clicking on ReacTeaTimer.exe. Figure 7 shows the running Windows application. The window now has a typical Windows frame with the corresponding controls. On the other hand, the content is identical to the presentation under Linux.
Space requirements
The finished builds are still quite large even by today’s standards. The total size of the directories is 448 MB under Linux (64 bit) and 351 MB under Windows (32 bit).
One of the reasons for the large space requirement is that a complete Chromium browser is included in the package every single time. Nevertheless, we can save a bit of space in a relatively easy way by deleting the following lines in packages.json in the dependencies area:
"react": "16.8.4",
"react-dom": "^16.8.4",
"react-scripts": "2.1.8"
and inserting this under devDependencies instead:
"devDependencies": {
"react": "^16.8.4",
"react-dom": "^16.8.4",
"react-scripts": "2.1.8",
"electron": "^4.1.0"
}
This reduces the space requirements to at least 221 MB (Linux, 64 bit), zipped 73 MB, or 141 MB (Windows, 32 bit) zipped 57 MB. That’s still a lot, but at least our application will be reasonably portable.
Summary
Here’s a quick rundown of what steps we’ve taken to implement a React-based Electron application (it’s just one possible way, the motto ‘many roads lead to Rome!’ certainly applies here):
- Create new React project by running create-react app:
create-react-app <Name of the application>
- Write code for a browser application in the src directory of the React project
- Install Electron in React project:
npm install --save-dev electron
- Test the application using npm:
npm run build && npm run electron
- Copy main.js into the project and adapt the Create Window() function
- Build the application using npm:
npm run build
- Before the build: Provide icons for the different target systems
- Install Electron Packager as needed:
npm install electron-packager –save-dev -g
- Restructure packages.json as needed and move the dependencies from dependencies to devDependencies
- Call the command line for the relevant target system, for example for Linux:
electron-packager . ReacTeaTimer --overwrite --platform=linux --arch=x64 -- prune=true --out=release-builds
Conclusion
Using Electron, you can transform browser applications implemented using React into independent applications for a variety of desktop operating systems with not too much effort. As a result, software for different platforms can be generated from the very same source code. Nevertheless, smaller adjustments still need to be made for the various operating systems, such as providing icons in various formats. However, this is a well-known and widely accepted issue in cross-platform development, and the cost is relatively manageable in most cases. The resulting applications retain their appearance and behavior within the window. On the other hand, the respective operating systems determine the appearance and behavior of the embedded windows. The resulting applications have been very large so far, so the technology is rather not suited to provide small auxiliary applications.
This subject matter is quite diverse, and we were only able to briefly touch upon many of them in this article. Interesting and advanced topics include the following:
- electron-forge [5]: This tool works much like electron-packager, but also creates installers for built-in software.
- Fine tuning: By using a suitable boiler plate such as electron-react [6], the space requirements can be further reduced.
- Use of changeable window sizes/responsiveness: Customizing the application so that it can be resized.
It is also interesting to see if there will be a chance in the future for several Electron applications to share a runtime environment (i.e. the Chromium components and other libraries). That would greatly reduce space requirements and load times.
In any case, I wish interested readers a lot of fun with their own projects in Electron; as we have seen, the hurdles aren’t terribly high, so there are hardly any obstacles in the way of conducting your own experiments.
Link & literature
[1] https://de.wikipedia.org/w/index.php?title=Electron_(Framework)&oldid=186294387
[2] https://de.wikipedia.org/w/index.php?title=Atom_(Texteditor)&oldid=185115443
[3] https://de.wikipedia.org/w/index.php?title=Visual_Studio_Code&oldid=186614921
[4] https://github.com/electron-userland/electron-packager
[5] https://github.com/electron-userland/electron-forge
[6] https://github.com/electron-react-boilerplate/electron-react-boilerplate