The great strength of Angular lies in the fact that it provides all the necessary components for building a complete Single Page Application (SPA): Routing, support for PWA, internationalization and test automation. All these aspects and many more are covered by Google’s framework (Fig. 1).
![Fig.1: Angular covers all areas of Single Page Applications [1]](https://javascript-conference.com/wp-content/uploads/2019/07/steyer_angular_elements_1.png)
Fig.1: Angular covers all areas of Single Page Applications [1]
- CMS-based pages and classic web solutions that are supposed to be enriched bit by bit with interactive components.
- Legacy applications that need to be migrated to a newer technology step by step.
- Components or entire micro frontends that are dynamically loaded for UI integration.
- Widget libraries that can be used with any technology.
You just need a very lightweight component framework for such use cases. Angular Elements, a pretty new solution that releases Angular Components as standard-compliant Web Components, is providing just the right kind of solution for that. These components behave like conventional HTML elements, e.g. div, img or table, and can be used with any JavaScript framework of your choice or directly with VanillaJS.
This article takes this up and shows how Angular Elements can be used for such scenarios. It also gives an outlook regarding the new Ivy compiler that will support such scenarios.
Web Components
Strictly speaking, the term Web Component is merely a collective name for various standards. Table 1 provides an initial overview.
| Standard | Description |
|---|---|
| Templates | Providing HTML fragments that are parsed only once and inserted into the page only once or multiple times as required. |
| HTML Imports | Import of HTML files and the Web Components they contain |
| Custom Elements | Providing your own HTML elements that behave like the built-in ones, e.g. |
| Shadow DOM | Isolation of CSS rules to one component so that they do not affect other components. |
Table 1: Overview of the standards behind web components
By now, HTML imports are not used anymore. Instead, browser manufacturers have agreed to use the existing JavaScript import mechanism to reference Web Components.
As of now, the other standards I mentioned are implemented in most major browsers such as Chrome, Firefox, Opera, Edge, or Safari. For all others, like Internet Explorer, polyfills [2] are an option. Thus, this technology can be used in all established browsers.
Providing Web Components with Angular Elements
To combine the powerful features of angular with the lightweight nature of Web Components, the Angular team has released version 6 of Angular Elements. They can be installed via npm (npm i @angular/elements –save) and encapsulate traditional Angular Components so that they can be used by the browser as Web Components. To do so, one only needs to use the createCustomElement function (Listing 1).
import { createCustomElement } from '@angular/elements';
[...]

@NgModule({
  imports: [
    CommonModule,
    NgxChartsModule
  ],
  declarations: [
    DashboardTileComponent
  ],
  exports: [
    DashboardTileComponent
  ],
  entryComponents: [
    DashboardTileComponent
  ]
})
export class DashboardTileModule {

  constructor(private injector: Injector) {
    const tileElm = createCustomElement(DashboardTileComponent, { injector: this.injector });
    customElements.define('dashboard-tile', tileElm);
  }

}
The custom element obtained by this can be registered using the standardized customElements.define method. It doesn’t matter where these two lines of code are stored. As soon as they are executed, a <dashboard-tile> element becomes available. In the example shown, these lines were placed in the constructor of a module. This also fits in with the semantics of modules that make components accessible.
Further more, this constructor can be injected with the current injector, which has to be passed to createCustomElement. That is necessary to couple the custom element with the dependency injection mechanism of Angular. Because Angular creates such components dynamically if required, they must also be registered within the module under entryComponents.
Using Shadow DOM
Did you know Angular provided support for Shadow DOM right from the very beginning? It emulates this concept by default. To do so, the Angular compiler adds to the CSS rules in use. The encapsulation property in the Component decorator also offers the option of using the browser’s implementation instead:
@Component({
  [...]
  encapsulation: ViewEncapsulation.ShadowDom
})
export class MyComponent { }
The value ShadowDom activates Shadow DOM version 1 in the browser, provided the browser of choice supports the current version, or the application provides appropriate polyfills. Alternatively, the value Native activates the older version 0, which can be found in some browsers, but is now considered outdated. If you want to refrain completely from using Shadow DOM, use None instead.
Templates
There isn’t much that needs to be said about HTML templates at this point, because they are ubiquitous in Angular anyway. Strictly speaking, there are two use cases for this in Angular: The most obvious is the use of templates to display components; a less obvious one is the handling of the content of a structural directive like *ngIf or *ngFor, which Angular only inserts into the page when needed.
Consuming Web Components with Angular
The Angular compiler will check whether it is accustomed to the HTML elements applied. However, it cannot recognize Web Components interpreted directly in the browser. That is why the application must prepare Angular for the unknown Web Components. This is done by assigning the schema CUSTOM_ELEMENTS_SCHEMA to the individual modules:
@NgModule({
  [...],
  schemas: [ CUSTOM_ELEMENTS_SCHEMA ],
})
export class AppModule { }
This schema allows use of all possible HTML elements. Whether it is actually available, or how each unknown element is treated like a div by the browser can only be seen at runtime.
Since Web Components are based on ECMAScript 2015+, the TypeScript compiler must be instructed to emit code for this version of JavaScript. To do so, the target property in tsconfig.json can be set to ES2015. To support older browsers like Internet Explorer one could use differential loading introduced with Angular CLI 8. This allows to generate two sets of bundles: One is using ES5 and supports older browser and the other one uses ES2015 for newer ones. As differential loading is on by default, it’s enough to switch the target in tsconfig.json to ES2015.
Also, we need to load polyfills for older browsers. Those can be found on GitHub [2]. When using them, it must be ensured that they are not included in the same bundle. One solution for that is to copy them to the assets folder and to reference them in the classic way:
<script src="./assets/custom-elements/src/native-shim.js"></script>
<script src="/assets/webcomponentsjs/webcomponents-loader.js"></script>
If one wants to automate this task, one can use the community-build solution ngx-build-plus, which is provided by the author via npm [3]. It can be installed via ng add and its schematic wc-polyfill takes care of the setup of both polyfills:
ng add ngx-build-plus
ng g ngx-build-plus:wc-polyfill
Afterwards the registered Web Component can be called in the templates:
<dashboard-tile></dashboard-tile>
This is not very profitable at first glance, especially since conventional Angular Components can be used in the same way. A first real added value is visible when the application is supposed to generate this component dynamically. To do this, just insert a corresponding DOM node:
const content = document.getElementById('content');
const tile = document.createElement(tileKind);
content.appendChild(tile);
Another advantage is that Web Components can now be very easily loaded dynamically into an application. If this is the intended use case, a corresponding script tag has to be created [4]. Additionally, the consuming application does not necessarily have to be based on Angular, because the Web Components executed by the browser interact with every client-side technology.
External Web Components
To provide a bundle with the Web Component for other applications, one only needs an Angular application that registers the component during bootstrapping. The ngDoBootstrap method can be used for this in the main module (Listing 2).
@NgModule({
  imports: [
    HttpClientModule,
    BrowserModule
  ],
  declarations: [
    ExternalDashboardTileComponent
  ],
  bootstrap: [],
  entryComponents: [
    ExternalDashboardTileComponent
  ]
})
export class AppModule {
  constructor(private injector: Injector) {
  }

  ngDoBootstrap() {
    const externalTileCE = createCustomElement(ExternalDashboardTileComponent, { injector: this.injector });
    customElements.define('external-dashboard-tile', externalTileCE);
  }

}
As the last example also shows, the module does not use a bootstrap Component. The reason for this is that the generated bundle should not actually generate any Angular Components, but only Web Components. That’s the reason why the Web Component still has to be registered as an entryComponent.
Unfortunately, the Angular CLI does not currently support the creation of such bundles. For example, it always creates multiple bundles per application. While this is a good thing for a full-scale SPA, for Web Components it makes more sense to make do with a single bundle, which can be loaded on demand.
Fortunately, the previously mentioned community project ngx-build-plus [3] also comes to the rescue here. It extends the CLI by a –single-bundle switch, which causes the CLI to generate a single bundle containing the Web Component:
ng build --prod --project external --single-bundle
The resulting bundle is similar to those in Figure 2.
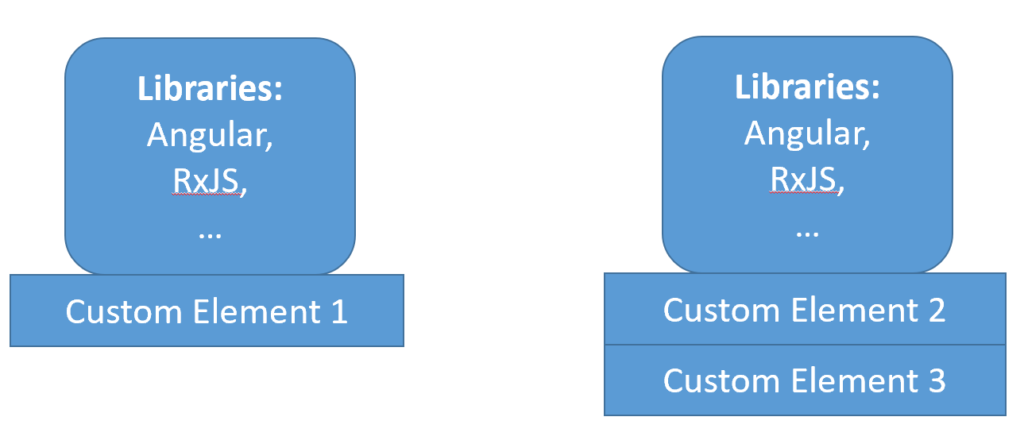
Fig. 2: Dependencies are repeated per bundle
All is well, if a single such bundle prevails. From the second one on, though, the dependencies repeat themselves, e.g. Angular. This is, of course, anything but optimal in terms of bundle size and performance. The new Ivy compiler promises to find a remedy.
Ivy
The Ivy compiler, which the Angular team has been working on for some time, is supposed to produce smaller bundles, thanks to additional possibilities for tree shaking. The entire thing is primarily adding changes under the hood: From the application programmer’s point of view, nothing shall change due to Ivy for the time being. Starting with Angular 8, developers can activate Ivy with a flag and check if their own application can be compiled with it without any problems.
In later versions Ivy will be active by default. The goal is to make this change in the time after Angular 8 without any breaking changes, although the product team admits that in special cases the code will have to be adjusted a bit.
Ivy not only brings more possibilities for Tree Shaking, but also translates components into very DOM-like code. The compilation then resembles code written in VanillaJS itself. In the best case scenario only a very small runtime of Angular itself remains (Fig. 3).
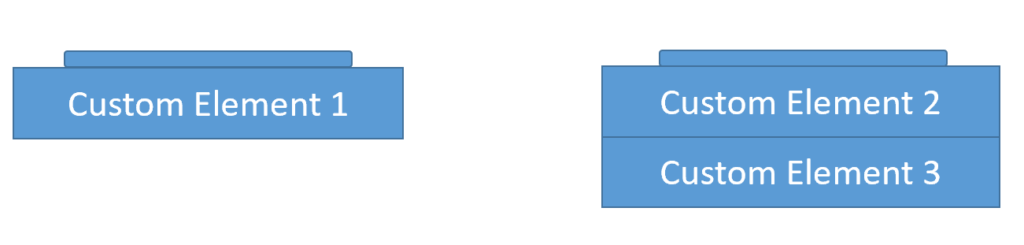
Fig. 3: Bundles compiled with Ivy
Ivy scores particularly well with Web Components, as it can optimize code for rendering the UI quite well. Thus, the problem I described in the last section, is solved when in a situation where you use ideal Web Components. However, if the bundles also contain libraries, e.g. for validation, routing, or internationalization, Ivy can only help to a limited extent. This code is translated to JavaScript by the TypeScript compiler anyway.
Sharing Libraries
When a project reaches the limits of Ivy, then the approach outlined in Figure 4 could be useful. Here, different, separately created Web Component bundles share common dependencies. These have to be loaded into the global namespace of the browser once. The Universal Model Definition Format, UMD for short, helps with that. Fortunately, most libraries, including Angular, are available in this format, among others.
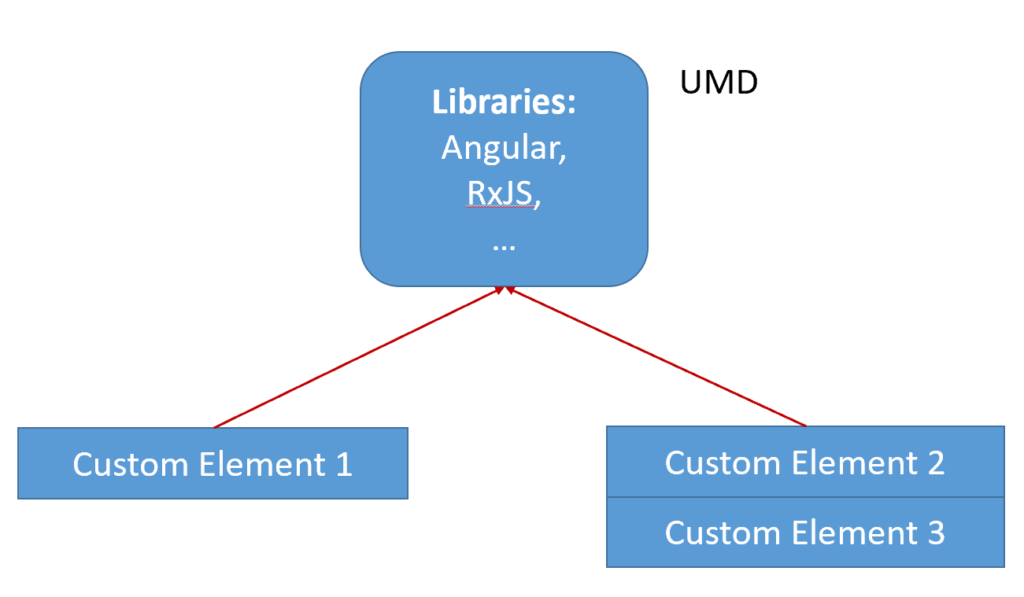
Fig. 4: Several separately compiled bundles share a common dependency.
Another requirement for this variant is that the used build tools should not include the shared libraries in the bundle, but only provide a reference to the global namespace. Even if it can be solved with tools like webpack, one usually does not want to bother about this. That’s why the here already mentioned ngx-build-plus community solution automates this task with the help of the Angular CLI. For example, to turn an existing project into such one, it offers an externals schematic: ng g ngx-build-plus:externals. Then you can build the project with the npm script build: externals [5].
Conclusion
Angular Elements makes it very easy to translate Angular components into Web Components. They score especially well in lightweight scenarios where a full-scale single page application is not appropriate.
The new Ivy compiler will also make sure that the provided bundles will get along with as few Angular components as possible, and are, therefore, as slim as manually written counterparts.
Currently, Angular Elements can be used wonderfully within Angular to increase the dynamics of an application. There is no official support yet for usage outside of Angular. Community projects like ngx-build-plus are trying to fill this gap.
Links:
[1] Green, Brad; ngAtlanta Keynote: „Angular in 2019“: https://docs.google.com/presentation/d/18IJ5cMRB9d8Zx29VfFHX91eD-NTaribzweU5IAwEVgc/edit#slide=id.g35a74f8ff6_0_0
[2] https://github.com/webcomponents/webcomponentsjs/
[3] https://www.npmjs.com/package/ngx-build-plus/
[4] https://www.softwarearchitekt.at/post/2018/07/13/angular-elements-part-i-a-dynamic-dashboard-in-four-steps-with-web-components.aspx
[5] https://www.softwarearchitekt.at/post/2019/01/27/building-angular-elements-with-the-cli.aspx