First, a bit of background
Websocket protocol has landed with HTML5. It is useful when you want a low latency persistent bidirectional communication between the client and the server so you can both send data from and to the browser. Unlike HTTP, Websocket is a stateful communication protocol that works over TCP. After making a connection, the client and server will exchange data per frame, which is 2 bytes each.
The technology has been around for a while, long enough to enjoy excellent support across all browsers. Having a two-way channel is attractive for use cases like games, messaging applications, and when you need near real-time updates in both directions.
Project Setup
I’ll be using Angular 8 for the client, Node.js for the server which uses the ws library as it is simple to use, blazing fast and thoroughly tested WebSocket client and server for Node.js.
You can use pretty much any front-end or server framework.
This is an overview of a simple node server:
const WebSocket = require('ws');
const wss = new WebSocket.Server({ port: 8081 });

wss.on('connection', ws => {
  onConnection(ws);
  ws.on('message', message => {
    onMessage(message, ws);
  });
  ws.on('error', error => {
    OnError(error);
  });
   ws.on('close', ws=> {
    onClose();
})
});
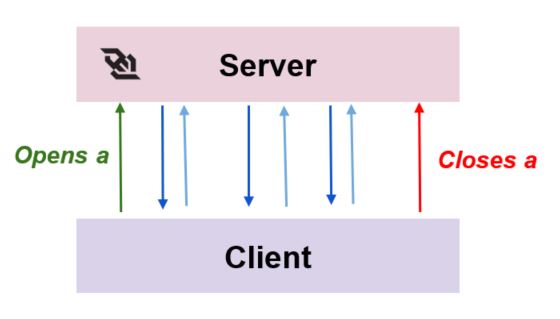
As it is an event driven protocol, you will have to provide actions when:
- the connection is established (the onConnection method is called)
- a message is received (the onMessage method is called)
- an error occurs (the OnError method is called)
- the connection is closed (the onClose method is called)
…and so on and so forth.
iJS Newsletter
Join the JavaScript community and keep up with the latest news!
How to handle real time updates in your Angular application
Many open source packages are available to handle live updates coming from a WebSocket server. Some implement the protocol and leave the rest to the developer. The others are built on top of the protocol with various additional features commonly required by real-time messaging applications.
However, I don’t really recommend adding a third-party dependency in your project every time you have a new feature to support. This will increase your bundle size and affect the performance of your application. You have to also consider some parameters such as compatibility, versions management, reliability, active support, and maintainability.
So, we better pick something from the Angular ecosystem. What you will be really glad to know is that Rxjs surprisingly ships with a special kind of subject WebSocketSubject, which is a wrapper around the w3c-webSocket object available in the browser. It allows us to both send and receive data via WS connection.
Sounds great!
How to put it in place
In order to use it, all you need to do is call the WebSocket factory function that produces this special type of subject and takes as a parameter the endpoint of your ws server. You can use wss for secure websocket connection.
import { webSocket } from "rxjs/"webSocket;
const subject = webSocket("ws://localhost:8081");
This way you have a ready to use subject that you should subscribe to in order to establish the connection with your endpoint and start receiving and sending some data.
As WebSocketSubject is nothing but a regular RxJS subject, it can be considered both observable and the observer at the same time. Therefore you can send data to the WebSocket using next method and register callbacks to process the incoming messages.
Simple, right? Now let’s see the recommended architecture together.
What architecture to adopt
All the interactions with the WebSocketSubject should be isolated in a separate service as follows:
import { Injectable } from '@angular/core';
import { webSocket, WebSocketSubject } from 'rxjs/webSocket';
import { environment } from '../../environments/environment';
import { catchError, tap, switchAll } from 'rxjs/operators';
import { EMPTY, Subject } from 'rxjs';
export const WS_ENDPOINT = environment.wsEndpoint;

@Injectable({
  providedIn: 'root'
})
export class DataService {
  private socket$: WebSocketSubject<any>;
  private messagesSubject$ = new Subject();
  public messages$ = this.messagesSubject$.pipe(switchAll(), catchError(e => { throw e }));

  public connect(): void {

    if (!this.socket$ || this.socket$.closed) {
      this.socket$ = this.getNewWebSocket();
      const messages = this.socket$.pipe(
        tap({
          error: error => console.log(error),
        }), catchError(_ => EMPTY));
      this.messagesSubject$.next(messages);
    }
  }

  private getNewWebSocket() {
    return webSocket(WS_ENDPOINT);
  }
  sendMessage(msg: any) {
    this.socket$.next(msg);
  }
  close() {
    this.socket$.complete(); }}
Let’s break this down!
- getNewWebSocket(): Returns a new webSocketSubject given a url.
- close(): Closes the connection by completing the subject.
- connect(): Call the getNewWebSocket and emits messages coming from the server to a private subject messagesSubject$.
- sendMessage(): Sends a message to the socket. This latter will send it to the server.
- messages$: A public observable that we will be subscribing to in every component subject to real time. SwitchAll
What remains is calling the connect method from your root component…
constructor(private service: DataService) {
this.service.connect();
}
…and subscribing to the messages observable in your Angular component to receive the most recent values.
  liveData$ = this.service.messages$.pipe(
    map(rows => rows.data),
    catchError(error => { throw error }),
    tap({
      error: error => console.log('[Live component] Error:', error),
      complete: () => console.log('[Live component] Connection Closed')
    }
    )
  );
As you can see, we don’t subscribe to the messages directly. We process the incoming messages from the server and do a transformation of the current observable map(rows => rows.data) first. The result is stored in the liveData$ observable.
Errors are handled using the RxJS catchError operator and the tap operator is used to log a message when an error occurs or when the connection closes.
We are one step left from the live component, so just subscribe to the liveUpdates$ observable in the component’s template using the async pipe.
And now we are done!

How to improve performance
Now, time for the icing on the cake. It is highly advisable to modify the change detection strategy to onPush in order to gain performance.
changeDetection: ChangeDetectionStrategy.OnPush
At this point you may be wondering how to handle reconnection. When we restart the server or the connection cuts out for whatever reason, does this Subject restore the lost connection for us?
Well, the answer is no. The reconnection is not supported by the WebSocketSubject or the WebSocket protocol. By design, WebSockets do not handle reconnection.
But don’t worry. You can implement this easily in your Application using RxJS as well.
How to restore a lost connection
When the connection is lost, the socket will be closed and the WebSocketSubjet will no longer emit values. This is not the expected behaviour in the real time world. The reconnection capability is a must in most cases.
So, let’s say that after a disconnection, our application should attempt to reconnect each 2 seconds for example. The trick in this case, is intercepting the closure of the socket and retrying the connection.
How to intercept the closure of the connection?
This is possible thanks to the WebSocketSubjectConfig. The WebSocketSubjectConfig is responsible for customizing some behaviour in the socket lifecycle, namely the opening and the closure of the connection. Instead of calling the webSocket function that takes one string argument which is the url of your endpoint, you can call it by passing to it a whole object which is the WebSocketSubjectConfig .
The following code creates a WebSocket subject using the WebSocketSubjectConfig and simply intercepts the closure event to display a custom message. [DataService]: connection close in the browser’s console.
  private getNewWebSocket() {
    return webSocket({
      url: WS_ENDPOINT,
      closeObserver: {
        next: () => {
          console.log('[DataService]: connection closed');
        }
      },
    });
  }
Cool! But how do you retry the connection?
RxJS has a set of operators that come in handy in many situations. In our case, we can combine the retryWhen operator that will resubscribe to a subject conditionally after it completes, with the delayWhen operator to set the delay between one connection and another.
Let’s implement a function that will retry to connect to a given observable every configurable RECONNECT_INTERVAL . We will log every attempt of reconnection in the browser’s log. The function will look like the following:
  private reconnect(observable: Observable<any>): Observable<any> {
    return observable.pipe(retryWhen(errors => errors.pipe(tap(val => console.log('[Data Service] Try to reconnect', val)),
      delayWhen(_ => timer(RECONNECT_INTERVAL))))); }
This reconnect function will be used as a custom operator to handle the reconnection after the socket’s closure.
 public connect(cfg: { reconnect: boolean } = { reconnect: false }): void {

    if (!this.socket$ || this.socket$.closed) {
      this.socket$ = this.getNewWebSocket();
      const messages = this.socket$.pipe(cfg.reconnect ? this.reconnect : o => o,
        tap({
          error: error => console.log(error),
        }), catchError(_ => EMPTY))
      this.messagesSubject$.next(messages);
    }
  }
As you can tell, a new reconnect flag is added to the connect function to be able to differentiate between the reconnection mode and the first connection mode. This will optimize the code and avoid adding an additional function.
Then, all you have to do is call the connect function with the flag reconnect: true when intercepting the connection closure as follows:
 private getNewWebScket() {
    return webSocket({
      url: WS_ENDPOINT,
      closeObserver: {
        next: () => {
          console.log('[DataService]: connection closed');
          this.socket$ = undefined;
          this.connect({ reconnect: true });
        }
      },
    });
How to send messages to the socket
In order to send messages to the server all that you have to do is call the sendMessge detailed above that calls the next method.
this.service.sendMessage('Hello');
Message serialization
The message will be serialized before sending it to the server. By default the JSON.stringify method is used by the API. But, if you want to customize the serialization function, you can define your own in the WebSocketSubjectConfig:
  private getNewWebSocket() {
    return webSocket({
      url: WS_ENDPOINT,
      serializer: msg => JSON.stringify({roles: "admin,user", msg: {...msg}})
      },
    });
  }
The same thing is true for the deserialization function. By default the JSON.parse is used and you can define your own function in the WebSocketSubject as well:
  private getNewWebSocket() {
    return webSocket({
      url: WS_ENDPOINT,
    deserializer: ({data}) => data  }

        }
      },
    });
  }
Error Handling
You can report a custom error by calling the error method on the subject. This error will close the connection but at least the server will know the cause.
socket$.error({code: 5555, reason: 'wrong parameter'});
That’s good! But what about event typing?
If you have a closer look, you will notice that you can’t intercept a specific event using an event ID. WebSocket lacks this by design.
How you can get around event typing?
RXJS provides a cool multiplexing feature. It is useful when you want to listen only to specific events coming from the server. The connection to the socket server will remain the same, the same stream is open, and when a message come in, the WebSocketSubject will route it to the adequate observer.
Here’s an example: The multiplex method produces an observable and accepts three parameters. The first two are functions returning subscription and unsubscription messages respectively.
The subscription msg will be sent on every subscription to the observable. The unsubscription msg will be sent on every unsubscription to the observable. This way, the server is notified and can use them to start or stop sending messages to the client.
    const eventX$ = this.socket$.multiplex(
      () => ({subscribe: 'eventX'}),
      () => ({unsubscribe: 'eventX'}),
      message => message.type === 'eventX');

    const subA = eventX$.subscribe(messageForAlerts => console.log(messageForAlerts));
In this example, the server will send specific messages when an eventX is fired.
This technique is useful also when you have separate services with different WebSocket endpoints, running on separate machines with only GUI combining them together. You can implement a single Gateway that communicates with the services and manipulates streams separately from your client using the multiplexing.
How to debug it
The browser’s console is a very good tool! Just go to the Network tab and filter the ws request.
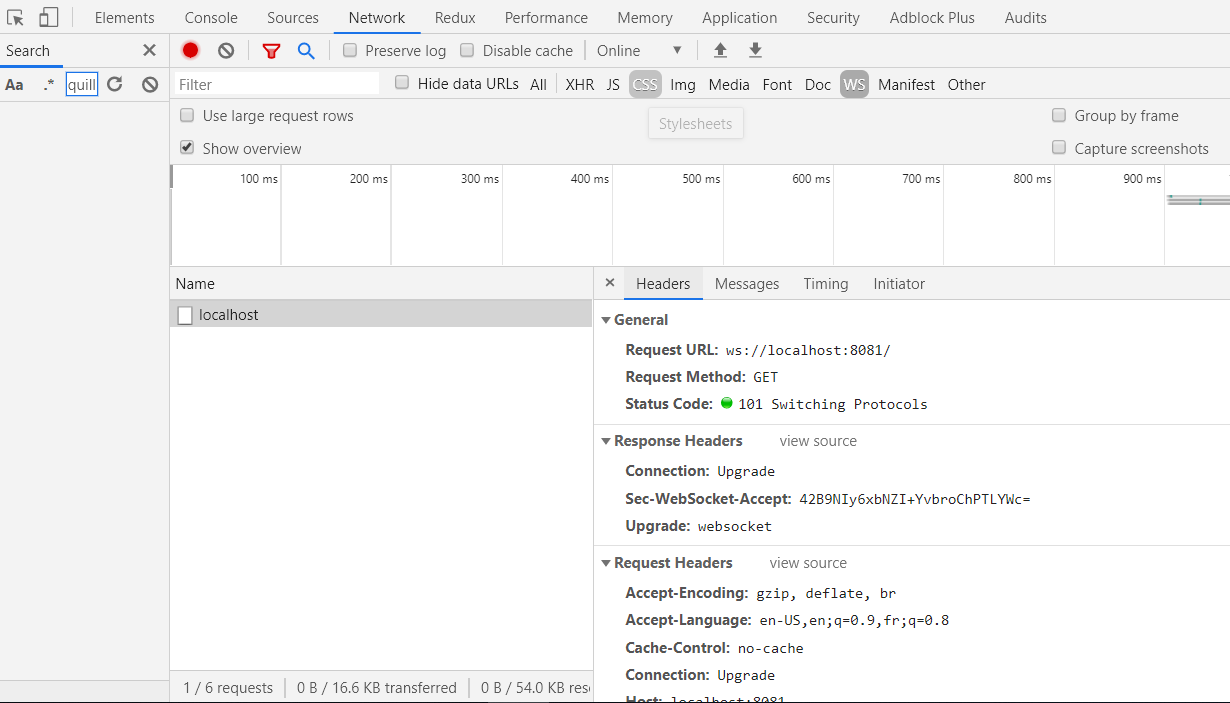
The first request is done over HTTP which is known as the protocol upgrade 101 Switching Protocols. The client and the server will agree to speak a different language or use a new websocket protocol. Starting from this point, all communication will be done over WS, no HTTP anymore. Just hit the Messages tab to see the incoming messages:

SmartWebSocketClient is a good plugin to test the WS server.
Let’s take things to the next level!
If your application is scalable then you should consider a management state. NgRx is a cool state management library. This way, the call to the socket service will be triggered from the NgRx effects. The Live component will only dispatch the action. By isolating this side effect from the components you achieve more pure components. The components then select a state and dispatch actions. You can achieve pure components and gain big performance improvements.
You can find two repositories on GitHub for a real project: Real Time Dashboard
Version without NgRx: https://github.com/lamisChebbi/ng-realtime-dashboard
Version with NgRx: https://github.com/lamisChebbi/ng-realtime-dashboard-ngrx
Summary
In this article, we used RxJS to implement a real-time Angular application. We explored the features that the WebSocketSubject provides to support connection control, multiplexing and event typing. We also learned how to add support of reconnection mechanism, how to process messages coming from the server, how to send messages to the server and finally, we went even further with state management using ngrx for scalable and more complex applications.
Thanks for reading. Peace out!