
TypeScript has a fantastic mechanism called Decorators for attaching behaviors in an orthogonal way. It’s most commonly used by framework developers, but application developers have a lot to gain from using them as well.
The purpose of the decorator is to attach useful functionality to our code in a declarative way that clearly communicates what’s going on without cluttering up the code.
Angular developers will recognize such decorators as @Component, which identifies a class as a Component, @Injectable, which registers a class with the Angular dependency injection engine, and @ViewChild, which provides a code reference to an element in the HTML view.
Note that TypeScript Decorators look syntactically similar to Annotations you may be familiar with from languages such as Java. The big difference is that Annotations are compile-time modifiers that provide metadata to the element they modify, while Decorators are run-time functions that can also wrap or transform existing code.
Use Cases
Rather than starting with the boring details of how to create decorators, let’s dig straight into some interesting use-cases where decorators can help you clean up your code and provide valuable functionality with minimal effort.
iJS Newsletter
Join the JavaScript community and keep up with the latest news!
Memoize
Memoization is a common code optimization technique that automatically caches results for every set of input parameters to a function for reuse. This works in situations where the same inputs will always produce the same output (stable), and the output is the only goal (no side effects or operations). A memoized function returns the cached result for every call after the first. This can be used for intensive calculations (the Fibonacci sequence is a common example), or expensive calls such as to a database or API.
Implementing memoization on a function can be just a bit messy and makes the original intent of the function slightly less clear. Below are two examples of memoization, contrasted against the extremely simple original functions.
// Database Example
class UserService {
  getUser(userId: string): User {
    return this.db.fetchUser(userId)
  }

  memoizedGetUser(userId: string, memo?: {[key: string]: User}): User {
    memo = memo ?? {}
    if (!memo[userId]) memo[userId] = this.db.fetchUser(userId)
    return memo[userId]
  }
}
const userService = new UserService()
const user = memoizedGetUser('XY43797')

// Fibonacci Example
class MathUtils {
  fibonacci(n: number): number {
    if(n < 0) throw new Error('Positive numbers only please')
    return n < 2 ? n : ( fibonacci(n - 1) + fibonacci(n - 2) )
  }

  memoizedFibonacci(n: number, memo?: {[key: number]: number}): number {
    if(n < 0) throw new Error('Positive numbers only please')
    memo = memo ?? {}
    if(memo[n]) return memo[n]
    return memo[n] = n < 2 ? n : (
      fibonacci(n - 1,  memo) + fibonacci(n - 2, memo)
    )
  }
}
const mathUtils = new MathUtils()
console.log('fibonacci', 5, mathUtils.memoizedFibonacci(5))
console.log('fibonacci', 12, mathUtils.memoizedFibonacci(12))
Using a @Memoize decorator, we can accomplish the same functionality with none of the complexity visible in our code.
@Memoize
getUser(userId: string): User {
  return this.db.fetchUser(userId)
}

@Memoize
fibonacci(n: number): number {
  if(n < 0) throw new Error('Positive numbers only please')
  return n < 2 ? n : ( fibonacci(n - 1) + fibonacci(n - 2) )
}
All of the complexity has been abstracted away into the implementation of the decorator. Before we get into these implementation details, let’s look at a few more examples.
Measure Performance
It can often be useful to measure the time it takes for a method to complete. This can help us find bugs, performance issues, or room for improvement through techniques such as Memoization.
The following example measures the total time taken to perform a function call and logs the results using Console Timers.
class UserService {
  fetchUser(email: string): Promise<User> {
    return this.db.query('Users', 'email', email)
  }

  fetchUserMeasureTime(email: string): Promise<User> {
    console.time('UserService#fetchUser') // Needs to be unique
    const result = db.query('Users', 'email', email)
    console.timeEnd('UserService#fetchUser')
    return result
  }
}
While sometimes we may want to leave this performance measuring code in production, other times we just want to be able to quickly add and remove it during testing. This is tricky when we may have to change the way the function returns, such as in the example above. Additionally, we must be careful to always use a unique value for the timer label to avoid errors or inaccurate results. We can handle these considerations with a @PerfLog decorator, which can be easily added anytime and is easily discoverable.
class UserService {
  @PerfLog
  fetchUser(email: string): Promise<User> {
    return this.db.query('Users', 'email', email)
  }
}
We can go even further and add configurable performance monitoring to an entire class. The Angular framework has a series of lifecycle hooks that application developers can use to respond to setup, update, and tear down events. Through a carefully crafted @AngularPerformance() class decorator, we can automatically add performance markers for these events to the browser’s performance data along with measurements of the component startup time.
import { Component } from '@angular/core';
import { AngularPerformance } from './angular-performance.decorator';
import { environment } from '../environments/environment.development';

@AngularPerformance(!environment.production)
@Component({
  selector: 'app-root',
  template: '<h1>{{title}}</h1>',
})
export class ExampleComponent {
  title = 'angular';
}
With just a single line of code (plus imports), we’ve added performance monitoring to all Angular lifecycle events for the class for all non-production environments, providing a tremendous amount of visibility into application behavior.
When doing a performance recording in Chrome, the lifecycle marks show up in the timing diagram and in the event listing as shown below.
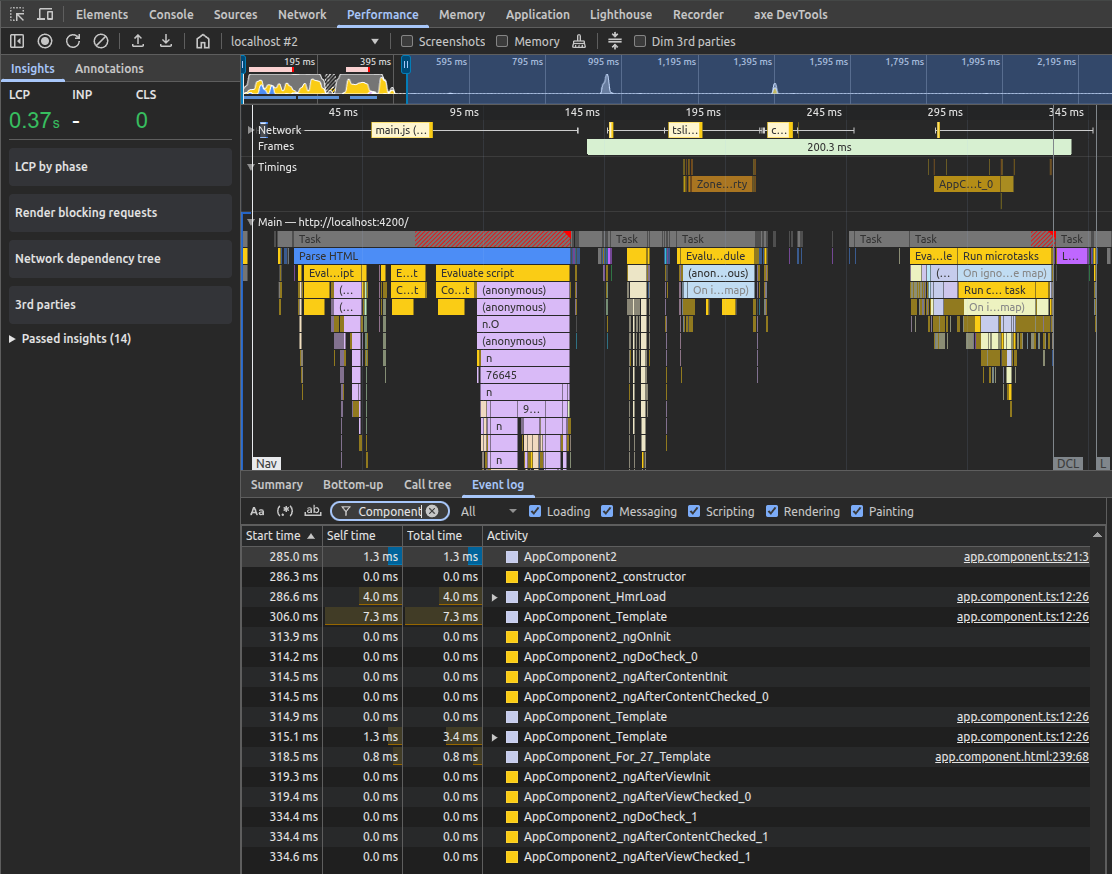
Figure 1: Screenshot of the Performance tab in the Google Chrome developer tools, showing the Gantt chart of event timings above and a list of timing events in a list below
Parameter Management
It’s very common for us to perform standard operations on function parameters, including and especially making sure that we handle missing or null parameters appropriately. Two common tasks include returning null if the parameters are missing and logging the values sent to a function for troubleshooting purposes. Without decorators, we could do this.
class RandomStuff {
  // Log parameter names & values
  sendMessage(fullName: string, email: string): Promise<boolean> {
    console.debug('RandomStuff#sendMessage', fullName, email)
    // Do stuff here
    return true
  }

  // If the parameter is null, return null
  function getUser(userId: string): User {
    if(userId === null) {
      return null
    }
    return this.db.fetchUser(userId)
  }
}
This isn’t hard to do, but it clutters up the code with things that aren’t directly related. It’s also a bit harder to make this configurable at the application level or to find the places we are (or should be) applying this behavior. We can accomplish the same thing with @LogParams(level) and @PassNull(match) method decorators, which accept configuration parameters to control behavior.
class RandomStuff {
  @LogParams('debug')
  sendMessage(fullName: string, email: string): Promise<boolean> {
    // Do stuff here
    return true
  }

  @PassNull()
  function getUser(userId: string): User {
    return this.db.fetchUser(userId)
  }
}
This allows our functions to maintain their cohesion while still adding the intended functionality.
Persistence
While memoization is great for functions that are called repeatedly while an application is running, sometimes we need persistence between application runs. One common use case for this is to maintain user preferences on their device, or to hold state in the browser (outside of the session) in case the user reloads the page. Without persistence, we might see this:
class UserService {
  public userId: string
}

const userService = new UserService()
userService.userId = 'XY43797'
console.log('User ID', userService.userId)
In this example, the userId property is publicly readable and writable, but I have no way to capture changes to this property to add persistence. Fortunately, TypeScript has us covered with Accessors, which are get and set methods for class properties.
class UserService {
  private _userId: string

  get userId() {
    return this._userId ?? (
      this._userId = localStorage.getItem('UserService_userId')
    )
  }

  set userId(id: string) {
    localStorage.setItem('UserService_userId', this._userId = id)
  }
}

const userService = new UserService()
userService.userId = 'XY43797'
console.log('User ID', userService.userId)
In the above example, you’ll notice that we read/write to the property the same way we did before, but behind the scenes, the get and set accessor functions are being called. This has allowed us to keep a localStorage property in sync with the class property _userId so that this value will be available between sessions. We can further simplify this example with the use of an accessor decorator.
class UserService {
  private _userId: string

  @Persist
  get userId() { return this._userId }
  set userId(id: string) { this._userId = id }
}
There are two possible surprises about the accessor decorator. The first is that we have to decorate an accessor instead of just decorating the property itself. The reason for this is that property decorators (which do exist) are unable to add behaviors or attach code. The second surprise is that we have just one decorator instead of decorating both get and set separately. The reason is that accessors are treated as a single unit, and you’ll actually get an error if you attempt to add the decorator to both accessors. You can decorate either get or set as you wish, and these functions don’t have to be adjacent in the code, although you’ll find your code much easier to read if you keep them together.
iJS Newsletter
Join the JavaScript community and keep up with the latest news!
Decorator Implementation
Now that we’ve seen some compelling examples of custom decorators, it’s time to show off the implementation. Note that we’re only using three types of decorators in this article: Method decorators, Class decorators, and Accessor decorators. TypeScript additionally supports Property and Parameter decorators.
Getting Started
Before you can jump right into the code, it’s important to note that Decorators are still currently an experimental feature that you must enable in your TypeScript configuration file.
{
  "compilerOptions": {
    "lib": ["es6"],
    "module": "commonjs",
    "experimentalDecorators": true,
    "target": "es6",
  }
}
The important entry in this example tsconfig.json file is the experimentalDecorators setting, which must be true for your decorators to work. It’s also important that the target be set to ECMAScript 6 or later, as shown here.
@Memoize
We’ll start by showing the implementation of the method decorator for memoize.
export function Memoize(
  target: any,
  methodName: string,
  descriptor: PropertyDescriptor
) {
  // function details
}
This is the standard signature for a method decorator function. The parameters are:
- target – the object instance of the class containing the decorated method. This allows you to modify the underlying object
- methodName – the name of the decorated method (for example, “getUser” or “fibonacci”)
- descriptor – the metadata of the method being modified
Because this is a method decorator, the actual method we’re decorating can be found in descriptor.value, which should be treated as a function reference. We’ll replace this function with our own implementation so that we can modify it, but we have to make sure to call the original function, so the underlying functionality is unaltered.
const originalMethod = descriptor.value

  descriptor.value = function(...args: any[]) {
    originalMethod.apply(this, args)
  }
The next step is to set up our memo and define the key we’ll use to uniquely identify values in the memo based on the parameter values. It’s important that we account for multiple parameters.
const memo: { [key: string]: any } = {}
  descriptor.value = function(...args: any[]) {
    const _key = [target.constructor.name, methodName, ...args]
      .map(o => o.toString()).join('_')
  }
The memo has a string key and any type of object value, and the key is defined as a concatenation of the class name, the method name, and the argument values. The last step is to read from the memo whenever possible and update the memo with the value when necessary. This gives the following final implementation.
export function Memoize(
  target: any,
  methodName: string,
  descriptor: PropertyDescriptor
) {
  const memo: { [key: string]: any } = {}
  const originalMethod = descriptor.value
  descriptor.value = function(...args: any[]) {
    const _key = [target.constructor.name, methodName, ...args]
      .map(o => o.toString()).join('_')
    return memo[_key] ?? ( memo[_key] = originalMethod.apply(this, args) )
  }
}
PropertyDescriptor
Don’t let the type name PropertyDescriptor throw you off. Technically, all members of a class are “properties,” whether they are simple values, objects, functions, or accessors, so you’ll see this descriptor across all of our example decorators. The properties of the descriptor are all optional, and include:
- configurable – a boolean value that indicates if the descriptor itself can be changed, such as changing writable or enumerable properties, or if the property can be deleted from its containing object.
- enumerable – indicates if this property will be included in iterations over the object, such as for…in loops or Object.keys().
- value – the actual value of the property, which may be data or a function.
- writable – a boolean value that indicates if the property can be changed. Setting this to false will cause future reassignment attempts to be ignored in non-strict mode or to throw an error in strict mode.
- get – the actual property getter function for accessor descriptors. When the property is accessed, this function is called, and its return value becomes the property’s value.
- set – the actual property setter function for accessor descriptors. When the property is assigned a new value, this function is called with the new value as an argument.
@PerfLog
Similar to the Memoize decorator, @PerfLog is a simple method descriptor that we’ll use to inject timing calls before and after the original function does its thing.
const _context = `${target.constructor.name}_${methodName}`

  const originalMethod = descriptor.value

  descriptor.value = function(...args: any[]) {
    const _key = `${_context}_${globalThis.performance.now()}`
    console.time(_key)
    const retVal = originalMethod.apply(this, ...args)
    console.timeEnd(_key)
    return retVal
  }
We start by setting context, which includes the class name and method name, because console timers require unique values. We then account for multiple calls to the same function by adding a high-performance timer value to the key we use for the timer to ensure that every single call to the decorated function will have its own unique timer. Otherwise, we’re overriding the original function, adding a timer call before and after the method, and then returning any value from the original method.
This works well in many cases, but most of the time we want to time a function, there will be a Promise involved. We don’t actually want to measure how long it takes to return a Promise, but how long it takes for the promise to complete once all the work is done. This requires some extra code.
 if(retVal && typeof (retVal as PromiseLike<any>).then === 'function') {
      return (retVal as PromiseLike<any>).then(value => {
        console.timeEnd(_key)
        return value
      })
    }
This does a type check against the return value to see if it’s a promise that we need to wait for, in which case we call the end timer once the promise is complete. Putting this all together gives the final implementation for @PerfLog.
export function PerfLog(
  target: any,
  methodName: string,
  descriptor: PropertyDescriptor
) {
  const _context = `${target.constructor.name}_${methodName}`
  const originalMethod = descriptor.value

  descriptor.value = function(...args: any[]) {
    const _key = `${_context}_${globalThis.performance.now()}`
    console.time(_key)
    const retVal = originalMethod.apply(this, ...args)
    if(retVal && typeof (retVal as PromiseLike<any>).then === 'function') {
      return (retVal as PromiseLike<any>).then(value => {
        console.timeEnd(_key)
        return value
      })
    }
    console.timeEnd(_key)
    return retVal
  }
}
@LogParams(level)
Unlike our previous decorators, we want to provide configuration to the @LogParams decorator to indicate the logging level (debug, info, etc.) that we want to use for reporting the parameters and values. This will require us to use a Decorator Factory.
export function LogParams(
  level: 'debug' | 'info' | 'warn' | 'error' = 'debug'
): MethodDecorator {
  return (
    target: any,
    methodName: string,
    descriptor: PropertyDescriptor
  ) => {
    // implementation here
  }
}
The decorator factory takes a single optional parameter of level, which we default to “debug”, making this the value if the decorator is used without a parameter, such as @LogParams(). Note that the use of parentheses is not optional for decorator factories. The factory returns a MethodDecorator which has the same function signature we’re familiar with.
The logging of parameters itself is very straightforward, and we use the provided level as a parameter to the console. Note that we’re handling the case where no arguments are provided to the function call.
if(args.length) console[level](`${methodName} Params`, ...args)
      else console[level](`${methodName} Params void`)
@PassNull(match)
We’ll also implement @PassNull as a decorator factory so that we can accept a match parameter of “any” or “all”. This specifies if we want to return null automatically when any one of the method parameters is null, or only if every one of the method parameters is null.
export function PassNull(match: 'any' | 'all' = 'any'): MethodDecorator {
  return (
    target: any,
    methodName: string,
    descriptor: TypedPropertyDescriptor<any>
  ) => {
    const originalMethod = descriptor.value

    descriptor.value = function(...args: any[]) {
      switch(match) {
        case 'all':
          if(args?.length && args.every(arg => arg === null)) return null
          break
        case 'any':
          if(args?.length && args.some(arg => arg === null)) return null
          break
      }

      return originalMethod.apply(this, args)
    }
  }
}
Let’s look at how this behaves in an example context.
class UserService {
  @PassNull('all')
  findUser(id: string, email: string) {
    // do stuff
  }

  @PassNull() // any
  changeEmail(oldEmail: string, newEmail: string) {
    // do stuff
  }
}

const userService = new UserService()

userService.findUser(null, '[email protected]') // ok
userService.findUser('XY43797', null)          // ok
userService.findUser(null, null)               // null

userService.changeEmail('[email protected]', '[email protected]') // ok
userService.changeEmail(null, [email protected]')                // null
userService.changeEmail('[email protected]', null)                  // null
@Persist
As explained above, we’ll implement persistence with an Accessor Decorator using localStorage. While local storage is a Web API, there are implementations available for Node.js that would allow this to run across environments. We’ll get right to it, since no factory is needed and the method signature looks familiar.
export function Persist(target: any, propertyKey: string, descriptor: PropertyDescriptor) {
  const _key = `${target.constructor.name}/Persist/${propertyKey}`

  const originalGetter = descriptor.get
  descriptor.get = function () {
    const prop = originalGetter.call(this)
    return originalGetter.call(this) ?? globalThis.localStorage.getItem(_key)
  }

  const originalSetter = descriptor.set
  descriptor.set = function(value: any) {
    globalThis.localStorage.setItem(_key, value)
    originalSetter.call(this, value)
  }
}
We’re using globalThis, so the example code can be run and tested in a Node.js environment, but in a web environment, this will be effectively synonymous with window. As we’ve done with method decorators, we’re wrapping the existing functionality, but rather than descriptor.value we’re using .get and .set to obtain the accessor functions.
iJS Newsletter
Join the JavaScript community and keep up with the latest news!
@AngularPerformance(enabled)
Before digging into the promise of tracking performance of Angular lifecycle events, let’s take a look at what those events are:
- constructor – when Angular instantiates the component
- ngOnInit – once all inputs have been initialized
- ngAfterContentInit – after the component’s content has been initialized
- ngAfterViewInit – after the component’s view has been initialized
- ngOnChanges – every time inputs have changed
- ngDoCheck – every time this component is checked for changes
- ngAfterContentChecked – every time the content has been checked for changes
- ngAfterViewChecked – every time the view has been checked for changes
There are additional events for rendering and destruction of the component, but we’ll only be tracking the above events for this example. Read more about these lifecycle events here.
To do everything we’ve promised, we’ll start with a Class Decorator Factory and our own custom interface for convenience.
export function AngularPerformance(enabled: boolean = true) {
  return function _ClassDecorator<T extends NgClassConstructor>(target: T) {
    if(enabled) {
      // setup event hooks
    }
    return target
  }
}

interface NgClassConstructor {
  new(...args: any[]): {}
}
The enabled parameter defaults to true, allowing us to apply this decorator as simply @AngularPerformance(), but this allows us to conditionally disable this decorator.
Unlike the @PerfLog decorator, here we’ll be using the Performance API instead of the Console API. The requirements are similar: provide a unique name with every call. We can use mark for point-in-time snapshots and measure to calculate a range of time between marks. Because setting up the tracking will be the same for every event hook, and because it’s quite tedious, we’ll abstract this into its own function.
function setupMethod(constructor: any, methodName: string) {
  const className = constructor.name
  const original = constructor.prototype[methodName]
  let index = 0

  constructor.prototype[methodName] = function(...args: any) {
    const _key = `${className}_${methodName}_${index++}`
    globalThis.performance.mark(_key)
    if(original) {
      original.apply(this, args)
    }
  }
}
Conveniently, the lifecycle hooks are void functions, so we don’t need to worry about return values. Note that we’re building a unique key using the class name, method name, and an incrementing index, so each call gets its own mark.
NOTE: this code never cleans up after itself by calling clearMarks, so it can absolutely cause memory leaks and as-is should never be left running for extended periods of time.
We can use this to finish setting up event hooks.
      setupMethod(target, 'ngOnInit')
      setupMethod(target, 'ngAfterContentInit')
      setupMethod(target, 'ngAfterViewInit')
      setupMethod(target, 'ngOnChanges')
      setupMethod(target, 'ngDoCheck')
      setupMethod(target, 'ngAfterContentChecked')
      setupMethod(target, 'ngAfterViewChecked')
This would be good enough for many uses, but we want to additionally measure various startup times for the component.
- init: component → ngOnInit
- contentInit: ngOnInit → afterContentInit
- viewInit: ngOnInit → afterViewInit
These measurements will show up in the browser performance graph and will help us understand the startup timing of the component. Unfortunately, this introduces a new wrinkle because we need consistent names for the marks we’re using to measure between. We’ll start by setting up the model and configuration.
export function AngularPerformance(enabled: boolean = true) {
  return function _ClassDecorator<T extends NgClassConstructor>(target: T) {
    if(enabled) {
      setupMethod(target, 'ngOnInit',
        { measurementName: 'init', markStart: 'constructor' })
      setupMethod(target, 'ngAfterContentInit',
        { measurementName: 'contentInit', markStart: 'ngOnInit' })
      setupMethod(target, 'ngAfterViewInit',
        { measurementName: 'viewInit', markStart: 'ngOnInit' })
      // no change to other event hooks
      globalThis.performance.mark(`${target.name}_constructor`)
    }
    return target
  }
}

type Measure = {
  measurementName: string
  markStart: string
}

function setupMethod(
  constructor: any,
  methodName: string,
  measurement?: Measure
) {
  constructor.prototype[methodName] = function(...args: any) {
    if(measurement) {
      // Handle measurements
    }
    // original code
  }
}
The new Measure type gives us a parameter to use for specifying what to measure. In addition to specifying the start and end points of the measurement, we need to create a mark for the constructor that we can measure from. In most contexts, we could wrap the constructor function to add this mark at either the beginning or the end of the constructor function, but this is not compatible with Angular due to the dependency injection that takes place. We’ll use the configuration of the decorator itself as a reasonable timing surrogate, as we can reasonably expect this to run just before the component is constructed.
With all of this configuration work done, now we need to perform the measurements.
      const perf = globalThis.performance
      const _start = `${className}_${measurement.markStart}`
      const _end = `${className}_${methodName}`
      perf.mark(_end)
      perf.measure(
        `${className}_${measurement.measurementName}_${index++}`,
        _start,
        _end,
      )
In each case, the end point of the measurement is the function being called, which allows us to specify the endpoint. Technically, marking this is a duplication since we already have another mark at this point, but it’s necessary so that we have a non-indexed mark that can be referenced by the next measurement. With this, we can put it all together for the final @AngularPerformance(enabled) implementation.
export function AngularPerformance(enabled: boolean = true) {
  return function _ClassDecorator<T extends NgClassConstructor>(target: T) {
    if(enabled) {
      setupMethod(target, 'ngOnInit',
        { measurementName: 'init', markStart: 'constructor' })
      setupMethod(target, 'ngAfterContentInit',
        { measurementName: 'contentInit', markStart: 'ngOnInit' })
      setupMethod(target, 'ngAfterViewInit',
        { measurementName: 'viewInit', markStart: 'ngOnInit' })
      setupMethod(target, 'ngOnChanges')
      setupMethod(target, 'ngDoCheck')
      setupMethod(target, 'ngAfterContentChecked')
      setupMethod(target, 'ngAfterViewChecked')
      globalThis.performance.mark(`${target.name}_constructor`)
    }
    return target
  }
}

interface NgClassConstructor {
  new(...args: any[]): {}
}

type Measure = {
  measurementName: string // measurement name
  markStart: string // method name
}

function setupMethod(
  constructor: any,
  methodName: string,
  measurement?: Measure
) {
  const perf = globalThis.performance
  const className = constructor.name
  const original = constructor.prototype[methodName]
  let index = 0

  constructor.prototype[methodName] = function(...args: any) {
    if(measurement) {
      const _start = `${className}_${measurement.markStart}`
      const _end = `${className}_${methodName}`
      perf.mark(_end)
      if(!perf.getEntriesByName(_start, 'mark')?.length){
        console.warn('Missing starting performance mark', _start)
        return
      } else if(!perf.getEntriesByName(_end, 'mark')?.length) {
        console.warn('Missing ending performance mark', _end)
        return
      }
      perf.measure(
        `${className}_${measurement.measurementName}_${index++}`,
        _start,
        _end,
      )
    }
    const _key = `${className}_${methodName}_${index++}`
    perf.mark(_key)
    if(original) {
      original.apply(this, args)
    }
  }
}
It’s important to note that this implementation will track lifecycle events even if we don’t have those events implemented within the Angular class, making it particularly useful compared to the longhand method of implementing this type of timing class-by-class and method-by-method.
iJS Newsletter
Join the JavaScript community and keep up with the latest news!
Conclusion
We’ve introduced TypeScript decorators, including getting started with instructions and concrete code examples. We’ve explored six unique use cases where decorators can remodel our code for a better living experience, and we’ve shown example code both with and without the decorators for emphasis. Please check out the full source code at GitHub and reach out to me here with any questions and to share your experience implementing these examples. Enjoy decorating!
🔍 Frequently Asked Questions (FAQ)
1. What are TypeScript decorators?
TypeScript decorators are runtime functions that attach behavior to classes, methods, or accessors in a declarative way. The article positions them as a way to add functionality without cluttering the core implementation of the code.
2. How are TypeScript decorators different from annotations?
The article explains that annotations are compile-time modifiers that provide metadata, while decorators run at runtime and can wrap or transform existing code. Although they may look similar syntactically, they serve different purposes.
3. Why use decorators in application code?
The article argues that decorators help declare behavior orthogonally, making code easier to read and maintain. Instead of embedding cross-cutting concerns directly into methods, developers can attach them with concise decorators such as @Memoize or @PerfLog.
4. How can decorators be used for memoization?
The article shows that a @Memoize method decorator can cache results based on method arguments and return cached values on repeated calls. This is useful when a function is stable, side-effect free, and expensive to recompute, such as Fibonacci calculations or repeated data fetches.
5. How can decorators help measure method performance?
A @PerfLog decorator can wrap a method with timing logic so that performance measurement is easy to add and remove. The article also notes that promise-returning methods need special handling so timing ends when the promise resolves rather than when it is first returned.
6. Can decorators simplify parameter handling?
Yes. The article uses @LogParams(level) to log argument values and @PassNull(match) to return null automatically when parameters meet configured null-matching rules. This keeps validation and logging concerns out of the main business logic.
7. How can decorators support persistence?
The article demonstrates an accessor decorator called @Persist that synchronizes a class property with localStorage. By decorating an accessor rather than a property, the implementation can intercept both reads and writes and preserve values across sessions.
8. Why is an accessor decorator used for persistence instead of a property decorator?
The article explicitly says property decorators cannot add behaviors or attach executable logic. Accessor decorators can wrap getter and setter functions, which makes them suitable for persistence scenarios like syncing values with localStorage.