Guards
Guards can be used to inform Angular applications about route changes. These are merely services with predefined methods that the router invokes at specific times. These methods can also intervene in the routing: their returned value determines whether the router is actually allowed to perform the requested route change. If the method can advertise its decision immediately, it returns a boolean. In order to delay the decision, it returns either an Observable<boolean> or a Promise<boolean>. Once the decision was made, it can notify the router via these mechanisms. This procedure is necessary if a Web API or the user has to be consulted in order to make a decision.
For different types of guards, Angular also defines different interfaces for implementation (Table 1).
| Interface | Method | Description |
|---|---|---|
| CanActivate | canActivate | Determines whether the desired route can be activated. |
| CanActivateChild | canActivateChild | Specifies whether or which child routes of a route may be activated. |
| CanLoad | canLoad | Specifies whether or which child routes of a route may be activated. |
| CanDeactivate | canDeactivate | Determines whether a route may be deactivated. |
Table 1: Interfaces for Guards
Looking at these interfaces, you can obviously tell how some types of cross-cutting concerns can be implemented with Guards. The following example serves to protect routes. If a user wants to activate a route that they do not have the permissions for, they will be sent back to the log-in page (Fig. 1).
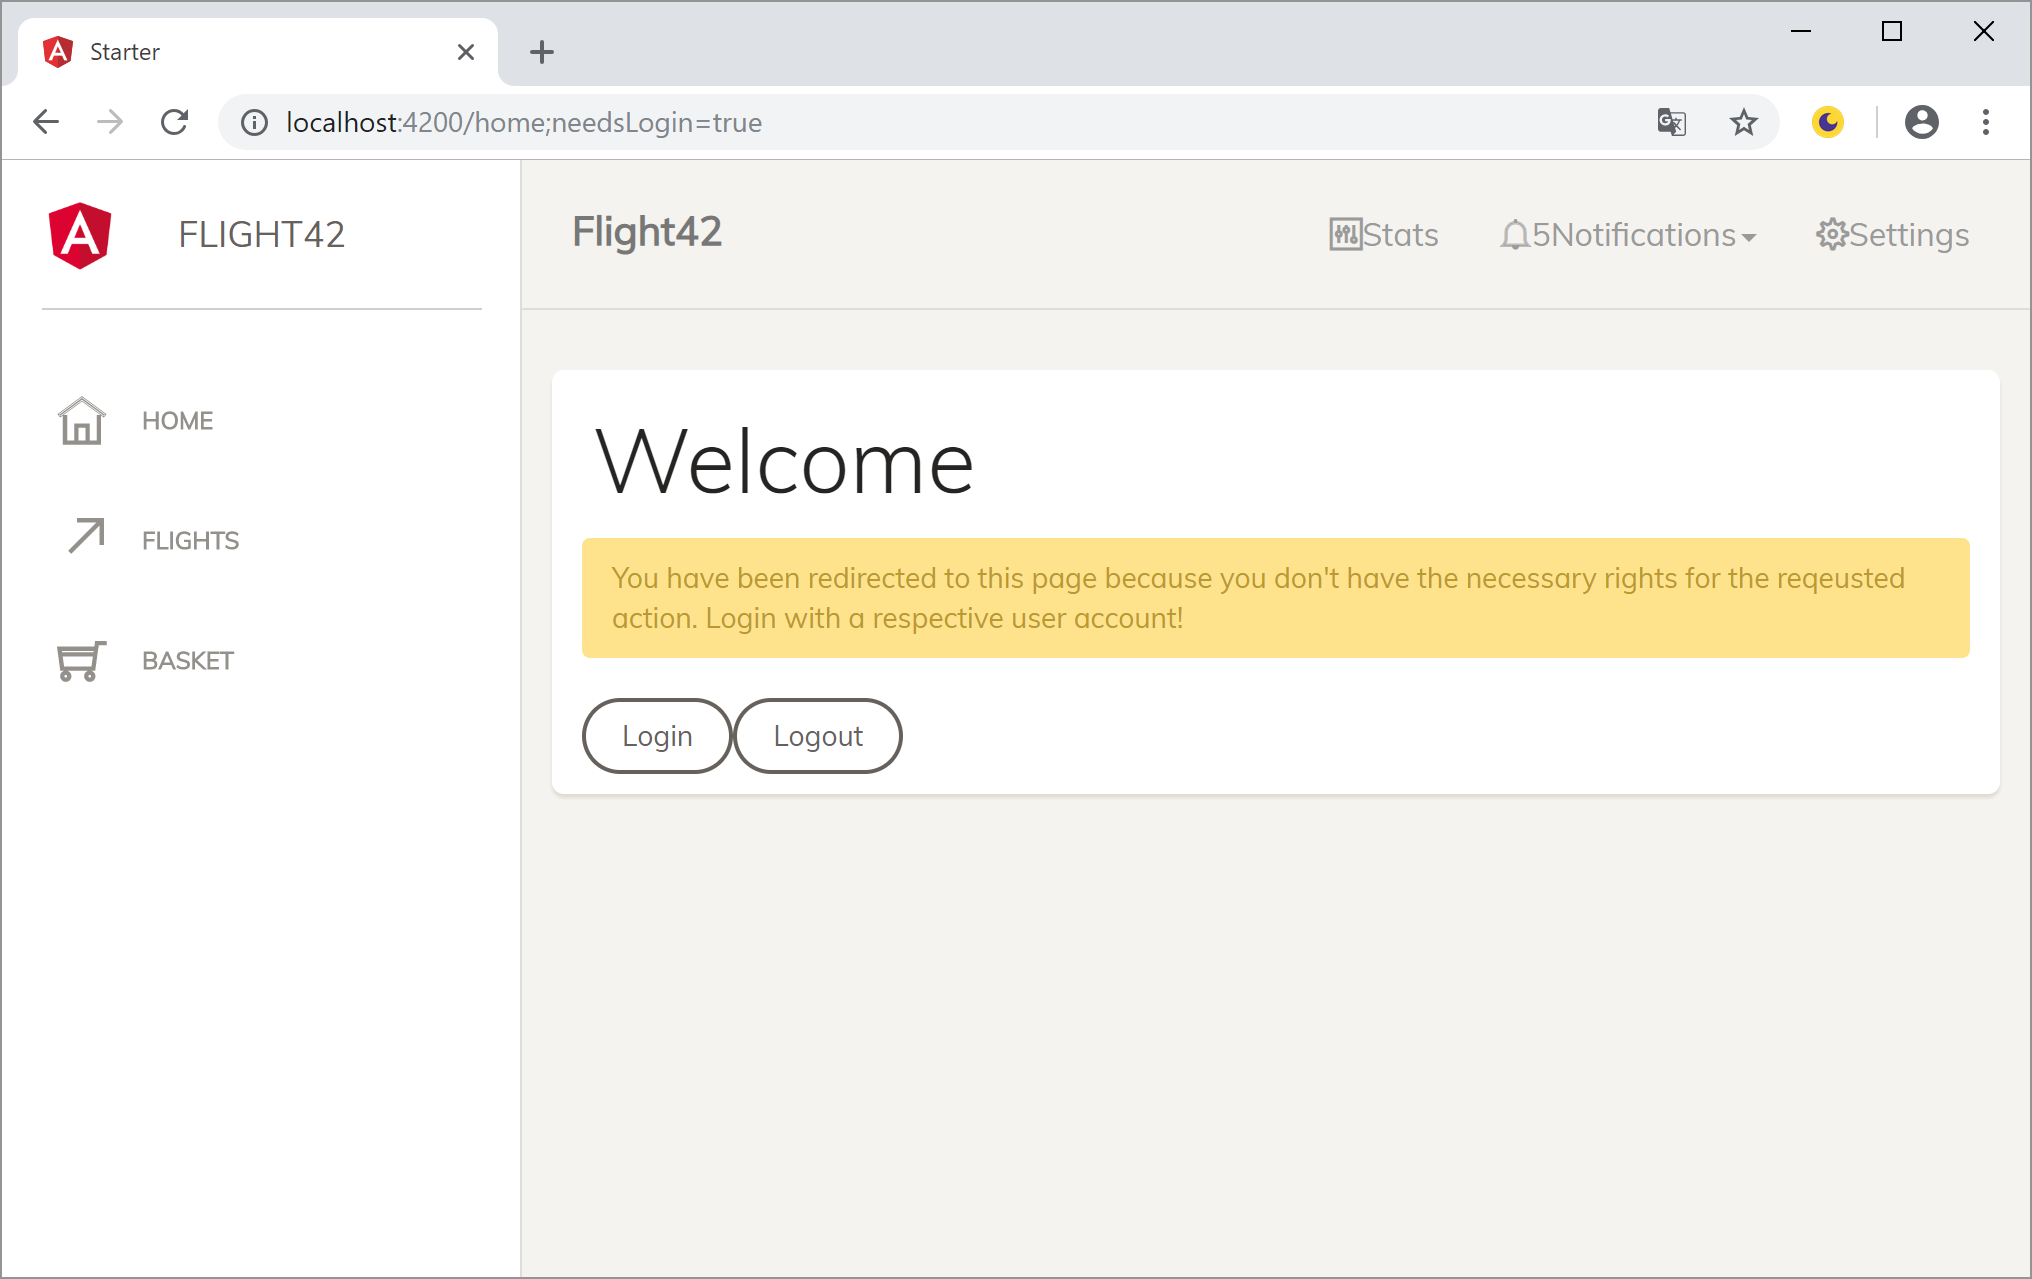
Fig. 1: Protecting routes with guards
This isn’t precisely for security purposes, especially since security is always realized in the backend with browser-based SPAs. Rather, it promotes user-friendliness, since the application can prompt the user to log-on if necessary. The guard is a simple service that implements the CanActivate type. In addition to the AuthService for logging on users, which is not described here for space reasons, it can also be injected into the router. That way, it forwards unauthorized users to another route (Listing 1).
@Injectable({ providedIn: 'root'})
export class AuthGuard implements CanActivate {
  constructor(private authService: AuthService, private router: Router) {
  }
  canActivate(route: ActivatedRouteSnapshot, state: RouterStateSnapshot): boolean
  {
    if (this.authService.isLoggedIn) {
      return true;
    }
    else {
      this.router.navigate(['/home', {needLogin: true}]);
      return false;
    }
  }
}
The method of the same name given by CanActivate receives an ActiveRouteSnapshot from the router, which informs about the desired route as well as a RouterStateSnapshot, which informs about the current route. It contacts the AuthService to find out if the current user is logged in. If so, it returns true and allows the desired activation. Otherwise, it forwards the user to the route “home” using the navigate method of the router. It passes a parameter that lets the underlying HomeComponent know that the user is stranded there due to missing authorizations.
To activate the guard for a route, it only has to refer to it with its canActivate property. canActivate is an array, so a route can be used for several of these guards (Listing 2).
const FLIGHT_BOOKING_ROUTES: Routes = [
  {
    path: '',
    component: FlightBookingComponent,
    children: [
      {
        path: 'flight-search',
        component: FlightSearchComponent
      },
      {
        path: 'passenger-search',
        component: PassengerSearchComponent,
        canActivate: [AuthGuard]

      },
      {
        path: 'flight-edit/:id',
        component: FlightEditComponent,
      }

    ]
  }
];
HTTP Interceptors
Angular’s HTTP Client offers an entry point with interceptors. Every provided interceptor can manipulate outgoing HTTP requests as well as incoming HTTP responses. This way, requests can be extended by authentication information, caching strategies can be implemented, and data formats such as XML or CSV can be processed. The idea behind these interceptors follows the pattern of the chain of responsibility (Fig. 2).
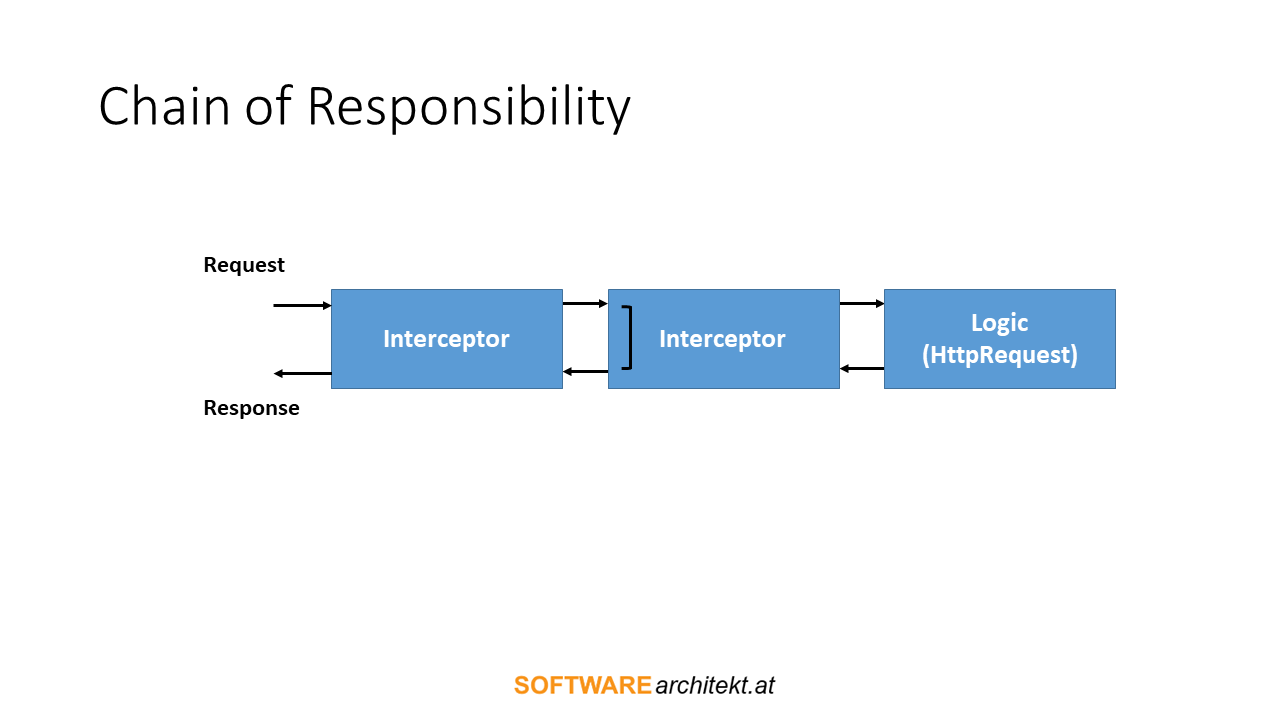
Fig. 2: Chain of Responsibility
It is part of the design of this pattern, that an action is extended with additional logics. The additional logics are stored in classes whose objects are combined to form a chain. The actual action is located at the end of this chain. Each of these objects takes care of its task and can delegate to the next chain link.
Listing 3 shows an example of an interceptor that adds an exemplary authorization header to each outgoing request .It also redirects the user to the home page if the response indicates a security error.
@Injectable()
export class AuthInterceptor implements HttpInterceptor {

  constructor(private router: Router) {
  }

  intercept(req: HttpRequest, next: HttpHandler): Observable<HttpEvent> {

    if (req.url.startsWith('http://www.angular.at')) {
      const headers = req.headers.set('Authorization', 'asfjsdfjjkjru==');
      req = req.clone({ headers });
    }

    return next.handle(req).pipe(
      catchError(resp => this.handleError(resp))
    );
  }

  handleError(resp: HttpErrorResponse): Observable<HttpEvent> {

    if (resp.status === 401 || resp.status === 403) {
      this.router.navigate(['/home', {needsLogin: true}]);
    }
    return throwError(resp);

  }
}
As the example above shows, interceptors are services that implement the HttpInterceptor interface. It only specifies the method intercept, to which Angular passes the current request and the next link in the chain. To pass control to it, the interceptor calls the next method. The result of this method is an observable with the HTTP response. This can be edited with the usual RxJS operators.
Before the interceptor extends the requests by an authorization header, it checks whether or not it is a trusted web API. In doing so, it ensures that trustworthy information doesn’t fall into the wrong hands.
It should also be noted that the API around the HttpClient works with immutables. This means that interceptors cannot change the headers list or the request. Instead, they have to clone these objects and modify them within this framework. For the headers, the method set takes care of this. Instead of changing the collection, it returns a copy with the additional header. At the request, the clone method is used for the same task.
For Angular to use the interceptor, the application must register it for the token HTTP_INTERCEPTORS (Listing 4).
@NgModule({
  imports: [
    CommonModule
  ],
  declarations: [
    CityPipe,
  ],
  exports: [
    CityPipe,
  ]
})
export class SharedModule {
  static forRoot(): ModuleWithProviders {
    return {
      ngModule: SharedModule,
      providers: [{
        provide: HTTP_INTERCEPTORS,
        useClass: AuthInterceptor,
        multi: true
      }]
    }
  }
}
The option multi is set to true to inform Angular that there may be multiple interceptors. All these form the chain mentioned above. The order of the registrations represents the order of the links within the chain.
Directives
Directives are like the little brothers of components. They add behavior to certain elements without displaying a template. They address the desired elements using CSS selectors. Directives can extend all elements of the application that have certain properties. This is why they are wonderfully suited for the implementation of cross-cutting concerns.
For demonstration purposes, an alternative to the click event intended for critical is shown below. At first, the alternative just issues a warning message; it only triggers the stored event handler if the warning message has been confirmed (Fig. 3).
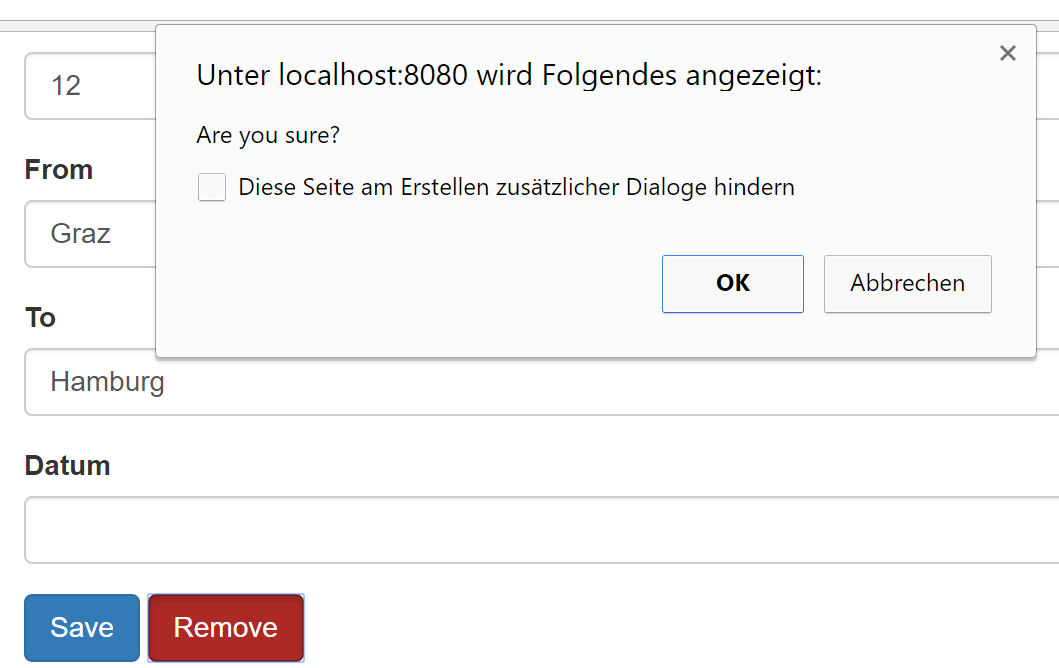
Fig. 3: Directive for critical actions
A directive is similar to a component: it is a class that can have bindings. Metadata must be provided through the decorator directive. This directive has almost all properties known from components; only template-related properties are missing, especially since directives do not have templates. These properties include template or templateUrl, styles or styleUrls, and viewProviders. The directive observed here uses a selector that addresses all elements with the flightClickWithWarning attribute. The use of camel case is just as common here as the use of a project-specific prefix. For the latter, the choice is again flight (Listing 5).
@Directive({
  selector: '[flightClickWithWarning]'
})
export class FlightClickWithWarningDirective implements OnInit {

  // Warning that is to be displayed
  @Input() warning: string = 'Are you sure?';

  // Event-Handler, to be executed after warning
  // is confirmed
  @Output() flightClickWithWarning = new EventEmitter();

  constructor(
    private elementRef: ElementRef,
    private renderer: RendererV2) {

      // elementRef: Reference to current element
      // renderer: Services for changing elements

  }

  ngOnInit() {
    // Warning: Direct DOM-Access!
    // this.elementRef.nativeElement.setAttribute('class', 'btn btn-danger');

    // Indirecter DOM-Access through renderer
    this.renderer.setAttribute(this.elementRef.nativeElement, 'class', 'btn btn-danger');
  }

  [...]
}
The name flightClickWithWarning is not only used for the selector, but also for the event that is called after a possible confirmation. This is a common proceedure, especially since it makes it possible to apply the directive to a component as well as to define a first binding at the same time:
<button (flightClickWithWarning)="remove()" [warning]="...">Remove</button>
The current ElementRef is injected in the directive. This is an object that references the current element. It is this element to which the directive was applied. In the case of the last example, it is the button element. To change the button, it can also be injected with the current renderer. Its use is demonstrated by the lifecycle hook ngOnInit. Its task is to add the classes btn and btn-danger to the button. These let it shine in an alarming red. Like the comment shows, this task could be accomplished by a directive without a renderer, as an ElementRef grants direct access to the underlying DOM element via its nativeElement property. However, this procedure only works if Angular is executed in the main thread of the browser in the classic fashion. For example, if Angular is executed on the server side in a native application or in a web worker, the DOM element is not available.
To manage this, Angular needs to provide every platform defines its own renderer. This takes care of the correct modification of elements, such as the addition of classes demonstrated in the case under consideration. In addition to modifying the addressed elements, directives often also have to handle their events. For example, the FlightClickWithWarningDirective has the task of responding to the click event. HostListeners are used to link an event with a method:
@HostListener('click', ['$event'])
  handleClick($event): void {
    if (confirm(this.warning)) {
      this.flightClickWithWarning.emit();
    }
  }
The HostListener used here executes the handleClick method for each click event of the addressed element. This method displays a warning dialog and triggers – if confirmed – the event flightClickWithWarning. Like components, directives can be declared via a module and made available to other modules via exports if desired.
Conclusion
Ideally, cross-cutting concerns are activated automatically without the program code having to trigger them over and over again. Guards make this possible during routing. They provide logics that take effect during the route transition and they can also prevent the route process. This can be used to implement authorization logic. On the other hand, HTTP interceptors become active with every HTTP call and can manipulate outgoing requests and incoming responses. They are used for transmitting authentication information, caching, or error handling. The directives are somewhat overshadowed by the components, but they allow additional behavior to be added to all elements of the application that have certain properties.
Links & Literature
[1] https://github.com/manfredsteyer/CrossCutting.git
Talks by Manfred at the iJS 2019 in London:
→ Web Components with Angular Elements: beyond the basics
→ Angular Workshop: Building Blocks and Best Practices for Modern Web Frontends