If you aren’t using a CI server yet, you should take a look at the advantages:
- Fast, automatic feedback for all code changes
- Reproducible build results through a neutral environment
- All changes can be made automatically available for testing by customer or department in a test environment
Originally, GitLab was created as a pure Git repository and it was later extended with an own CI server. The advantage of this integrated solution is quite obvious: GitLab is aware of changes that are occurring in the code and can then start a build directly. Therefore, the complex integration of a version management and a build server is not necessary.
GitLab follows the trend of versioning the build configuration together with the artifact to be built. The procedure described in this article can be transferred to other build servers due to the similarity of the mechanisms. GitLab CI expects a .gitlab-ci.yml file inside the project, in which the individual build steps are described in the YAML format. Storing the configuration in a file has the advantage that a different build configuration can be used for each branch. The rather simple syntax does not tempt you to design particularly complex builds that can hardly be adjusted outside the build server. Usually, the individual build steps are simple calls to shell scripts.
GitLab CI supports Docker images for running the build steps. This also answers the question as to how the build server can access the required tools, such as npm or Maven, and runtime environments, such as Node.js or a Java environment. In addition to the Docker container used for the build, GitLab CI can also start other service containers in order to provide the peripheral system for tests, such as a database or backend systems. The actual execution is carried out by so-called Runners. These build agents can be started on separate machines or in the cloud and communicate with GitLab CI via an API. This allows the build infrastructure to be easily scaled and adapted to the respective resource requirements.
GitLab CI pipeline
In GitLab CI, a build configuration describes a pipeline. The configuration format is YAML and it is segmented in so-called stages. The stages build, test, and deploy are defined by default. But there is also the possibility of custom stages. Jobs are defined within a stage. All jobs of a stage can be executed in parallel to improve performance.
Each job can define a script instruction to be executed within the job. Listing 1 shows such an example. If there are several instructions to be executed, they must be defined as an array below script. The individual steps are successively executed sequentially. The array syntax is also used in several places in the following listings.
Listing 1: Structural build of a GitLab CI pipeline with two jobs
job1:

 script: "execute-script-for-job1"


job2:

 script: "execute-script-for-job2"
Become part of our International JavaScript Community now!
LEARN MORE ABOUT iJS:
If a job is not assigned to a stage, the test stage is used by default. It’s also possible to execute a job, if the build is only for a branch or tag. This allows you, for example, to define specific release or deployment jobs. A regular expression can even be used to configure that jobs are only executed for tags or branches that correspond to a certain naming scheme. Commands that are executed before the actual script can be defined per job or globally as before_script. This could be, for example, a call to the dependency manager to download the required libraries. If a special Runner is required for the execution, it can be selected by using tags declared on the job.
The artifacts are the most important result of a job. Files or directories declared in this way are provided by GitLab CI in subsequent stages or can be downloaded as files for a specific build. Files and folders that aren’t declared as artifacts are not available in other jobs. Variables are another important element of builds. Variables can be used to parameterize builds and manage passwords externally.
Angular build with a GitLab pipeline
Angular projects can be built via webpack with npm as a dependency manger and Angular CLI as a build abstraction. This setup will also form the framework of our example. Once an Angular project has been created with Angular CLI, it is usually built with ng build. In a CI environment, dependencies have to be installed by npm. In newer npm versions, it is better to use npm ci instead of npm install, so that an exactly reproducible version resolution takes place. The build requires a Node.js environment and the Angular CLI tool. The easiest way to provide this environment for a build server is through appropriate Docker containers. For Angular, we use the trion/ng-cli image, which provides Node.js, npm, and the Angular CLI. There are also suitable images for tests, but more about this later.
In GitLab CI, a Docker container can be specified as a runtime environment for a job. To do so, merely the parameter image and a suitable Docker image are specified. If tags are needed to select a docker-capable Runner, then they must also be specified in the job. Listing 2 shows an example of an Angular job. Next to the actual build, the directory dist is declared as an artifact, which should be kept for up to one day. The dist directory is the result of an Angular CLI build and contains the finished application. Usually, this result is used for deployment in subsequent jobs.
If the project uses the freely available gitlab.com, one of the so-called shared Runners can be used for the CI Build. GitLab provides these Runners for general use. However, you should keep in mind that these Runners are shared by all other users, so you should not use sensitive data like private keys. In addition to these shared Runners, you can also use your own Runners regardless of whether you run GitLab yourself or use the hosted version. Every Runner can be marked with tags that indicate what abilities a particular Runner has. Tags can also be used to control on which Runner a job should be executed. In Listing 2, only Runners that have a Docker environment are selected.
Listing 2: GitLab CI „build“ job for Angular with Docker build container
build:

 stage: build

 image: trion/ng-cli

 before_script:

  - npm ci

 script:

  - ng build --prod

 artifacts:

  expire_in: 1 day

  paths:

   - dist/

 tags:

  - docker
Tests with Karma and Protractor
Angular has three levels of tests: Unit tests for pure TypeScript and JavaScript code, component tests for Angular Components, and the so-called end-to-end (E2E) tests for the entire application. Unit and component tests use Karma as the JavaScript runtime. Karma is based on the concept of using a real JavaScript environment from a browser. This is the only way to verify the actual behavior and identify potential errors. In a CI environment, there is usually no graphical user interface available to run a browser in it. This is why PhantomJS was often used in the past. However, this commonly led to the problem that bugs that occurred in real browsers weren’t found or that the reported bugs only occurred due to the use of PhantomJS. Newer browsers support a so-called headless mode in order to be started without a graphical user interface. In principle, this allows tests to be carried out in CI environments. Another variant is the use of a graphical user interface that renders into a frame buffer and can therefore be started in any environment. Both variants have their advantages and disadvantages, so that no general recommendation can be given for one of the variants. The use of a Docker container is a good option if you want to work with as little configuration effort as possible in both the Angular project and on the build server.
The trion/ng-cli-karma image has everything you need to run a Chrome browser with either Framebuffer or Headless and to run the Karma tests in it. An example of a corresponding job is shown in Listing 3.
Listing 3: GitLab CI job for Karma tests with Docker
variables:
  CLI_VERSION: 6.2.1

test:karma:
  stage: test
  image: trion/ng-cli-karma:${CLI_VERSION}
  allow_failure: false
  script:
  - ng test --progress false --watch false
  tags:
  - docker
Even more dependencies are needed for the E2E tests: Protractor is based on the WebDriver project, which in turn emerged from the Selenium project. WebDriver may require a Java runtime environment and, of course, a web browser that executes the commands from WebDriver. The additional Java dependency can be mapped with a Docker image, for example trion/ng-cli-e2e. If E2E tests are used in a project, the Docker image can be used in all places, since both the karma and the Angular CLI dependencies are included. An example of a test job with E2E tests can be found in Listing 4.
Listing 4: GitLab CI job for Protractor E2E tests with Docker
test:e2e:
  stage: test
  image: trion/ng-cli-e2e:${CLI_VERSION}
  allow_failure: false
  script:
  - ng e2e
  tags:
  - docker
Unlike Java applications, for example, Angular allows many steps to be parallelized. The tests do not require a separate artifact build. In GitLab CI, all jobs of a stage are executed in parallel, which enables a test stage to process all types of tests in parallel and thus provide fast feedback. Accordingly, the test execution examples have all defined the stage test.
Quality Metrics: code coverage
How well a software is tested can be approximated by the Code coverage metric. Code coverage specifies what percentage of the code has been tested. What sounds quite simple at first glance is relatively complex in practice: conditions and loops can make it necessary to test a part several times with different application states. A basic indicator is the simplest metric, namely how many lines of code are captured by tests. Both Angular CLI and GitLab CI support such an evaluation.
This transparency helps developers to estimate how the quality of an application develops over time. Especially when it comes to maintenance, high test coverage is indispensable, as it forms the safety net that enables us to carry out refactorings or extensions with high reliability. To determine the test coverage and communicate it to GitLab CI, the following steps must be taken:
- In conf.js, in the reports section, the text-summary must be added. The result is as follows: reports: [‘html’, ‘lcovonly’, ‘text-summary’ ],
- The parameter –code-coverage must be set during the test execution.
- GitLab CI must determine the test coverage by a regular expression from the output.
The complete build job can be seen in Listing 5. GitLab CI evaluates the test coverage and can then display it in the job and pipeline view, as shown in Figure 1. GitLab CI also provides URLs that can be used to retrieve badges in order to embed the build status and the test coverage in other web pages or in wiki documents. The URL structure is as follows: https://example.gitlab.com/<namespace>/<project>/badges/<branch>/coverage.svg

Fig. 1: Code coverage evaluation of Karma tests in GitLab CI.
Listing 5: Determination of test coverage and evaluation in GitLab CI
test:karma:
  stage: test
  image: trion/ng-cli-karma
  allow_failure: false
  script:
    - ng test --code-coverage --progress false --watch false
  coverage: '/Lines \W+: (\d+\.\d+)%.*/'
  artifacts:
    paths:
      - coverage/
  tags:
    - docker
Figure 2 shows a badge for the test coverage. The color of the badge changes from orange to red if the test coverage falls below certain thresholds. You can quickly get an impression of the state this way.

Fig. 2: Code coverage badge from GitLab CI for embedding in websites.
Static analysis with the Angular Linter
In addition to tests, static code analysis like in Java, .NET, or current PHP environments has proven itself in the TypeScript community. In static code analysis, a program examines source code on the basis of the code-structure and possibly existing type information. Thanks to TypeScript, Angular can avoid many errors in advance if the type system is used correctly. A classic example is the access to an incorrectly declared or incorrectly written property. The TypeScript Linter can be extended by plug-ins to better investigate angular-specifics, such as lifecycle hooks, and it is then comparable to FindBugs (or SpotBugs) in the Java environment.
Code smells, such as variable hiding or code style violations, are displayed to help identify and avoid potential maintenance problems at an early stage. The linter can be executed parallel to the tests. An example can be seen in Listing 6.
Listing 6: Using the Angular Linter in GitLab CI
test:nglint:
  stage: test
  image: trion/ng-cli:${CLI_VERSION}
  script:
  - ng lint
  tags:
  - docker
Depth analysis with SonarQube
In addition to linters, special tools for static analysis coupled with trend evaluation have been developed. This also allows quality limits to be defined, for example: “A commit must not worsen test coverage by more than 2 percent”. Even if the absolute coverage is still within an acceptable range, trend analyses can identify risks at an early stage and address them. One such tool is SonarQube, which is open source and available as a SaaS cloud solution. Since the setup would go beyond the scope of this article, it is assumed in the following that either a sonar instance is already available or the cloud solution is being used. The integration with the cloud solution is shown as an example in Listing 7.
Listing 7: Integration of SonarQube in GitLab CI
lint:sonar:
  stage: test
  image: trion/ng-cli:${CLI_VERSION}
  script:
  - npm install -g sonarqube-scanner
  - >
    sonar-scanner
    -Dsonar.projectKey=demo
    -Dsonar.organization=everflux-github
    -Dsonar.host.url=https://sonarcloud.io
    -Dsonar.login=covfefe
    -Dsonar.typescript.lcov.reportPaths=coverage/lcov/lcov.info
    -Dsonar.sourceEncoding=UTF-8
    -Dsonar.sources=src/app
    -Dsonar.exclusions=**/node_modules/**,**/*.spec.ts
    -Dsonar.tests=src/app
    -Dsonar.test.inclusions=**/*.spec.ts
SonarQube uses the results from other tools, such as Karma’s test coverage, and can evaluate them. In addition, SonarQube provides its own views to get an overview of all collected metrics (Fig. 3). Figure 4 also shows how SonarQube presents its own results; in this example, a redundant array initialization is noted.
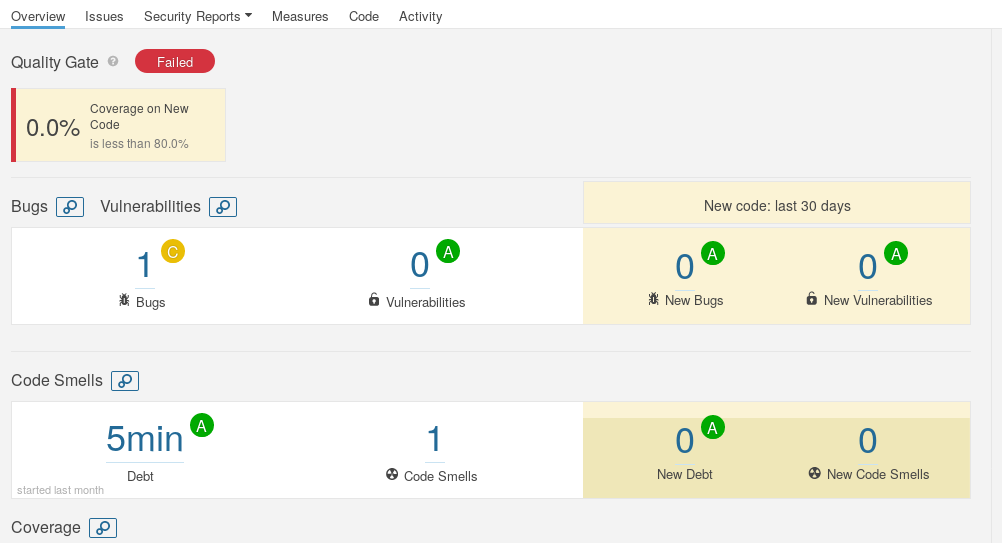
Fig. 3: Overview of all metrics collected by SonarQube.
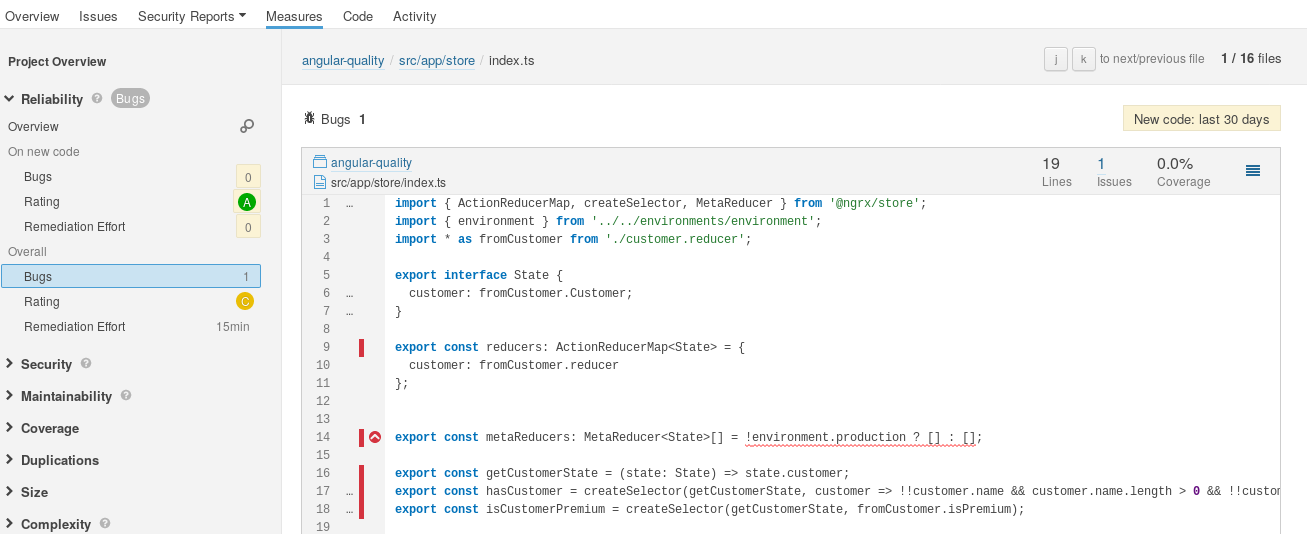
Fig. 4: Example for the reporting of a bug or code smell by SonarQube.
Deployment: From classic to cloud
Typically, a web server like nginx provides the user with a web application. Normally, at least two environments are operated: The productive live environment and a pre-production environment to perform manual testing and verifications. The deployment of the application into an environment as well as the build can be done from within the CI environment. The advantage of appropriate automation is obvious: fewer errors due to manual tasks and documentation of processes. The deployment itself can be solved in different ways. On the one hand, the build artifacts can be placed directly on the target server, e.g. via rsync. On the other hand, the application can be provided as a Docker container. The container can then simply be executed on the target server. The main advantage of the latter variant is that both the rollout and a possible rollback can be easily performed by a standardized, manageable unit. In addition, the deployment environment does not have to provide anything but a container runtime like Docker. Listing 8 shows the first variant, executed from within a CI job that itself runs in a minimal Alpine container. First, rsync is installed and subsequently the rsync-deployment takes place.
Listing 8: Application deployment by „rsync“ out of an Alpine container
deploy:
  image: alpine
  stage: deploy
  script:
    - apk add --no-cache rsync openssh
    - mkdir -p ~/.ssh
    - echo "$SSH_PRIVATE_KEY" >> ~/.ssh/id_dsa
    - chmod 600 ~/.ssh/id_dsa
    - echo -e "Host *\n\tStrictHostKeyChecking no\n\n" > ~/.ssh/config
    - rsync -rav --delete dist/ user@server:/web/path/
In the second approach, a Docker image is built (Listing 9) and then transported into a registry. With a suitable base image, the corresponding Dockerfile can be very minimalistic, as shown in Listing 10. The Dockerfile can then be exported from the registry to the target environment using any method, depending on which container orchestration is used. This can be a simple docker-compose, which in the simplest case is triggered by SSH from the build job, or a hook at the registry, which reacts to a push. It is also possible to use Kubernetes with an update of an associated deployment object. Since the Docker daemon typically cannot be used within GitLab CI jobs, even if the job is implemented within Docker, a Docker daemon is provided as an additional service to build the image (Listing 11). In this example, the image is deployed to Heroku, as described below.
Listing 9: A Docker Image is created with the application
variables:
  IMAGE: kakulty/angular-sample

build-image:
  stage: build-image
  image: docker
  before_script: []
  script:
    - docker build -t $IMAGE .
    - docker push $IMAGE
  tags:
    - docker
Listing 10: Example Dockerfile for Angular applications by using a base image
FROM trion/nginx-angular
COPY dist/ /usr/share/nginx/html/
Listing 11: Build job for Heroku deployment
variables:
  DIST_DIR: dist/angular-quality
  IMAGE: registry.heroku.com/angular-quality/web

deploy:
  stage: deploy
  image: docker:stable
  services:
  - docker:dind
  variables:
  DOCKER_HOST: tcp://docker:2375/
   DOCKER_DRIVER: overlay
  before_script: ['cd angular-quality']
  script:
  - docker build -t $IMAGE .
  - docker login --username=_ --password=$HEROKU_API_KEY registry.heroku.com
  - docker push $IMAGE
  - IMAGE_ID=$(docker inspect ${IMAGE} --format={{.Id}})
  - apk add curl
  - >
    curl -Ssl -X PATCH https://api.heroku.com/apps/angular-quality/formation
    -d "{ \"updates\": [ {
      \"type\": \"web\",
      \"docker_image\": \"${IMAGE_ID}\" } ] }"
    -H "Content-Type: application/json"
    -H "Authorization: Bearer ${HEROKU_API_KEY}"
    -H "Accept: application/vnd.heroku+json; version=3.docker-releases"
  tags:
  - docker
Deployment on Heroku with Docker
In order to make the examples easier to follow, Heroku is presented for the deployment via a Docker image. All you need to run a single Docker container is a free Heroku account. Simply create a new app. The name corresponds to the image to be deployed later. The API key required for deployment can be found at ACCOUNT SETTINGS. A special feature of Heroku is that the port to be used for the web server is not specified by Heroku until runtime. Accordingly, the environment variable Port is used to adjust the configuration of the nginx web server at startup. Listing 12 shows the corresponding Dockerfile. The default.conf configuration used for nginx is adjusted at startup with sed.
Listing 12: Dockerfile for nginx in Heroku environment
FROM trion/nginx-angular
COPY dist/angular-quality /usr/share/nginx/html/

CMD sed -i "s/listen 8080/listen ${PORT:-8080}/" /etc/nginx/conf.d/default.conf && exec nginx -g "daemon off;"
In order to deploy the image to production on Heroku, an API-Call against Herokus has to be performed. This can be compared to the approach in Kubernetes, where Kubernetes provides an API to manage deployments in a similar fashion. An API key is required for the build server to access the Heroku API. This should be created as secret and not as a variable in the build script, so that the value does not end up in the normal version control. The API can be called using curl, which is installed as a package in the Docker container for this purpose. Alternatively, a matching base image can be used.
Conclusion
Versioning a complete build pipeline together with the application is an established best practice and is supported by many CI servers. As can be seen from the example of GitLab CI, container technology makes it easy to specify builds in a comprehensible and reproducible way. Furthermore, the build configuration can be done dynamically in this way, e.g. per branch, and every change to the build configuration can be reviewed by other developers involved in the project, e.g. via pull request. A CI pipeline leads to more transparency in the development process and an increased sensitivity for good code quality through automatic tests and the collection of quality metrics.
If the CD (Continuous Deployment) shown in this article is not desired, but a release is only to take place at a defined point in time as a special release build, then this is also possible with a CI pipeline via Git tags. This is easy to implement as an extension of this article.
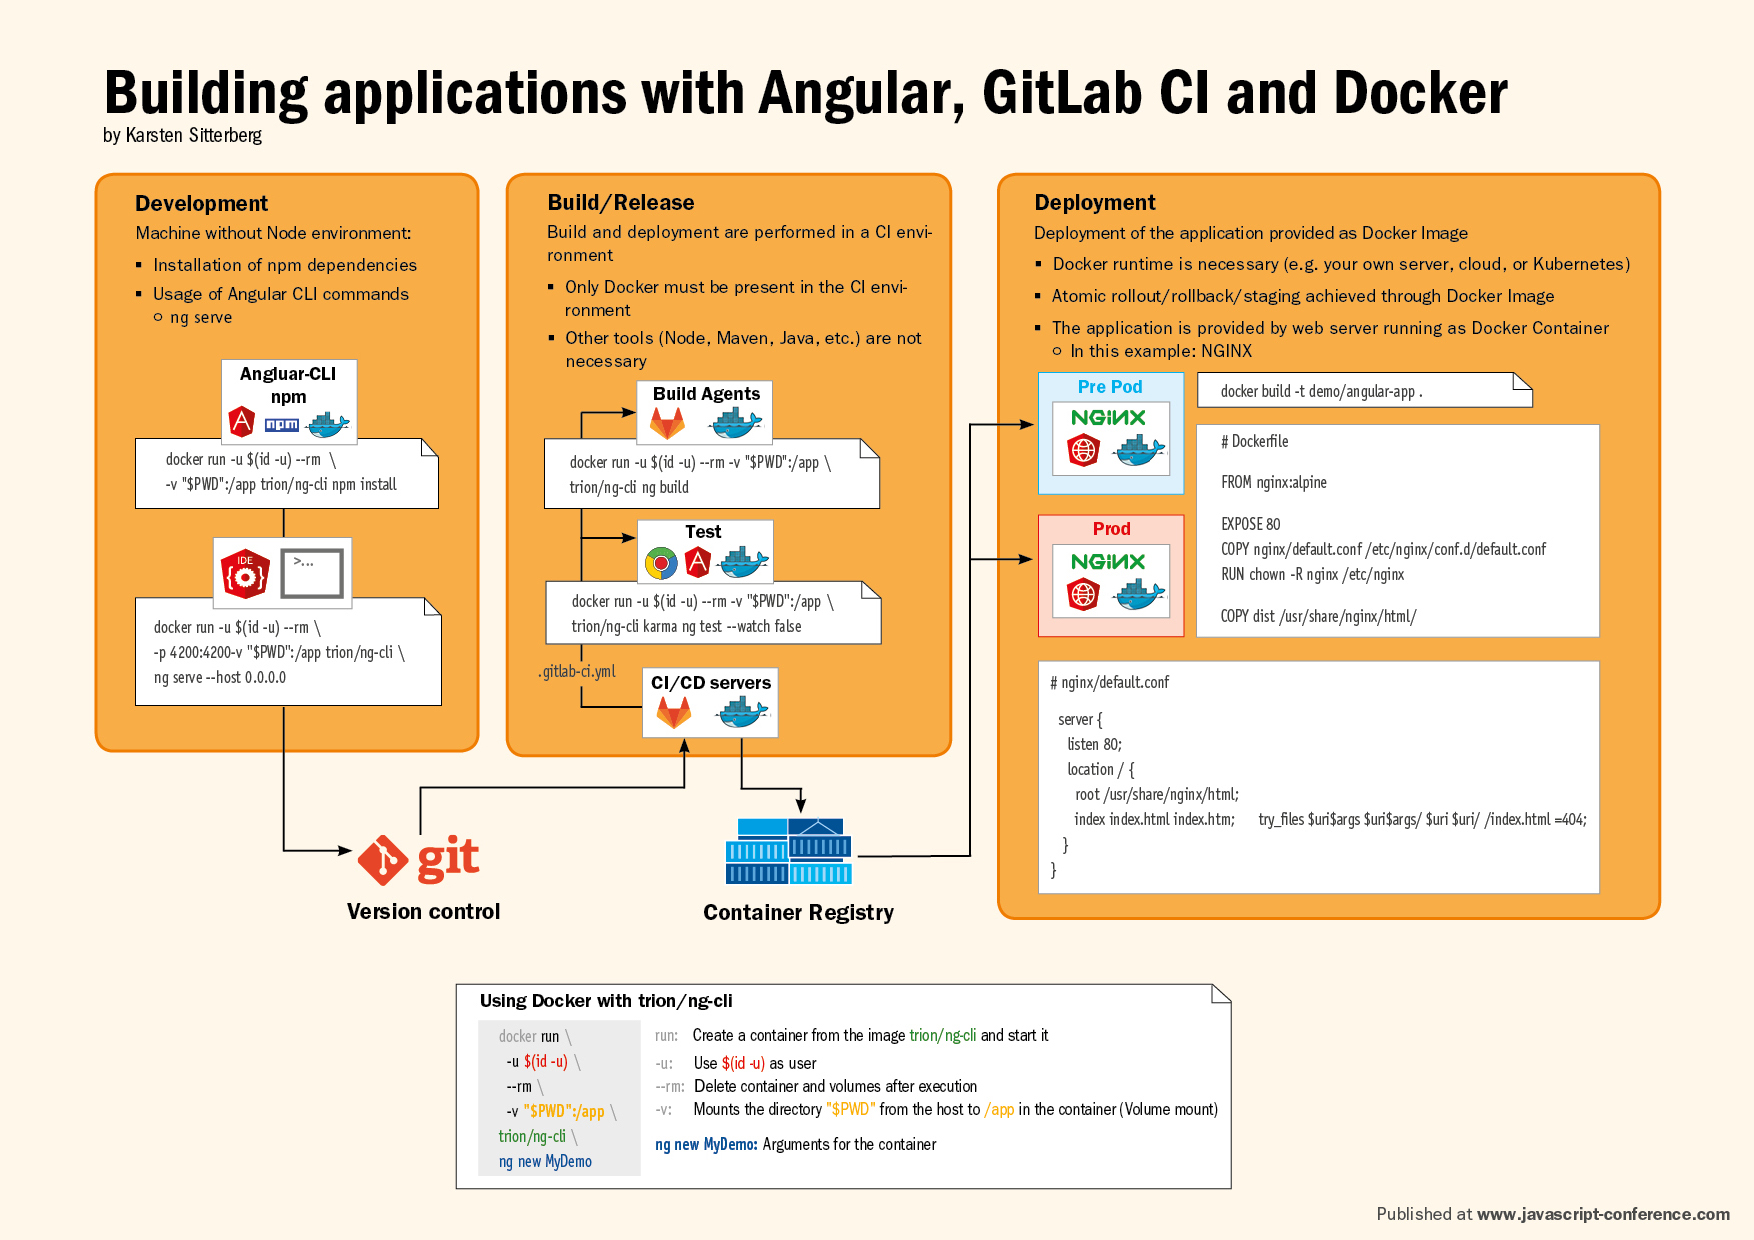
CI pipelines that are versioned with the application can not only be realized with GitLab, but also with other tools such as Jenkins with a Jenkinsfile. Docker also offers the advantages shown above for build, test, and deployment in this context. The concepts and connections shown here are visualized by the infographics on the following page.
A demo project for this article can be found on GitLab at https://gitlab.com/trion-development/frontend-quality.
Program Highlights of iJS London 2020
→ Taking your web app offline (in a good sense)
→ The journey of publishing a PWA to App Stores