In the early 2010s, when the author of these lines turned to JavaScript more as a hobby than as a serious business necessity, the language generally lived in browsers. The battles between Mozilla, Opera and Internet Explorer had made JavaScript engines faster and faster. This allowed code previously residing on the server and on a native client to be transferred to the cloud, eliminating the need for installation and keeping technically challenged users away from support hotlines.
At that time, the first frameworks were created, but at that time they were optimized for working with web-based content. Products such as Node.js and other runtimes could only be tested with great effort, if at all. The Jest developer team wants to do everything different with their framework. This starts with supporting services like Babel and Node, but also the frameworks Angular, React and Vue. Besides the announcement that tests can be set up with almost no configuration effort, they also promise that the isolation of the individual test tasks in their own threads will manage tests of very large codebases with very high performance. Last but not least, the product’s website at https://jestjs.io also emphasizes that a function called Snapshot makes comparisons of objects against reference templates with little effort. In short, there are a few things that developers might be happy about – so let’s take a look at the product.
A question of the execution environment
The documentation of the framework demonstrates the use of the product primarily using the Yarn working environment. Since we are working on Ubuntu 18.04 in the following steps, the installation can be accomplished by the familiar triad of adding a key, running a script, and downloading a package:
t@t18:~$ curl -sS https://dl.yarnpkg.com/debian/pubkey.gpg | sudo apt-keyadd -

t@t18:~$ echo "deb https://dl.yarnpkg.com/debian/ stable main" | sudo tee/etc/apt/sources.list.d/yarn.list

t@t18:~$ sudo apt-get update && sudo apt-get install yarn
Yarn is not only available under Linux. The development team of the working environment provides installation instructions for other operating systems under [1]. If you want to work with macOS or Windows, you don’t have to forgo the advantages. Yarn is based on the procedure of npm, which is known from Node.js. Analogously, we start with the creation of a new project, which should be placed in an empty subfolder:
tamhan@TAMHAN14:~/yarnspace$ yarn init

yarn init v1.13.0

question name (yarnspace): jesttest

question version (1.0.0):

. . .

success Saved package.json

Done in 7.82s.
Analogous to the example, you can generally acknowledge various requests by pressing Enter. The author of these lines at least decided to replace the folder name with a different project name. The next step is a call to the add command, which downloads and installs the test framework:
tamhan@TAMHAN14:~/yarnspace$ yarn add --dev jest

yarn add v1.17.3

. . .
In itself, this is not rocket science either. What is important is that the parameter dev must be passed. It tells the runtime that the resource to be created is a devDependency. This is a special regime of Yarn, in which the package in question is only made available during development. After the successful completion of the deployment process, the package.json file, which also exists in npm-based projects, is enriched with an additional reference to the test framework. You can check this by opening it in an editor of your choice. Leave the file open immediately, because you also have to create the passage from Listing 1 in the scripts section.
Listing 1

{

. . .

"devDependencies": {

"jest": "^24.1.0"

},

"scripts": {

"test": "jest"

}

}
In theory, Jest-based test processes can also be initiated from the command line. However, practice teaches that unit test processes are most consistently executed when they generate minimal to non-existent effort for the developer. A nice way to ensure speed is to integrate Jest into the Yarn workflow. The test process is then activated in the same way as all other commands of the package manager; thanks to the parallelization of execution, the total execution time should also be comparatively short. With this we have finished the work for now and can start testing.
A first dry run
Provided you saved the package.json file after entering the script block, we are ready to process it in theory. Return to the command line and command a first test run by entering yarn test. This will fail with the error message shown in Figure 1.
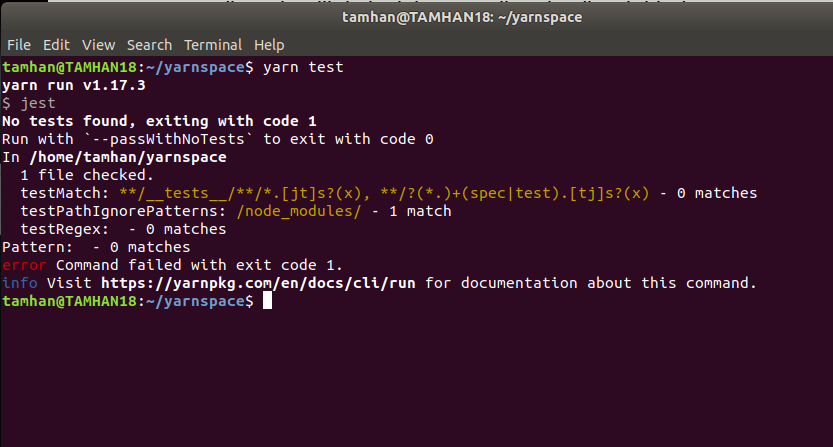
If you don’t configure Jest further – as in the file package.json – the file grabber function included in the framework is activated automatically. It uses the RegEx string highlighted in ochre in Figure 1 to search all files belonging to the project. Unfortunately, our program does not find any such files at the time of our work. The subfolder that contains the modules used by Node.js is excluded.
What makes a good demonstration case for a unit test framework has always been a matter of debate. In the following steps I want to create a file named tam.js which should be located in the root directory of the jest process. Open it in a JavaScript editor of your choice and start by inserting the three methods as shown in Listing 2.
Listing 2

function sayHello()

{

return "Hello";

}

function add(a, b)

{

return a+b;

}

function divide(a,b)

{

return a/b;

}

module.exports = sayHello;
In addition to the popular string return, there are also two functions that perform mathematical operations. This is an important and thankless task, especially in the world of JavaScript – the language standard knows no way to distinguish fixed point numbers from natural numbers. In practice, therefore, you always have the problem of how exactly you want to compare numbers. Whether 8.88888 and 8.88889 are identical is subject for discussion. Incidentally, it should be noted here that the scope of numerical comparison functions is an excellent tool for checking the quality and ease of use of a JavaScript test framework.
Save tam.js afterwards at the level of the package.json file. Unfortunately, we have not yet completely reached our goal. For a successful run of Yarn test, we still need a test file, whose name must be structured according to the formula **/__tests__/**/*.[jt]s?(x),**/?(*.)+(spec|test).[tj]s?(x). Therefore, in the following steps we want to set to the file tam.test.js, which we place next to tam.js and furnish with the following content:
const tam = require('./tam');
test(‘Checks if Tam is friendly’, () => {
expect(tam()).toBe(“Hello”);
});
If you have worked with other JavaScript test frameworks in the past, you will generally find familiar things here. The test cases intended for everything else must also be available in the global namespace of the file; the test function includes a descriptive string as well as a function pointer that handles the actual task to be performed. The test function then contains various matchers that are used to check the correctness of the information returned by the test code against the constants to be provided by the developer.
Interestingly, the test logic is now loaded into the file via the Require function. This is an adaptation to the other procedures within the Yarn documentation: Since the framework is intended exclusively for object-oriented use, almost all examples are based on Require. In practice, however, there is nothing to prevent the logic from being brought into the scope of the test file in a different way. At this point we can again enter yarn test to command a first test run of the code:
tamhan@TAMHAN14:~/yarnspace$ yarn test

yarn run v1.13.0

$ jest

PASS  ./tam.test.js
A careful look at the command line output shows us that the yarn test command starts the runner included in the jest execution environment in the first step. It then calls jest at command line level to release the actual test framework. Since the condition declared in the file tam.test.js is fulfilled by the function, the parameter Pass is output. The output error Command failed with exit code 1. is missing without substitution. A script acting as caller would receive the return value 0 at this point.
Next, I would like to take a closer look at the problems with floating-point arithmetic mentioned above. Since our Jest code is based on the module pattern, we have to return to tam.js in the first step and expose the addition and division functions as well:
module.exports.add = add;

module.exports.divide = divide;
The next step is two unit tests, which check the correct division and correct addition. For the sake of humor, the author has determined the comparison values with his TI-84, whose accuracy is a bit limited due to a client:
const tam = require('./tam');

test('Checks if we can add', () => {

expect(tam.add(2,2)).toBe(4);

});
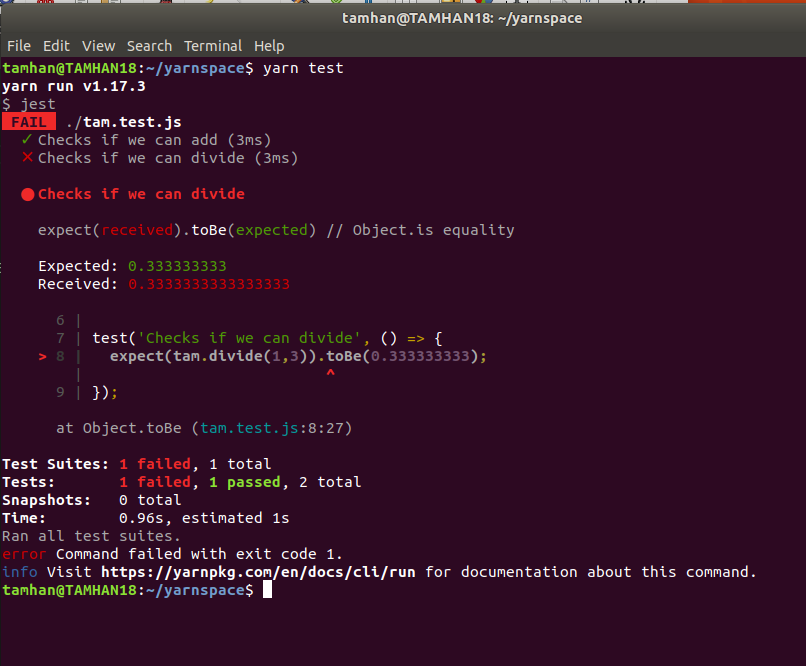
test(‘Checks if we can divide’, () => {
expect(tam.divide(1,3)).toBe(0.333333333);
});
Of particular interest is that the addition function works with natural numbers. Instead, the division method must make do with floating point numbers, which increases or complicates the accuracy requirements. To check the situation, we want to enable another compilation run at this point, which fails with the error shown in Figure 2.
The theoretical solution to the problem is to subtract the target value from the reference value. If the absolute amount of the difference is then determined, it is possible to estimate to a certain extent whether the routine is working correctly. This process quickly becomes a work in progress, which is why the test development team provides a special matcher for floating point comparisons. Using it, our test case looks like this:
test('Checks if we can divide', () => {

expect(tam.divide(1,3)).toBeCloseTo(0.333333333);

});
If we save the file tam.test.js and release the test case library for execution again, we find that now everything works without problems. If you wish, the manager will also take over an additional parameter, which you can use to specify the accuracy to be applied in the comparison. If you are particularly interested in the mathematical processes behind this, you can find advice and help in the StackOverflow discussion under [2].
A question of process control
Unit tests should – at least according to the original definition – be more or less stand-alone test cases. In practice, the development team quickly realized that it is advisable to integrate the individual test cases into a kind of life cycle. Behind this idea, which at first glance sounds complicated, is the concept that the test class can, for example, create resources or allocate memory as part of its initialization and/or deduction. The purpose of this approach is not only to significantly speed up test execution by reducing the electronic load, but also to shorten the code contained in the individual test cases and thus make them more transparent.
If your test cases are closely related to the underlying resources, it is recommended that you perform the removal and creation for each test condition separately. In this case, you use the beforeEach and afterEach method pair:
beforeEach(() => {

initializeCityDatabase();

});
afterEach(() => {
clearCityDatabase();
});
In practice, there are also situations where a broader scope of resources is quite sufficient. In such cases we can use the beforeAll and afterAll methods instead. Initialization and removal then occur less frequently, which reduces resource consumption:
beforeAll(() => {

return initializeCityDatabase();

});
afterAll(() => {
return clearCityDatabase();
});
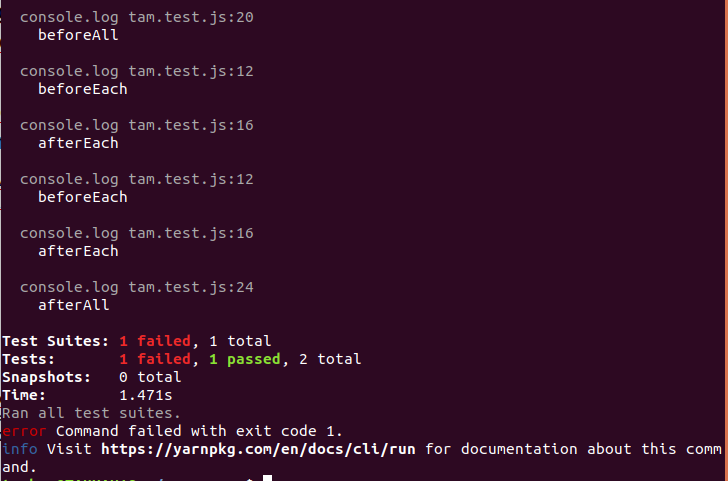
In the interest of a better visualization of the resume, we want to add the four methods to our test file in the next step. Since we run our program in the console window anyway, we can command the output of status information according to the following scheme. For space reasons, we only print the body of the method afterAll here – the other three methods should be parameterized in the same way (except for the use of other strings):
afterAll(() => {

console.log("afterAll");

});
The reward for execution is the list of expenses shown in Figure 3. The Jest Runner collects the console output during program execution and then outputs it in bulk under the status information. Also note that the development team is constantly adjusting the behavior of console.log. The discussion in [3] should be a favorite in your browser if your test cases often write data to the command line.
Another very interesting aspect in this context is the possibility to mark a test as “standalone” by calling test.only. If the framework finds a corresponding method, it ignores all other test cases. As an example we want to include the following structure in the file tam.test.js:
test.only('this will be the only test that runs',

() => {

expect(true).toBe(false);

});
If you command the execution of this file, you will see the result shown in figure 4.

test.only” deactivates all other test casesJest parses all files before the execution of the test battery starts. A test marked as only disables all ordinary test sets, and results in skipped status messages on the screen. The short-term separation of test cases is especially worthwhile if your project includes a comparatively extensive test suite. In this way, a newly added feature can be checked in a focused manner without losing much time executing the test battery. For the sake of completeness, however, it should be noted that this approach naturally increases the probability of regressions and other accidentally caused errors.
Object-oriented analysis
Object-oriented programming and JavaScript were long considered a very unfavorable combination. This was partly due to the fact that the language specification only provided for OOP to a very limited extent and had to be forced to emulate OOP through various design patterns. The book published by Addy Osmani stood out from the crowd at this point in that it significantly increased the popularity of such emulation approaches. Today there is hardly a developer who does not have these design patterns in mind and automatically applies them in his daily work. In addition, new versions of ECMAScript brought convenient methods and syntactic sugar that make it easier for developers to implement classes. However, this also creates a new situation for test frameworks. Classical comparisons of object contents are complicated in that the use of the == operator fails. The == operator only returns True if both variables refer to the same object instance (not just to an identical object). If you want to compare objects on member level, the only way to do so was to use manual comparison logic.
The most important feature of Jest are the snapshots presented in the introduction. A snapshot is – roughly speaking – a description of an object, which names the attributes relevant for a comparison and also provides the target values. The comparison engine implemented in Jest can apply this to an object instance supplied by the code to ensure the presence or correctness of the attributes contained in the object. What sounds immensely complicated at first glance proves to be immensely valuable in practice. The snapshots have the property of being much shorter than a selection built by hand based on If, Else and co.
A particularly nice aspect of the implementation is that the creation of the structures is done by the framework to a certain extent. In the first step we start by creating the following test case in a new test file. For the sake of convenience, it is recommended at this point that you save the file you have used so far. Its execution would only cause additional clutter on the screen:
it('is a small test', () => {

const user = {

createdAt: new Date(),

id: Math.floor(Math.random() * 20),

name: 'Tam HANNA',

};
expect(user).toMatchSnapshot();
});
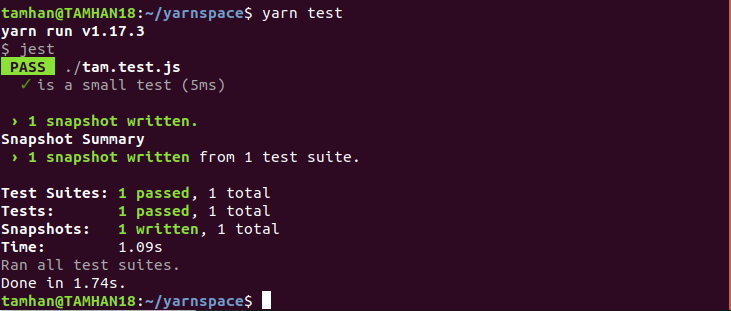
Technically, it’s not witchcraft. We create an object consisting of three values. Besides a date, we also assign a fixed name and an at least pseudo-random number. Then we call the function toMatchSnapshot, a matcher, which should compare the object instance with a snapshot. Thinking readers ask themselves when executing this test case where the test framework should get the data needed for comparison. The answer can be found in the command line, where we get the result shown in Figure 5 when we execute the command for the first time.
In the next step we look for the __snapshots__ folder, where we find a file named tam.test.js.snap. Its content looks like this at the beginning. Don’t be surprised if the random results appearing on your workstation look slightly different:
exports[`is a small test 1`] = `

Object {

"createdAt": 2019-08-12T00:40:13.198Z,

"id": 10,

"name": "Tam HANNA",

}

`;
For fun, it is a good idea to add one or two more runs of the test suite at this point. Jest finds a snapshot file and compares it with the values in the newly generated instance. Because of the randomness of the comparison, it is very likely that this comparison will fail – all attributes are automatically compared one to one.
As convenient as it would be to create snapshot files automatically and edit them manually, it is unproductive in practice. Imagine that developer A makes extensive changes in the file and developer B adds additional attributes some time later, which sooner or later leads to inconsistencies in the existing codebase. Jest avoids this problem in that the information in the test case definition always takes over the primary role.
The matcher previously used to compare normal values can also be applied to object attributes. Open the test file again, and replace the code in it with that from Listing 3.
Listing 3

it('is a small test', () => {

const user = {

createdAt: new Date(),

id: Math.floor(Math.random() * 20),

name: 'Tam HANNA',

};
expect(user).toMatchSnapshot({
createdAt: expect.any(Date),
id: expect.any(Number),
});
});
The two attributes createdAt and id are now checked by the matcher expect.any It takes a type parameter instead of a specific value and accepts all values at runtime that match the data type of the parameter supplied.
Of course you may also use other matcher to perform specific value comparisons. Parameters not equipped with a specific matcher still seem to perform a 1:1 check.
If you execute the code at this point, you will again get an error. The reason for this is that Jest, for performance reasons, does not check whether the snapshot is up to date for existing objects. Therefore, we have to approve an update of the snapshot files by hand in the first step:
tamhan@TAMHAN18:~/yarnspace$ yarn test -u

yarn run v1.17.3

$ jest -u

. . .

Test Suites: 1 passed, 1 total

Tests:       1 passed, 1 total

Snapshots:   1 updated, 1 total
The effects of this can be analyzed by opening the file tam.test.js.snap again in a text editor of your choice. You should now see something that looks like this:
exports[`is a small test 1`] = `

Object {

"createdAt": Any,

"id": Any,

"name": "Tam HANNA",

}

`;
After successfully updating the snapshot file, you can perform several test runs. Since both the number and the date always have the same data type, there should be no more errors in the execution of the test code from now on.
And now asynchronously
While the functions realized so far – with additional effort – could also be implemented manually, classic JavaScript test frameworks show massive problems at the latest when performing test operations against asynchronous code. The reason for this is that the test runner usually does not provide a method to make the execution wait for the result of the asynchronous task.
Because of his late birth, Jest is also able to provide a workaround for developers at this point. As a first small example, let’s take a look at the following test case, which implements a primitive asynchronous operation:
test('the data is peanut butter', done => {

function callback(data) {

expect(data).toBe('peanut butter');

done();

}
fetchData(callback);
});
Using the done argument instead of the normal function pointer informs the runtime that the code executed under this test case is asynchronous. As a result, Jest waits some time during execution of the test case to see if the done callback is called. If this happens, the test is considered to be completed, if the message is missing during the waiting period (not mentioned in the documentation), the test is considered to have failed.
Those who work with promises will find a more convenient way to process the return value directly. As an example, we will again start with the function fetchData(), which now returns a promise:
test('the data is peanut butter', () => {

return fetchData().then(data => {

expect(data).toBe('peanut butter');

});

});
It is interesting that test cases can also be parameterized to failing promises. The code required for this looks like this:
test('the fetch fails with an error', () => {

expect.assertions(1);

return fetchData().catch(e => expect(e).toMatch('error'));

});
At this point we have to end our considerations about Jest – if only for reasons of space. The documentation [4] contains a detailed discussion of the asynchronous test processes – there is hardly a test case that Jest does not cover.
Is it worthwhile?
There is no question that the support functions included in Jest provide a very comfortable working experience. Those who use asynchronous code or deal with objects save a lot of time when using the framework intelligently.
However, whether or not one should change an existing project is a much more difficult question. First, rewriting unit tests is a very thankless task, second, you always have to check if the development team is willing to accept the changes to the test case API…
Tam Hanna has been involved in the programming and application of handheld computers since the time of the Palm IIIc. He develops programs for various platforms, runs online news services on the subject and is available for questions, training and lectures at [email protected].
Links & Literature
[1] https://yarnpkg.com/lang/en/docs/install/
[2] https://stackoverflow.com/questions/50896753/jest-tobeclosetos-precision-not-working-as-expected
[3] https://github.com/facebook/jest/issues/2441
[4] https://jestjs.io/docs/en/asynchronous.html