
The success of the React library is partly due to its performance, which outshines its competitors. There is also an ecosystem developed around React that even allows for the most extensive applications to be implemented. Here, on the following pages, you will learn how you can structure your frontend with React, what secrets the library holds and what kind of changes will result from the new development of React’s core.
The first steps
Before you start working with React, you should have a working development environment, in which you can experiment with the framework and implement your own applications. Admittedly, React makes this task quite easy. As is the case with many other things, there is a starting tool for React. It is called the Create React App and it is implemented as a node package, while it also has been developed as an open-source project within the framework of the Facebook Incubator.
So, everything you need to work with React is an installation of Node.js on your system. You can either download the Node.js platform as an installer package or instead install it via your systems package manager. Dependencies you handle by either using the Node package manager, which is included in Node.js, or the manager Yarn, developed by Facebook. Both of these tools access the npm repository and only do differ so slightly in their use and internal mechanism. With the control command yarn add –g crate-app you are installing the control command line tool on your system. The control command create-react-app todo-list generates a new subfolder named todo-list for you, in the current directory. This now contains a new and fully functional React application (Fig.1).
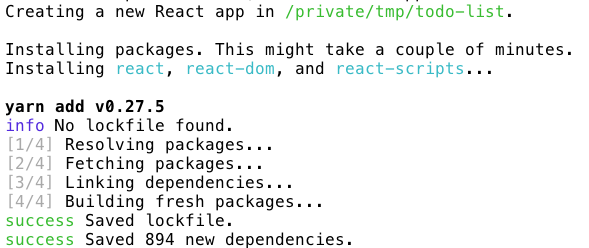
The command line tool installs all necessary dependencies like React itself, the ReactDOM package and also the react-script auxiliary package. Furthermore, the structure of the project is also generated. This structure consists of the common configuration files within the root directory, such as .gitignore-file, the package.json-file, README.md and the yarn.lock-file. The public-directory contains index.html to access the application. And the actual application is located in the src-directory of the application. This will also be the place, where you’ll spend most of your development time.
The application created by the command line tool utilizes webpack as a bundler and Babel as a JavaScript compiler platform. Webpack ensures that the application can be easily split into many smaller files for development, which can be combined into a few files for release. In addition, webpack provides you with the dev-server, an infrastructure for development. The dev-server works like a web server which delivers your React application. Changes to the application files are detected and the application is rebuilt accordingly and reloaded in the browser, so that the changes are immediately visible. The Babel compiler helps to translate React-specific syntax elements and enables the use of the ECMAScript module system to manage dependencies.
The react-scripts package installed during setup provides a number of scripts which further facilitate handling the application. With the control command yarn start you start the webpack-dev-server for the development business. The yarn build control command creates a package from your application, which you can use for the production operation.
A short introduction
Now take a look at the index.js-file within the src-folder and you will notice the first special feature of React at the penultimate line. Calling ReactDOM.render ensures that the application is included in the specified DOM node. ReactDOM is a renderer for React. This renderer can be exchanged, depending on the environment, so that a React application cannot only be rendered in the browser, but also server-side or native, on mobile devices.
For React, the creation of a graphical user interface of a web application is a declarative approach. You use JSX, a syntax extension developed especially for React, to describe the structure of your frontend. JSX breaks with the established pattern of strict separation between markup and application logic. In the case of React, the structure and parts of the JavaScript source code are merged again, primarily for performance reasons. Listing 1 shows you how to use a simple component in React.
import React from 'react';
import ReactDOM from 'react-dom';

function App() {
  return <div>Hello World!</div>;
}

ReactDOM.render(<App />, document.getElementById('root'));
Like every web application, a React application consists of a tree of DOM nodes. In addition to the DOM nodes, you can also define components yourself in React. This is a structure which receives properties, and returns a structure of elements. What sounds quite abstract at first proves to be a very helpful construct during the development, in order to model even complex frontends. Components are reusable modules which make up an application. The properties that are transferred to such a component are called props. Usually these function arguments should not be changed by the function, in this case by the component. The props can be used to pass information from the parent nodes to their child nodes through the tree.
For a better differentiation between DOM nodes and components, it has become common practice to start the names of components with a capital letter and those of DOM nodes with a small one. Since JSX is case sensitive, you must observe the notation, otherwise you will get a compiler error.
There are several ways to define components in React and the simplest variant is the creation of functional components.
Functional components
A functional component consists of a named function, which returns a tree of elements. An element represents a concrete instance of a DOM node or a component. This means that components can be nested in DOM nodes and vice versa to define the structure of the frontend. Listing 2 contains another example of a functional component.
function FormattedDate(props) {
  return (
    <h2>
    It is {props.date.toLocaleTimeString()}.
    </h2>
  );
}
If the component is included, attributes can be set within the component tag. These are available as props within the component. The fact that you can specify any JavaScript expression within JSX structures provides an additional flexibility. You only have to put them in braces. This way, it is possible to identify loops and conditions. You can also assign JavaScript variables to JSX elements and address them within your component.
Class Components
The advantage of functional components is that they are lightweight. However, this fact also bears a disadvantage: they have no status. This statement can also answer the question about the respective field of application. You can define your components as functional as long as they do not have their own status. However, if you need to provide information, which affects the display of the component, you should use class components. In Listing 3 you can find an example of such class components.
class Profile extends React.Component {
  constructor(props) {
    super(props);
    ...
  }

  componentDidMount() {
    ...
  }

  render() {
    return (...);
  }
}
A class component is derived from React.Component. The basic constructor and a number of methods originate from this base class. The most important differences to functional components are that you can store routines in separate methods in a class component and that the class component has its own status. Additionally, you can also define various lifecycle hooks. For example, the ComponentWillReceiveProps-method is called when the component receives new props. The status of a component, often referred to as a State, consists of information which is only available to the component and is managed by it itself
In contrast to the props, the state of the component can be changed during the runtime. Initially, the state is defined in the constructor of the component. Here, the status property is directly accessed. In the later stages of the components lifecycle, the status can still be read directly. However, write changes must be made by using the setState-method of the component. This ensures that the renderers updater is notified of the change and can also update the display. There are a few points to consider when using the setState-method. You can commit both a function and an object to the method. In the case of an object, the properties of the transferred object are merged with the current state-object of the component. This means that you do not always have to commit the complete state-object, but only the properties which you want to change.
The way React handles status manipulations is optimized, which can lead to problems. The calls to setState are queued into a waiting line and are then applied, if it should be necessary. If a state-update depends on the previous state, then this can lead to problems with collected updates, since two updates follow one another immediately. And the state may not yet be updated in the component. A better solution in this case is to use a function when calling setState. This state-update function receives the previous state and the update as arguments, so that the correct manipulation can be ensured here.
Events
The data flow in a React application always happens from the parent elements in direction to their child elements. This type of architecture provides better control of the data flow and thus leads to a more understandable application, which is easier to maintain. The data in a React application is passed on via props. The child elements therefore have no possibility of manipulating this information, which in turn excludes unwanted side effects. On the other hand, this also means that the child elements need a different way to communicate with the parent components. For this purpose, callback functions can be transferred as props. These functions are then called by the child elements with additional parameters if necessary. In this way, the elements can communicate with each other. The information runs via the props from the parents to the children and via callback functions back again (Listing 4).
export class ButtonControl extends React.Component {
  constructor(props) {
    super(props);
    this.state = { isClicked: false };
  }

  handleClick() {
    this.setState({ isClicked: true });
  }

  render() {
    return (
      <div>
        <button onClick={() => this.handleClick()}>click me</button>
        {this.state.isClicked ? <div>you clicked the button</div> : ''}
      </div>
    );
  }
}
A similar procedure is also used for DOM events. React defines properties for handling events. For example, you can use the onClick-property of an element to bind a callback function to the click event. An object of the type SyntheticEvent, which represents the event, is transferred to this function when called. This event object conforms to the W3C standard and ensures that all supported browsers behave equally. When handling events, a naming convention has been established according to which the attributes to which the handler function is assigned begin with the character string “on”. The name of the handler function itself starts with “handle”. This convention causes you to assign the handleClick function to the onClick attribute.
If you use such callback functions in JSX, you should take note that the context of the function is no longer the instance of the component when it is called. This also means that this has the value undefined. The recommended solution to this problem is to actively bind the handler methods in the constructor of the component into the context of the component, by calling the bind-method.
Another alternative is to define the handler method as an arrow function, using the experimental property initializer syntax, so that the method is fixed to the context of the component. The disadvantage of this variant is the point of how the underlying syntax has not yet been finalized. A third approach consists of wrapping the handler method in JSX into an arrow function, which also ensures that the component context is preserved. The disadvantage of this procedure is that a new function object must be created, each time the component is rendered.
JSX – JavaScript-Syntax expanded
Unlike other JavaScript libraries, React does not work directly with DOM nodes, but rather with an object representation. The actual DOM nodes are created or manipulated during a later point in time. The objects used by React are much lighter than the corresponding DOM nodes, resulting in increased processing speed and lower memory consumption. The translation of objects in DOM structures and the recognition of changes in this structure is based on the Virtual DOM. This concept is the key to Reacts performance. If changes in the application require adjustments to the display, the DOM nodes are not directly manipulated, but instead the differences are calculated and applied in an optimized way. This process is called reconciliation. All versions of React, up until version 15, make use of the Stack Reconciler. Version 16 on the other hand uses the new Fiber Reconciler. This is a complete rewrite of the core algorithm, with some improvements and a new structure that allows future improvements and adjustments.
The Stack Reconciler
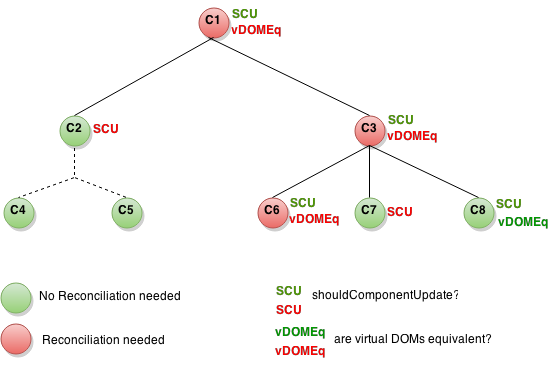
The reconciler from React is used to find out the differences between two trees. Although established algorithms already exist for this task, they have proven to be too resource-intensive. For this reason, React uses an optimized version of such a tree comparison. Initially, the element tree is structured and displayed from the root element. Each change to props or a call to setState ensures that a new tree is built which is compared with the previous version. The reconciler compares the nodes of the old tree with those of the new tree (Fig. 2).
If the type of both nodes differs, React assumes that the resulting subtrees will also be different. The existing tree is discarded and the new version is completely rebuilt. The teardown lifecycle hook componentWillUnmount is executed for each instance of a component which is discarded here. At this point, you have the option of carrying out cleanup tasks, such as ending intervals or closing connections that are still open. The componentWillMount and componentDidMount hooks are executed for all newly generated component instances.
If the type of DOM node is similar, a simplified update is performed. In this case, only the attributes can differ. React checks which properties have changed and updates them accordingly.
If the two versions of a component instance have the same type, their object representation can be retained. The props and state are going to be updated accordingly. The componentWillReceiveProps and componentWillUpdate hooks are executed for this instance. The components render method is then executed to calculate the new representation of the component. In the case of a functional component, the component function is executed instead. Finally, the reconciler then iterates over the child elements of the component.
The algorithm does not work directly on the DOM structure, but on the significantly more performant object representation. After comparing the two structures, the collected changes are applied to the DOM tree. React is also designing this action in such a way that it can be carried out as quickly and resource efficiently as possible. React has some conditions and assumptions to improve the runtime of the reconciler. Initially, it is assumed that two nodes of different types create different element trees and therefore no further checks are worthwhile. So the tree is discarded and rebuilt.
For the lists of elements, like those created by using loops, React requires a key-attribute, through which the elements are identified definitively. Unique IDs or hashes are normally used as the value for this attribute. Though the value must only be unique in the list and not for the entire application. Thus, the algorithm can determine which nodes can be reused and which have been deleted or added. If this attribute is not available, a warning will be displayed on the console, since the processing cannot be optimized. The Reconciler can map the relocating of an element tree on the same level and optimize it. However, if the tree is unhooked and hooked at another location in the application, then tree must be discarded and rebuilt.
If you implement the shouldComponentUpdate-method within in a component, then the method will be executed for all instances when the Reconciler is running. If its return value is false, then the render-method of the component instance is not executed and the instance itself and the entirety of its child elements are not redisplayed, but instead are further used in the previous version.
The biggest problem of the previous reconciler is that it processes the complete tree in one step. This means that the 60 frames per second required for fluid animations cannot always be adhered to. The name Stack Reconciler is also derived from this processing method. Each component is considered as a function, as its render-method. These functions call upon other functions. And this results in a call stack. It is not possible to switch smoothly from one state of the application to the next one, if there is a high stack and only little computing power available.
Fiber – the new Reconciler
Due to the weaknesses of Stack Reconciler, React developers began designing a new reconciler quite some time ago, in order to solve these problems. The focus of Fiber lies on supporting smooth animations, gesture control and new layout options. Here you can find the most important changes of Fiber summarized:
- The reconcilers tasks are partitioned into smaller sections, so that the processing must not be one singular operation.
- Parts of the processing can be assigned different priorities.
- A once started processing can be continued or reused.
- The reconciler can move better in the object tree.
- The render method of components is extended, so that it can return not only one root element, but several.
- The error handling is improved.
Fiber updates can have different priorities. Different browser features are used for scheduling, depending upon the priority:
- Synchronous: As with the Stack Reconciler, the processing takes place immediately.
- Task: Updates are applied in the next tick of the event loop.
- Animation: In order for the animations to run smoothly, they must be executed within 16 milliseconds, i.e. at 60 frames per second. The requestAnimationFrame-function is used for this purpose.
- High, Low, OffScreen: These priorities are planned with requestIdleCallback. This relatively new browser feature calls the committed callback function when the browser has some computing time left.
The processing of a change, which you start with setState, is controlled by an update queue that allows you to combine updates. Fiber works, similar like Stack Reconciler, with a tree comparison. However, there is an optimization here. Fiber works with two fixed trees according to the principle of double buffering. The current state is recorded in the current tree. All changes are applied to the work on progress tree. Once the change has been processed completely, the work-in-progress-tree becomes the new current-tree, by changing the reference to this tree. The old current-tree can be used as work-in-progress-tree for the next change, allowing objects to be reused to save memory and computing time.
The processing of changes is divided into two phases. The work-in-progress-tree is set up in the first phase, the rendering and reconciliation phase. If necessary this phase can be interrupted, if there is higher priority work available. The second phase, the actual rendering, can no longer be interrupted so to avoid inconsistencies in the display.
The Fiber Reconciler takes its name from the fibers, which are used to process the changes. A Fiber is the object representation of a component instance. These Fiber objects include the type and key of the instance, but also structural information, such as the first child element or a reference to the next sibling element. A Fiber also has a reference to the parent node with the return key, in order to be able to climb up the tree again.
At the beginning of the first phase of the Fiber algorithm, a callback function is first registered using requestIdleCallback, for example. As soon as this callback function is executed, the tree structures are processed. Here, Fiber is processed for Fiber. If the element still exists in the new version, the object is copied to the work-in-progress-tree. If an update is planned for the element, the node is selected and the change is entered in the Effect List of the node. The effect lists are merged upwards in the tree to create a list of changes for the Fiber Reconciler. After a Fiber has been processed, the reconciler first checks whether there is still time left in the current time window and processes the next Fiber, if this is the case. If there is no time left, React returns control to the browser, which can perform additional tasks, so that no important tasks are blocked by React. Once computing time is available again, React continues to work on the work-in-progress-tree from the point of its interruption. After the entire tree has been processed, the reconciler starts the second phase. Here the previously created Effect List is processed and the changes take effect. Additionally, the work-in-progress-tree is made into the current-tree.
While the reconciler is still in phase one, it may happen that higher priority updates are inserted. Should this be case, then the current work-in-progress-tree is discarded and the processing of the current-tree is starting again from new. This means that a sequence of high-priority updates may cause updates of lower priority to fail. However, the React development team is already working on a solution to this problem.
The Fiber Reconciler was integrated with version 16 of React. However, the algorithm had already been tested for its practicality, as Facebook was already using it productively. Although the introduction of the new Reconciler did not only had a positive impact on Reacts performance, but also made it necessary to adopt renderers, such as ReactDOM or React Native accordingly.
Conclusion
React is already a very serious competitor to Angular in many areas. In some areas, React has even overtaken Angular. One reason for Reacts success is the modular thought behind the library. React only structures the UI in a web application. The library itself knows nothing about server communication or business logic. In order to implement these things, further libraries and frameworks are integrated into an application, which in turn also focus only on a very specific purpose. A React application is therefore a composition of highly specialized components. This allows you as a developer to integrate only those components that you really need for your application, which has an advantageous effect on project size and complexity.