When working with React, the eventual excitement lies in deploying your web application to the cloud. It’s the moment you get to showcase your work to the world!
In the following steps, you’ll discover how to deploy your React application. I’m assuming a few things:
- You are familiar with Nextjs and React.
- You have a basic familiarity with Docker.
- You have a basic understanding of AWS.
Feel free to ping me if you face any issues, let’s get started.
Step 1: Setting up the project
As usual, let’s start by cloning the project:
git clone https://github.com/garciadiazjaime/tutorial-react-deployment-options
Let’s move inside the project:
cd tutorial-react-deployment-options
Let’s install the dependencies:
npm install

Output:
up to date, audited 281 packages in 470ms


106 packages are looking for funding
run `npm fund` for details


found 0 vulnerabilities
Now, let’s run the server:
npm run dev

Output:
> [email protected] dev
> next dev


▲ Next.js 14.0.2
- Local: http://localhost:3000


✓ Ready in 2.8s
Open localhost:3000 and you should see something like this:
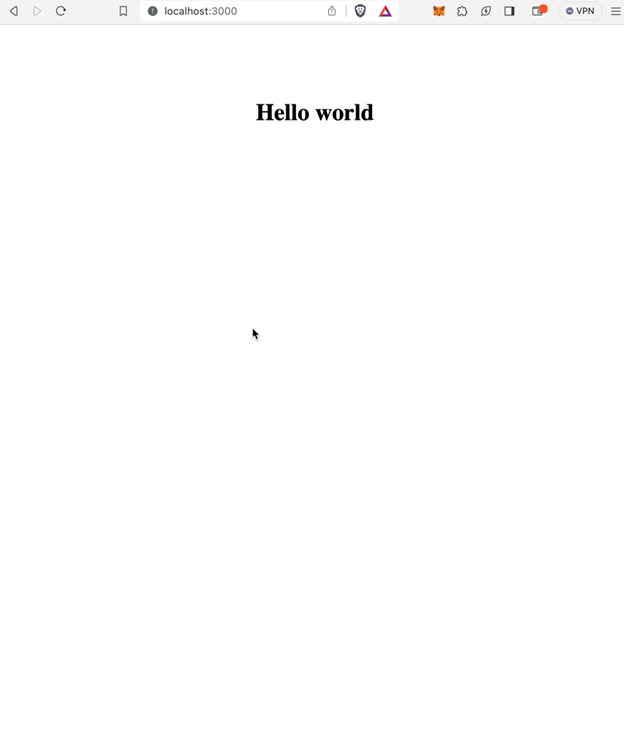
Fig. 1. Hello World, clean nextjs installation.
iJS Newsletter
Join the JavaScript community and keep up with the latest news!
This project uses Next.js and, and only displays the classic ‘Hello, world!’ message on the homepage:
If you open ‘page.tsx’, you’ll find the following code:
Listing 1. Simple Next.js application displaying Hello World
export default function Home() {
 return (
  <main style={{ textAlign: "center", marginTop: "10vh" }}>
   <h1>Hello world</h1>
  </main>
 );
}
The primary aim here is to guide you through the deployment process. At this stage, the functionality or appearance of the app doesn’t hold much significance.
Step 2: Create a Docker image
The script npm run dev starts a server locally, which works great for local development. However, the most common practice for production involves containerizing the application using Docker. Let’s proceed to create a Docker image for our React application.
Let’s go to the Docker website: https://www.docker.com/get-started/, and click the blue button “Download”, make sure to choose the right version.
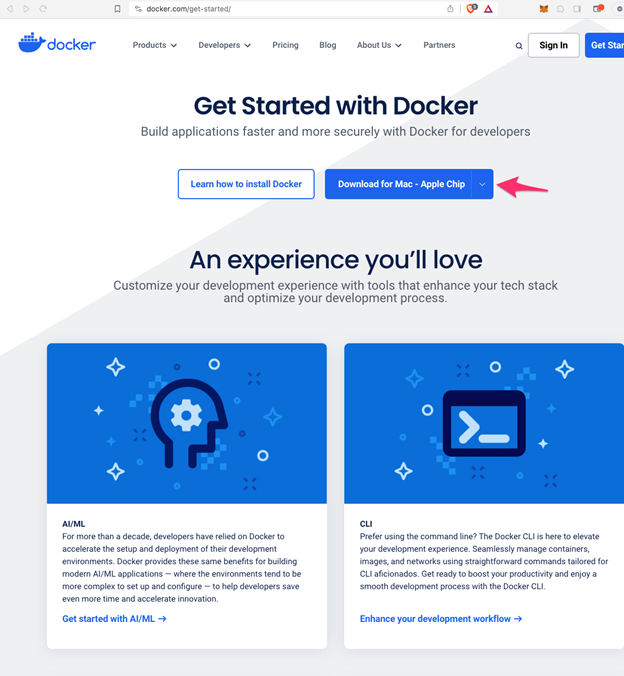
Fig. 2: Docker website, download button.
This process will initiate the download of a Docker image onto your machine. After it’s downloaded, proceed with the installation. Once installed, open the Docker Desktop application. It will prompt you to create an account; please do so. Finally, you should see the Docker Desktop interface with your user account logged in.
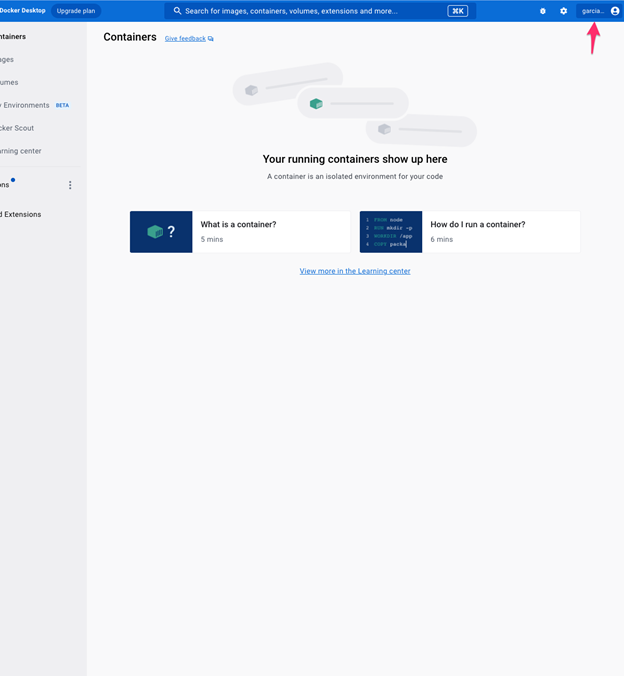
Fig 3: Docker Desktop user dashboard.
You should notice your username displayed there. I won’t delve into extensive details about the Docker installation, as there are many comprehensive tutorials available for that. The key here is to ensure Docker is installed and that you’ve set up a Docker Hub account.
To verify that Docker is running, let’s try the next command:
docker --version

Output:
Docker version 24.0.5, build ced0996
That command will display the Docker version installed on your machine, you can see that mine is version 24. If it throws an error, you might need to debug your installation. Feel free to reach out; I’m here to help.
Now, let’s set up two files: Dockerfile and .dockerignore.
The Dockerfile is a configuration file that outlines the steps required to install and run the project.
The .dockerignore file is a list of files the container should ignore, much like .gitignore.
If you open the Dockerfile, you’ll find the following lines:
Listing 2: Dockerfile extracted from nextjs
# Dockerfile


FROM --platform=linux/amd64 node:20-alpine AS base


# Install dependencies only when needed
FROM base AS deps
# Check https://github.com/nodejs/docker-node/tree/b4117f9333da4138b03a546ec926ef50a31506c3#nodealpine to understand why libc6-compat might be needed.
RUN apk add --no-cache libc6-compat
WORKDIR /app


# Install dependencies based on the preferred package manager
COPY package.json package-lock.json ./
RUN npm ci


# Rebuild the source code only when needed
FROM base AS builder
WORKDIR /app
COPY --from=deps /app/node_modules ./node_modules
COPY . .


RUN npm run build


# Production image, copy all the files and run next
FROM base AS runner
WORKDIR /app


ENV NODE_ENV production


RUN addgroup --system --gid 1001 nodejs
RUN adduser --system --uid 1001 nextjs


COPY --from=builder /app/public ./public


# Set the correct permission for prerender cache
RUN mkdir .next
RUN chown nextjs:nodejs .next


# Automatically leverage output traces to reduce image size
# https://nextjs.org/docs/advanced-features/output-file-tracing
COPY --from=builder --chown=nextjs:nodejs /app/.next/standalone ./
COPY --from=builder --chown=nextjs:nodejs /app/.next/static ./.next/static


USER nextjs


EXPOSE 3000


ENV PORT 3000
# set hostname to localhost
ENV HOSTNAME "0.0.0.0"


# server.js is created by next build from the standalone output
# https://nextjs.org/docs/pages/api-reference/next-config-js/output
CMD ["node", "server.js"]

The Dockerfile might seem complex, but in a nutshell, it does the following:
- Installs Node version: 20.
- Copies package-lock.json and installs npm dependencies.
- Runs script npm run build which generates a nextjs standalone project version.
- Copies static files. Despite the simplicity of our app, it relies on some asset files visible in the ‘network’ tab of the developer tools panel, mainly javascript files.
- Sets the hostname, port, and initiates the server.
Alright, these are the instructions to build the docker image, let’s create one by running the following command:
Note: Notice how I’m adding my Docker Hub username: garciadiazjaime, please change that for your Docker Hub username.
docker build -t garciadiazjaime/nextjs-docker .

Output:
[+] Building 118.0s (22/22) FINISHED                                                                          docker:desktop-linux
=> [internal] load build definition from Dockerfile                                                                          0.0s
=> => transferring dockerfile: 1.47kB                                                                                        0.0s
                                                                                                                             0.0s
=> => transferring context: 135B                                                                                             0.0s
=> [internal] load metadata for docker.io/library/node:20-alpine                                                             2.0s
=> [auth] library/node:pull token for registry-1.docker.io                                                                   0.0s
=> [base 1/1] FROM docker.io/library/node:20-alpine@sha256:b1789b7be6aa16afd642eaaaccdeeeb33bd8f08e69b3d27d931aa9665b731f01  0.0s
=> [internal] load build context                                                                                             1.1s
=> => transferring context: 3.13MB                                                                                           1.0s
=> CACHED [builder 1/4] WORKDIR /app                                                                                         0.0s
=> CACHED [deps 1/4] RUN apk add --no-cache libc6-compat                                                                     0.0s
=> CACHED [deps 2/4] WORKDIR /app                                                                                            0.0s
=> CACHED [deps 3/4] COPY package.json package-lock.json ./                                                                  0.0s
=> CACHED [deps 4/4] RUN npm ci                                                                                              0.0s
=> CACHED [builder 2/4] COPY --from=deps /app/node_modules ./node_modules                                                    0.0s
=> [builder 3/4] COPY . .                                                                                                    3.6s
=> [builder 4/4] RUN npm run build                                                                                           110.3s
=> CACHED [runner 2/8] RUN addgroup --system --gid 1001 nodejs                                                               0.0s
=> CACHED [runner 3/8] RUN adduser --system --uid 1001 nextjs                                                                0.0s
=> [runner 4/8] COPY --from=builder /app/public ./public                                                                     0.0s
=> [runner 5/8] RUN mkdir .next                                                                                              0.2s
=> [runner 6/8] RUN chown nextjs:nodejs .next                                                                                0.1s
=> [runner 7/8] COPY --from=builder --chown=nextjs:nodejs /app/.next/standalone ./                                           0.2s
=> [runner 8/8] COPY --from=builder --chown=nextjs:nodejs /app/.next/static ./.next/static                                   0.0s
=> exporting to image                                                                                                        0.1s
=> => exporting layers                                                                                                       0.1s
=> => writing image sha256:6977b0e02d5daeabd2cb6f97029f06d0d58c014d8731a71589b301df56c8df8f                                  0.0s
=> => naming to docker.io/garciadiazjaime/nextjs-docker                                                                      0.0s


What's Next?
 View summary of image vulnerabilities and recommendations → docker scout quickview
The docker build command looks for the Dockerfile and executes the instructions within. You’ll see each command’s output in the console. The Docker image is named garciadiazjaime/nextjs-docker (in your case garciadiazjaime will be your docker hub username). After completion, let’s run the following command to view your newly created Docker image:
docker images

Output:
REPOSITORY                        TAG       IMAGE ID       CREATED       SIZE
garciadiazjaime/nextjs-docker     latest    56c7adc7e01a   3 minutes ago    156MB
See how the garciadiazjaime/nextjs-docker image name appears (garciadiazjaime is my docker hub username, you should see your Docker Hub username). Similar to git, Docker enables pushing to a registry and pulling from any machine (environment), ensuring your application runs seamlessly. As long as the machine (environment) has Docker and your image was correctly built, it’s guaranteed to function across various machines (environments), including production.
Step 3: Run a Docker container
The subsequent step involves running a container after creating the image. In a way similar to the Git analogy, a Docker image, akin to a codebase, doesn’t inherently execute anything. You need an additional command to initiate a process. While for the codebase you might use “npm run dev,” in Docker, the command to commence the process is as follows:
Note: make sure to stop npm run dev, since it runs on the same port 3000.
docker run -d -p 3000:3000 garciadiazjaime/nextjs-docker

Output:
WARNING: The requested image's platform (linux/amd64) does not match the detected host platform (linux/arm64/v8) and no specific platform was requested
863152ffe8793dc98830b7b1c093fad43def6dc31485e265d613bb3be442c109
We are communicating a couple of instructions here:
- Run a container using the garciadiazjaime/nextjs-docker image.
- Run the container in the background using the -d flag.
- Map the container’s port 3000 to the machine’s port 3000.
Please note that the output contains a warning message, which is expected. The warning is related to the first line of the Dockerfile.
FROM --platform=linux/amd64 node:20-alpine AS base
The –platform=linux/amd64 flag is crucial as it specifies the operating system expected for the image to run on. The warning occurs because the Docker image was built for Linux, which is the common operating system for production and similar environments. Although my machine uses OSX, the container still runs without any issues.
If you refresh your browser at http://localhost:3000/, you should observe the same outcome as in step one (Image 1), but this time, the response is from the Docker instance. This is significant because containerizing the application enables it to be deployed to any infrastructure that supports Docker (making deployment easier).
You can also check the Docker container by running the following command:
docker ps

Output:
CONTAINER ID   IMAGE                           COMMAND                  CREATED         STATUS         PORTS                    NAMES
ead64e522b9e   garciadiazjaime/nextjs-docker   "docker-entrypoint.s…"   5 minutes ago   Up 5 minutes   0.0.0.0:3000->3000/tcp   wonderful_shtern
If the application isn’t visible on the browser or if the previous output doesn’t resemble what was expected, it’s time to troubleshoot steps 2 and 3. Feel free to reach out to me for assistance.
You can stop the Docker instance by running:
docker stop ead64e522b9e
Notice how the CONTAINER ID from the output of the docker ps command is used in the previous stop command.
Step 4: Create a Docker Hub Account
If you already have a Docker Hub Account, you can jump to step five.
Docker and Git share a similar approach. In step two, a Docker image was created, and in the previous step, it was confirmed that the image successfully initiated an instance, indicating readiness for registry pushing.
If you don’t have a Docker Hub account yet, navigate to https://hub.docker.com/ and create an account. After logging in, you should see a screen similar to this:
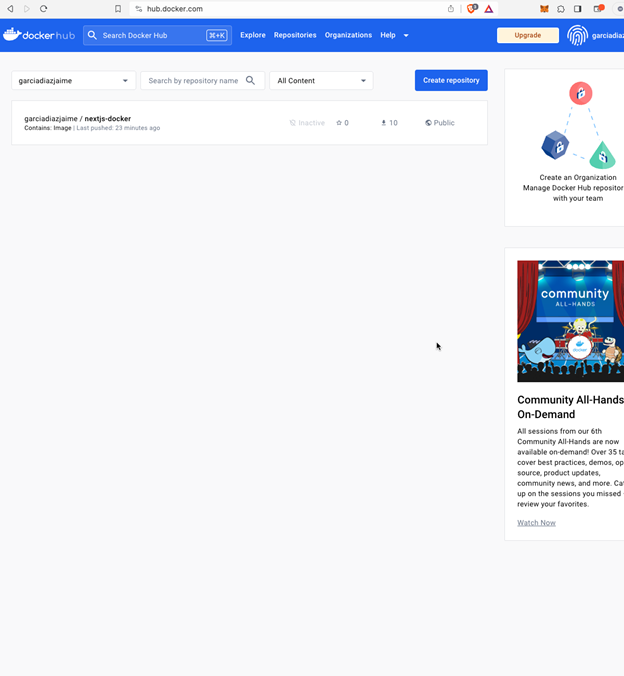
Fig 4: Docker Hub Profile
You won’t find the entry for garciadiazjaime/nextjs-docker in your repository list, but it will be added in the next step. Naturally, it will display your username instead of mine.
Step 5: Push Docker image
To begin pushing an image, you first need to create a repository. On the Docker Hub page, you’ll notice a blue button at the top labeled Create repository. Clicking this will open the Create Repository form. The only field you’re required to fill in is Repository Name. Let’s name it nextjs-docker. Your form will resemble this:
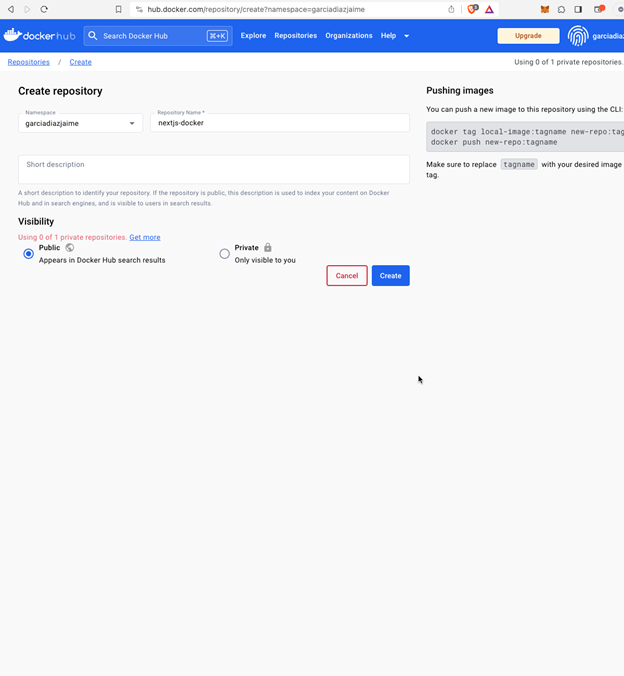
Fig 5: Docker Hub repository creation form.
Note: In your case, Namespace will be your username.
Go ahead and click create. This will take you to the repository page, which should look like this:
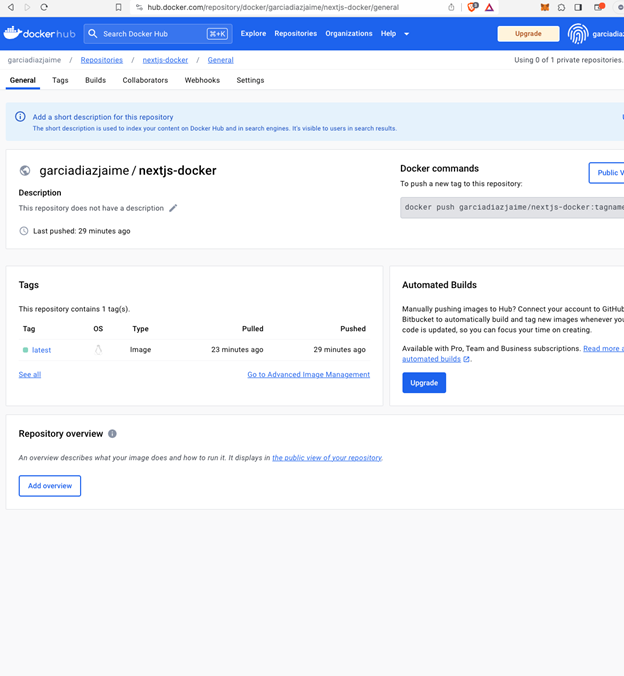
Fig 6: Docker Hub repository page.
The crucial part here is the Docker commands section, where you’ll find the following command, let’s copy the command and run it:
docker push garciadiazjaime/nextjs-docker

Output:
Using default tag: latest
The push refers to repository [docker.io/garciadiazjaime/nextjs-docker]
3c3f4c697a79: Pushed
0eb26abf9be7: Pushed
ff1ed8259e00: Pushed
75e6021a334c: Pushed
5c6d72162836: Pushed
1d5a5a6a0338: Layer already exists
5c57661fee69: Layer already exists
ae9fc9f2ae41: Layer already exists
e9e57e62cbd7: Layer already exists
abcaa4b7151d: Layer already exists
93043d250b57: Layer already exists
cc2447e1835a: Layer already exists
latest: digest: sha256:41b74907bb0bd3cb7697c7db437794586f9390e71753fbc8aca36035494a68bf size: 2825
Please note: garciadiazjaime is my Docker Hub username. In your case, it will be different. Ensure you use your own username.
You might have noticed that the command doesn’t include :tagname as shown on the Docker Hub page. Although using tags is a good practice, it’s not necessary for this tutorial.
And that’s it! You’ve just successfully pushed your first Docker image ? !
Step 6: AWS Account
AWS provides several deployment options for our React (Next.js) application. In this step, we’ll be focusing on the following architecture:
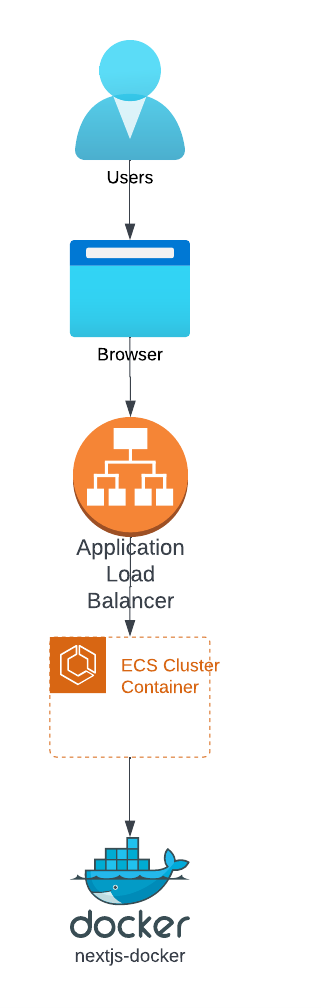
Fig. 7: AWS Architecture for React Application
There are other layers in the diagram, but to simplify, when a user navigates to your domain in a browser, it resolves to a page hosted in AWS. AWS includes a load balancer that directs traffic to the ECS Cluster where the nextjs-docker container operates. This container processes the request and generates the response, similar to the hello world message you encountered in previous steps.
For this tutorial, I’ll utilize the AWS graphical interface to complete the deployment. However, in real scenarios, deploying programmatically, often with Terraform, is a common practice.
Let’s proceed by creating an AWS account. Note that most AWS services have associated fees, so any resources created during this tutorial will be promptly deleted to prevent incurring charges.
I won’t delve into the specifics of creating an AWS account, as numerous tutorials cover this process extensively. The crucial part is having an active AWS account that allows the creation of resources. Rest assured, there won’t be charges for the resources utilized in this tutorial as they’ll be promptly removed.
Step 7: AWS Elastic Container Service ECS
Once logged in, search for ECS and select the entry labeled Elastic Container Service.
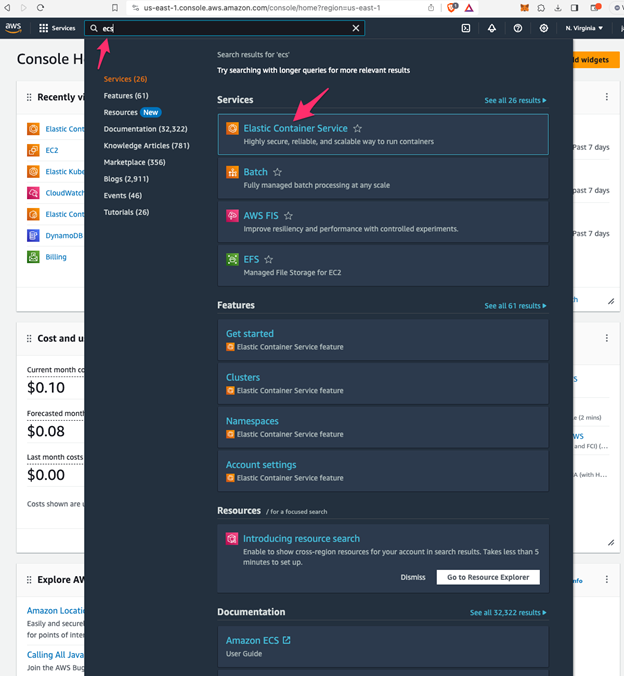
Fig. 8. AWS Elastic Container Service Selection
Once inside the Elastic Container Service dashboard, there should be a toggle to switch to the “classic” UI. Find this toggle to revert to the previous interface.
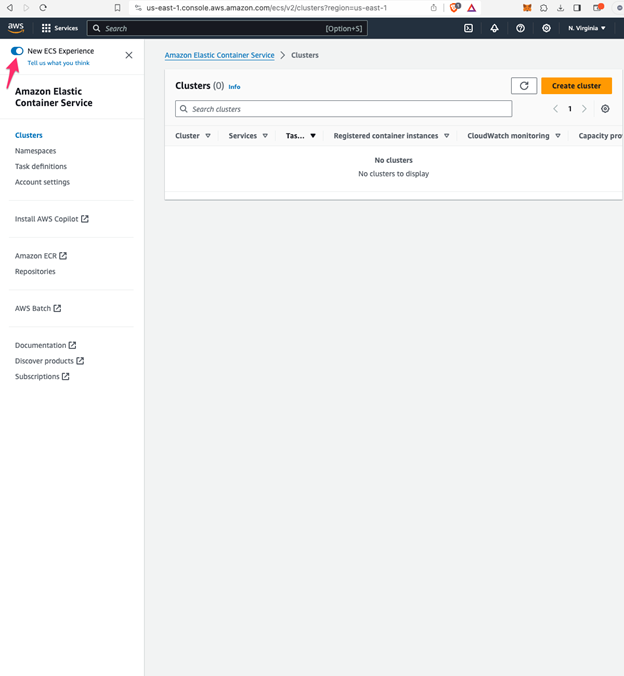
Fig. 9: AWS Elastic Container Service Classic Toggle
Once switched to the classic UI, the page should look like this:
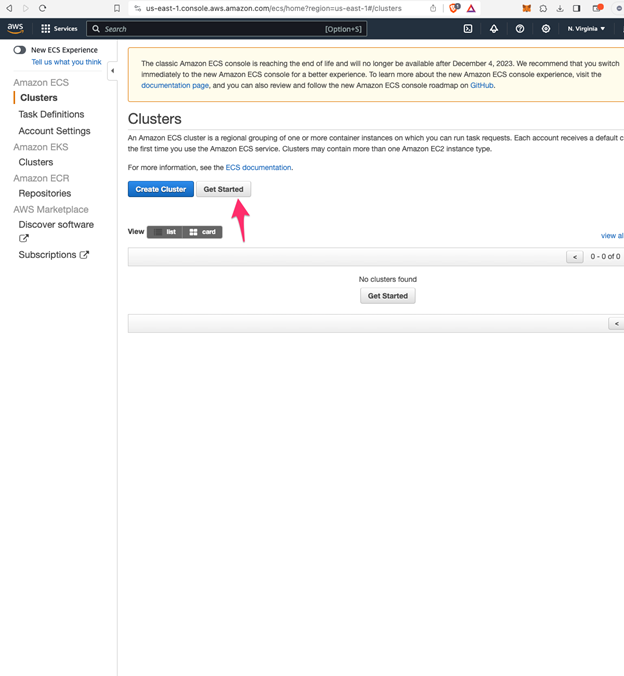
Fig. 10: AWS Elastic Container Service Classic UI
Let’s proceed by clicking Get Started; this action will bring up the next view:
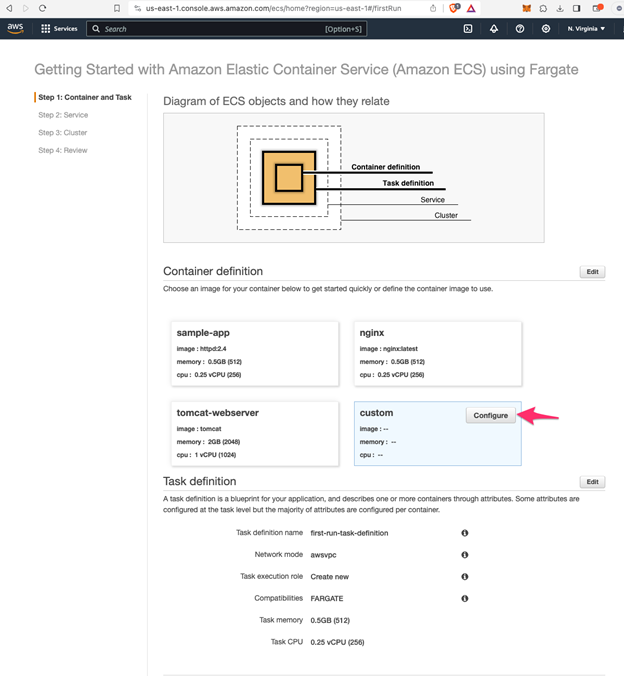
Fig. 11: AWS Elastic Container Service Cluster Creation
Click on Custom, then select the Configure button. This action will prompt the next modal to appear.
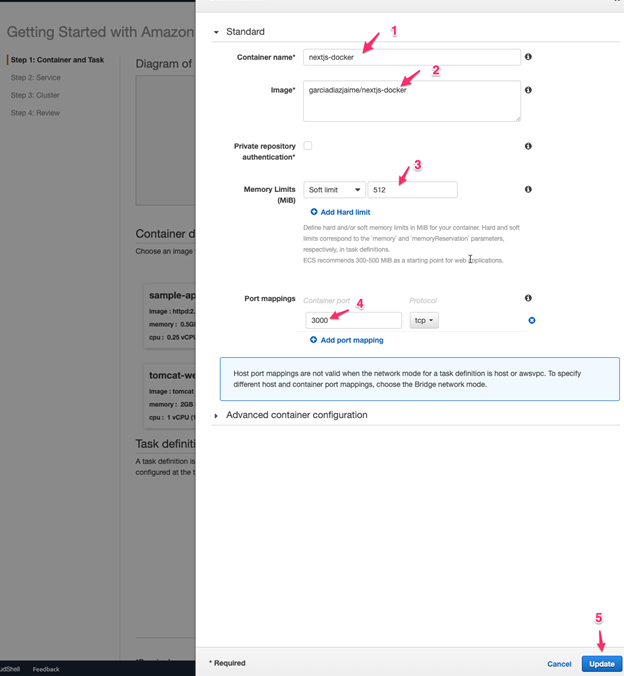
Fig. 12: AWS Elastic Container Service Configuration
Notice how the following fields were filled in:
Container name*: nextjs-docker. Image*: garciadiazjaime/nextjs-docker. Memory Limits: 512. Port mappings: 3000.
The container name can be any value; in this instance, I’ve retained the same name as the docker image.
Regarding the Image, it’s crucial that this matches your docker repository. You’ll need to replace garciadiazjaime with your username. Note: Although my docker repository is public, you should use your own for this tutorial to deploy your React application.
Memory Limit doesn’t matter much for now, so let’s stick with a basic value: 512MB.
Regarding port mapping: In Step 2, the Dockerfile defines port 3000, indicating that the React application (nextjs) runs on port 3000.
Now, click Update. This will close the modal and update the previous page, which should now look like this:
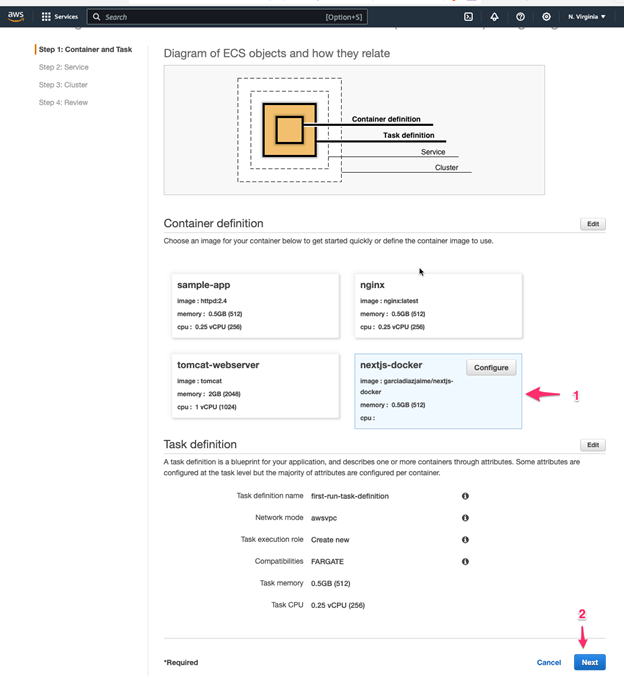
Fig. 13: AWS Elastic Container Service Custom Set Up
This page provides a summary of the upcoming creations. If everything appears correct, click on Next. On the subsequent page, it’s crucial to include a load balancer as mentioned in Step Six. The load balancer routes traffic to the container. Click on Application Load Balancer (ALB), which will display port 3000, the port configured for both the Web Application and the Docker instance. If everything seems correct, proceed by clicking Next.
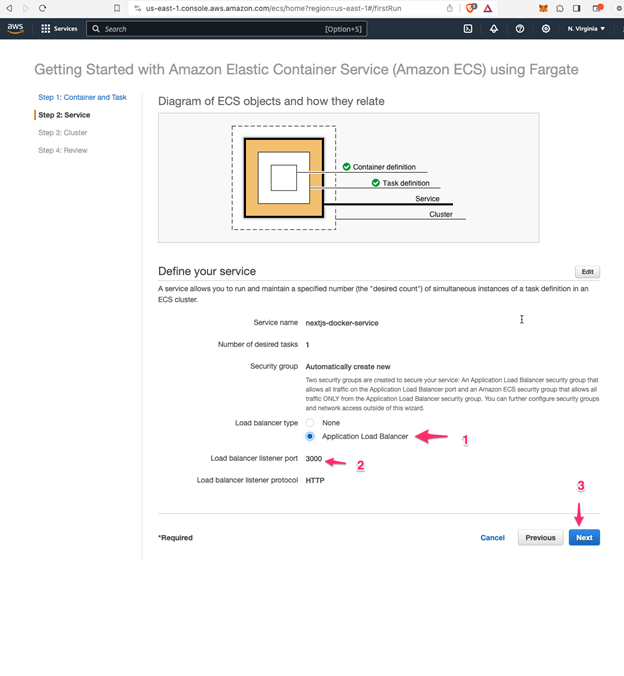
Fig. 14: AWS Elastic Container Service and Application Load Balancer
The following page creates the cluster, as indicated in the Architecture Diagram. The cluster offers scalability. Presently, only one container will be running, but the cluster configuration can accommodate more containers or perform tasks like auto-scaling.
Proceed by changing the Cluster name to nextjs-docker. This field accepts any string, so you can input any desired name. Afterward, click Next.
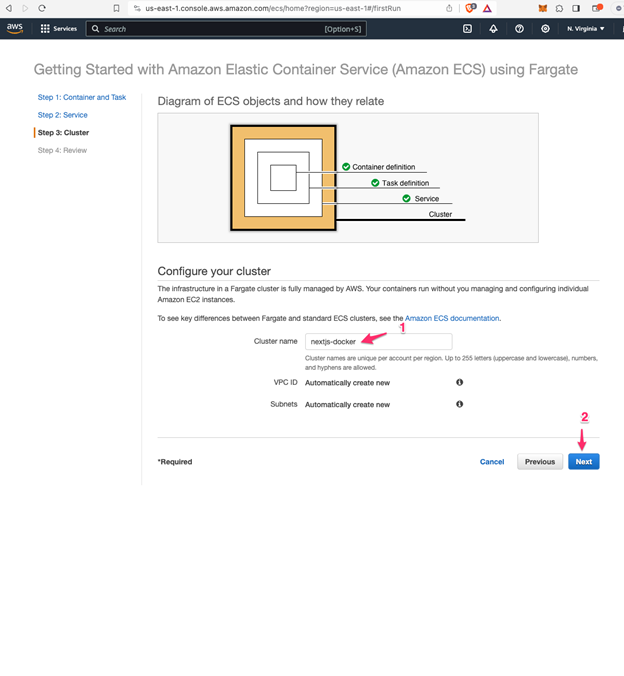
Fig. 15: AWS Elastic Container Service Cluster Name
The final step presents the “Review Page,” outlining the Elastic Container Service configuration, which includes the:
- Docker image.
- Port.
- Load balancer.
- Cluster details.
Notably, AWS provides an “Elastic Container Registry” to host Docker images. While it’s available, it isn’t entirely free. Thus, I opted for Docker Hub. Luckily, AWS recognizes the image garciadiazjaime/nextjs-docker without explicitly stating it’s hosted on Docker Hub. As you’ll confirm in the next step, the setup still functions seamlessly.
If everything appears correct, proceed by clicking Create.
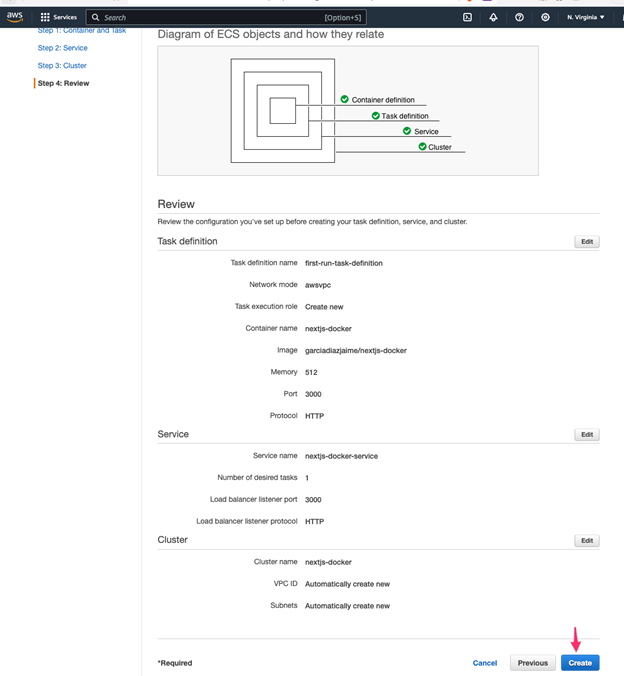
Fig. 16: AWS Elastic Container Service Review
After clicking Create, you will land on the Launch Status page, displaying the ongoing creation progress of the components. Currently, there are approximately 10 tasks pending completion. It usually takes a few minutes for the process to finalize. Once finished, you should see a confirmation similar to what’s shown here:
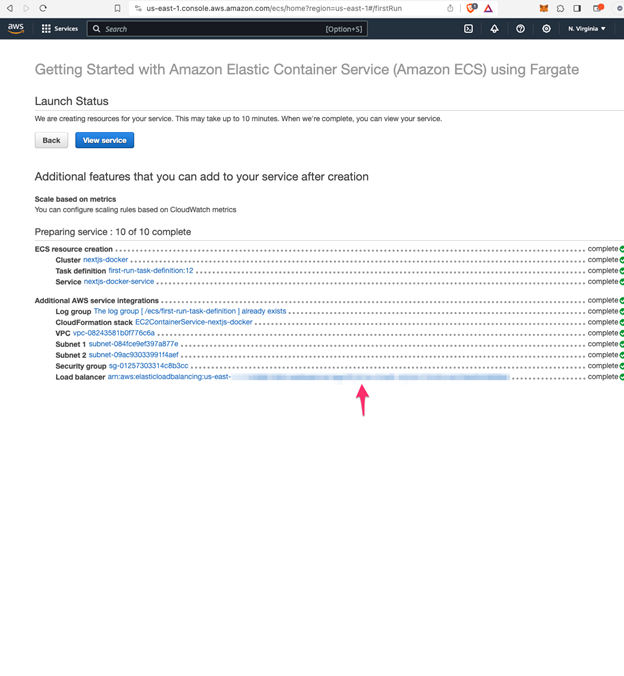
Fig. 17: AWS Elastic Container Service Launch Status Completed.
Great work! You’ve successfully deployed your React application on AWS. This configuration closely mirrors real-world scenarios. In enterprise settings, using tools like Terraform to achieve the same programmatically is common. Developers often prefer working with code rather than UI. Nevertheless, for this tutorial, using the UI suffices, delivering a similar end result.
In Image 17, the one above, upon completion of all ten tasks, you’ll notice multiple clickable links. Let’s click on the last link labeled Load balancer, leading you to a page similar to this one:
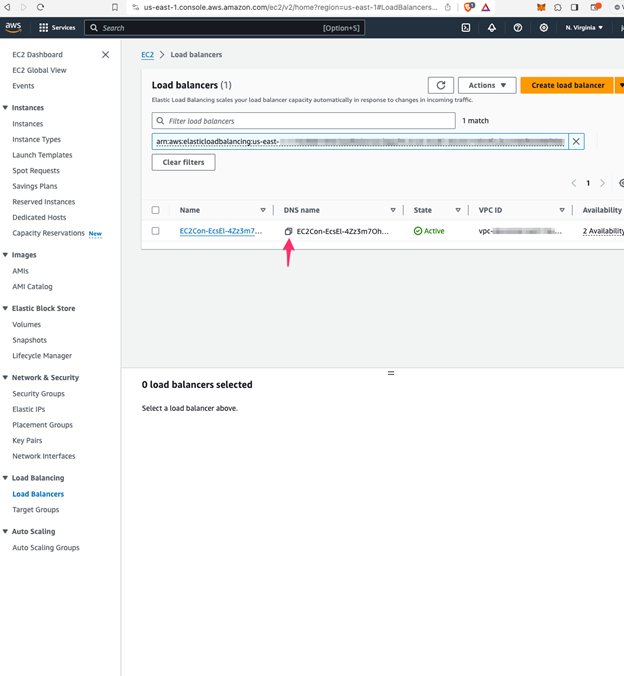
Fig. 18: AWS Elastic Container Service Load Balancer DNS
Look at the image above, Image 18, and locate the Two pages icon. Click on it to copy the DNS name. This DNS name is crucial as it represents the URL where your application resides. Once you’ve copied it, paste the URL in a new tab and add port :3000 at the end; it’s essential for the application to function correctly. After adding the port, hit enter, and voila! You should now see your React application hosted on AWS.
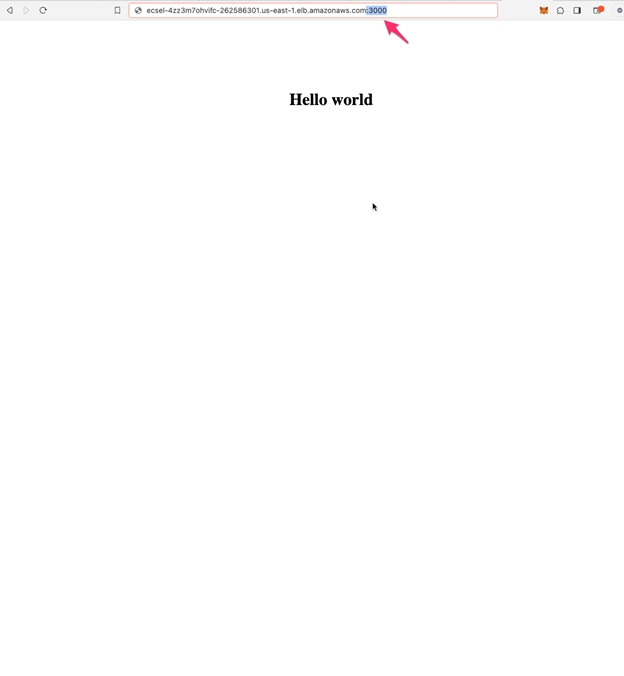
Fig. 19: AWS Elastic Container Service Hello World
Feel free to explore the UI and examine the various aspects that have been created:
- Elastic Container Service
- Cluster
- Task
- Group
- Load Balancer
When you’re finished exploring, let’s delete these resources to avoid incurring fees from AWS. Follow the same steps as shown in Image 8:
- In the search bar, type: ecs.
- Click the first entry: Elastic Container Service.
- Select the cluster named: nextjs-docker.
- Click: Delete Cluster.
- Type in Delete me.
- Finally, click: Delete.
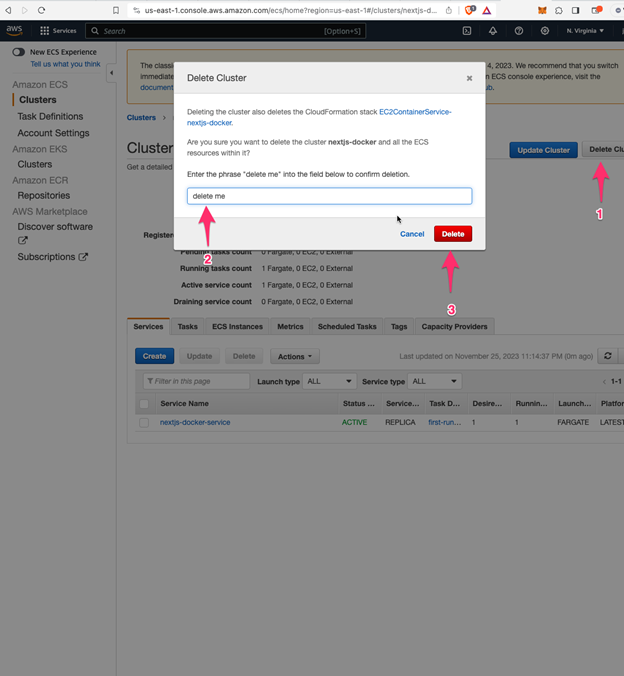
Fig. 20: AWS Elastic Container Service Delete Resources
Once you are done, you will see the message: “Deleted cluster nextjs-docker successfully”.
Let’s summarize the steps we took:
- Created a React application using nextjs with basic implementation.
- Developed a Docker image that installs project dependencies and runs the server on port 3000.
- Set up a Docker Hub account and repository to host the Docker image.
- Created an AWS account and deployed an Elastic Container Service using the Docker image from Docker Hub, along with a load balancer handling traffic on port 3000.
- Accessed the React Hello World application hosted on AWS after the resources were successfully created.
- Deleted the AWS resources to prevent incurring fees.
In the enterprise environment, tools like Terraform are commonly used. However, understanding the manual process and becoming familiar with the AWS UI is beneficial, as the end result remains the same.
Get in touch
You can find the whole code on GitHub.
I would love to hear your feedback and if you have any questions please send me a line, I’ll be more than happy to answer them.
Special thanks to my friend Alex, who helped me proofread.