
One thing in common between all the systems mentioned is that they accept input and generate output based on their trained knowledge. This output can then be processed by the application and presented to the user. A concrete example of such an AI application is a smart lamp. It has been trained to respond to specific commands such as “Turn on the light,” “Dim the light to 50%,” or “Turn off the light at 10 p.m.” The system is limited by its architecture and training data.
AI agents address this problem. These are software components that are capable of making decisions independently and executing actions based on those decisions. In the example with the smart lamp, one goal for the AI agent could be to always provide the perfect lighting without you worrying about it. The agent observes when you wake up and how lighting conditions change with the weather and time of day. It decides when it makes sense to turn on the light. For instance, if you want to sleep longer on Sundays, the light will turn on later. The actions it takes might include gradually brightening the light in the morning when you wake up or shifting to a warmer color tone in the evening as you wind down. Over time, the AI agent learns more about your habits–for example, preferring to switch to cinema mode when you watch a movie in the evening or using more natural light in the afternoon.
The term AI agent is therefore not a new name for a semi-intelligent chatbot, but refers to software with very specific characteristics:
- Autonomy: The AI agent can act independently within a certain framework. It does not work purely on a command basis, but continuously observes its environment and acts on its own initiative. This enables it to react to its environment and pursue its goals in the long term. In the case of the smart lamp, this means that you do not have to switch the light on and off yourself. Depending on the application, an AI agent can allow interactions and learn from them. This means that you can still control the light yourself. The agent will then adapt its behavior in the future so that intervention should no longer be necessary.
- Goal orientation: The actions of an AI agent are usually determined by a specific goal or a combination of several goals.
- Interaction with complex environments: AI agents play to their strengths above all in dynamic and unpredictable environments. If you work in such an environment with conventional architectures, you have to anticipate a wide variety of cases. An AI agent can respond to events in its environment, adapt its behavior, and get to know its environment better over time. The smart lamp not only takes the time of day into account in its actions, but also your behavior and habits, as well as external influences such as sunrise, sunset, or the weather.
- Learning over a longer period of time: AI agents can learn from their environment. This includes both dynamic changes in the environment and interactions between people or other systems and the agent. The smart lamp not only turns the light on and off, but also ensures optimal lighting in different situations, whether you are reading a book, watching a movie, or preparing a meal.
For an AI agent to work, you must ensure that it can perceive its environment, give it a goal, and invest a certain amount of time in the initial learning process.
From Idea to Practice: AI Agents in JavaScript with LangGraph
AI agents can be implemented in different languages and on different platforms. The most commonly used languages are currently Python and JavaScript or TypeScript.
The LangChain library exists for both programming languages to implement AI applications in the form of chained modules. LangGraph, a library for modeling and implementing AI agents, comes from the same manufacturer. In this article, we use the JavaScript version of this library based on Node.js, which scores points with its lightweight architecture and asynchronous I/O.
The library focuses on controlling data flows and states in the application. It allows you to integrate any models and tools. The most important terms in a LangGraph application are:
- State: The state contains information about the structure of the graph. It also stores the application’s variable data. The graph also has reducer functions that LangGraph can use to update the state.
- Node: A graph generally consists of nodes and edges. In the specific case of LangGraph, a node is a JavaScript function that contains the agent’s logic. These functions can use an LLM, send queries to a search engine, or execute any local logic.
- Edge: The edges of the graph connect the nodes of the graph and thus determine which node function is executed next.
A Concrete Example – What Time Is It?
To make things a little less abstract, let’s take a look at a concrete example. With this application, you can ask a locally executed LLM for the current time. If you use a simple local model such as Llama or Mistral, you can draw on an extensive knowledge base and be sure that your personal data will not be used for training purposes or analyzed in any other way, but the model cannot access current or dynamic data such as the date or time. In this example, you enrich the model with a function that returns the current date and time.
The implementation consists of two nodes: model, which is responsible for communicating with the LLM, and getCurrentDateTime, which contains the tool function for the date and time. The code in Listing 1 shows how the nodes are implemented and connected with edges.
Listing 1: LangGraph application with access to time and date
import { AIMessage, HumanMessage } from '@langchain/core/messages';
import { ToolNode } from '@langchain/langgraph/prebuilt';
import { StateGraph, MessagesAnnotation } from '@langchain/langgraph';
import { tool } from '@langchain/core/tools';
import { ChatOllama } from '@langchain/ollama';
import { z } from 'zod';

const getCurrentDateTime = tool(
  async () => {
    const now = new Date();
    const result = `Current date and time in UTC: ${now.toISOString()}`;
    return result;
  },
  {
    name: 'getCurrentDateTime',
    description: 'Returns the current date and time in UTC.',
    schema: z.object({}),
  }
);

const tools = [getCurrentDateTime];
const toolNode = new ToolNode(tools);

const model = new ChatOllama({ model: 'mistral-nemo' }).bindTools(tools);

function shouldContinue({ messages }: typeof MessagesAnnotation.State) {
  if ((messages[messages.length - 1] as AIMessage).tool_calls?.length) {
    return 'getCurrentDateTime';
  }
  return '__end__';
}

async function callModel(state: typeof MessagesAnnotation.State) {
  const response = await model.invoke(state.messages);
  return { messages: [response] };
}

const workflow = new StateGraph(MessagesAnnotation)
  .addNode('model', callModel)
  .addEdge('__start__', 'model')
  .addNode('getCurrentDateTime', toolNode)
  .addEdge('getCurrentDateTime', 'model')
  .addConditionalEdges('model', shouldContinue);

const app = workflow.compile();

const time = await app.invoke({
  messages: [new HumanMessage('How late is it?')],
});
console.log(time.messages.at(-1)?.content);

const timeMuc = await app.invoke({
  messages: [
    ...time.messages,
    new HumanMessage('And how late is it in Munich, Germany?'),
  ],
});

console.log(timeMuc.messages.at(-1)?.content);
The core of the implementation is the ToolNode, which supplies the LLM with current data. You create such a node by calling the tool function. You pass it the function that is to be behind the node. In this example, this function returns the current date and time as an ISO string. In addition to this function, you also define an object with meta information such as the name of the ToolNode, a description, and a schema. The bindTools method of the LLM instance is used to make the tools known. The LLM has access to the meta information and thus knows which tools are available to it for which purpose.
If the LLM receives a request that requires the current time to answer, it does not provide a direct answer, but informs the application that the ToolNode should be executed. In the example, the function can only be executed without receiving any additional parameters. However, you also have the option of defining parameters via the schema that the LLM passes on when called, and which you can access in the Tool function. This allows you to control the execution of this function and deliver a suitable result. It is important to define a description for the values in the schema using the describe method. The tool function does not yet create a node for LangGraph. To do this, you must pass the created object in an array to the constructor of the ToolNode class.
The second node in the graph is the model. In the example, the ChatOllama class is used to integrate a local LLM provided by Ollama. Specifically, the mistral-nemo model is used. Which LLM you choose depends on a variety of factors: Do you want to use a local open-source model such as Mistral or Llama, or would you prefer a commercial model such as GPT-4o from OpenAI? If you decide on a local model, the question arises as to what resources are available to you and whether you should opt for a smaller and therefore more economical model, such as the 3B variant of Llama 3.2, or a large model such as the Llama 3.1 model with 405B parameters. The smaller model can run efficiently on a computer with a standard graphics card. The large models require powerful and therefore expensive hardware.
With these two nodes, you can now proceed to create the state graph for the application. When creating the graph, you pass a structure that defines the state structure and a reducer function for updating the state. LangGraph provides the MessagesAnnotation, which only provides a state key with the name messages and the associated reducer. The instance of the StateGraph class has the methods addNode for adding nodes and addEdge for connecting the nodes. Figure 1 shows the graph for the example.
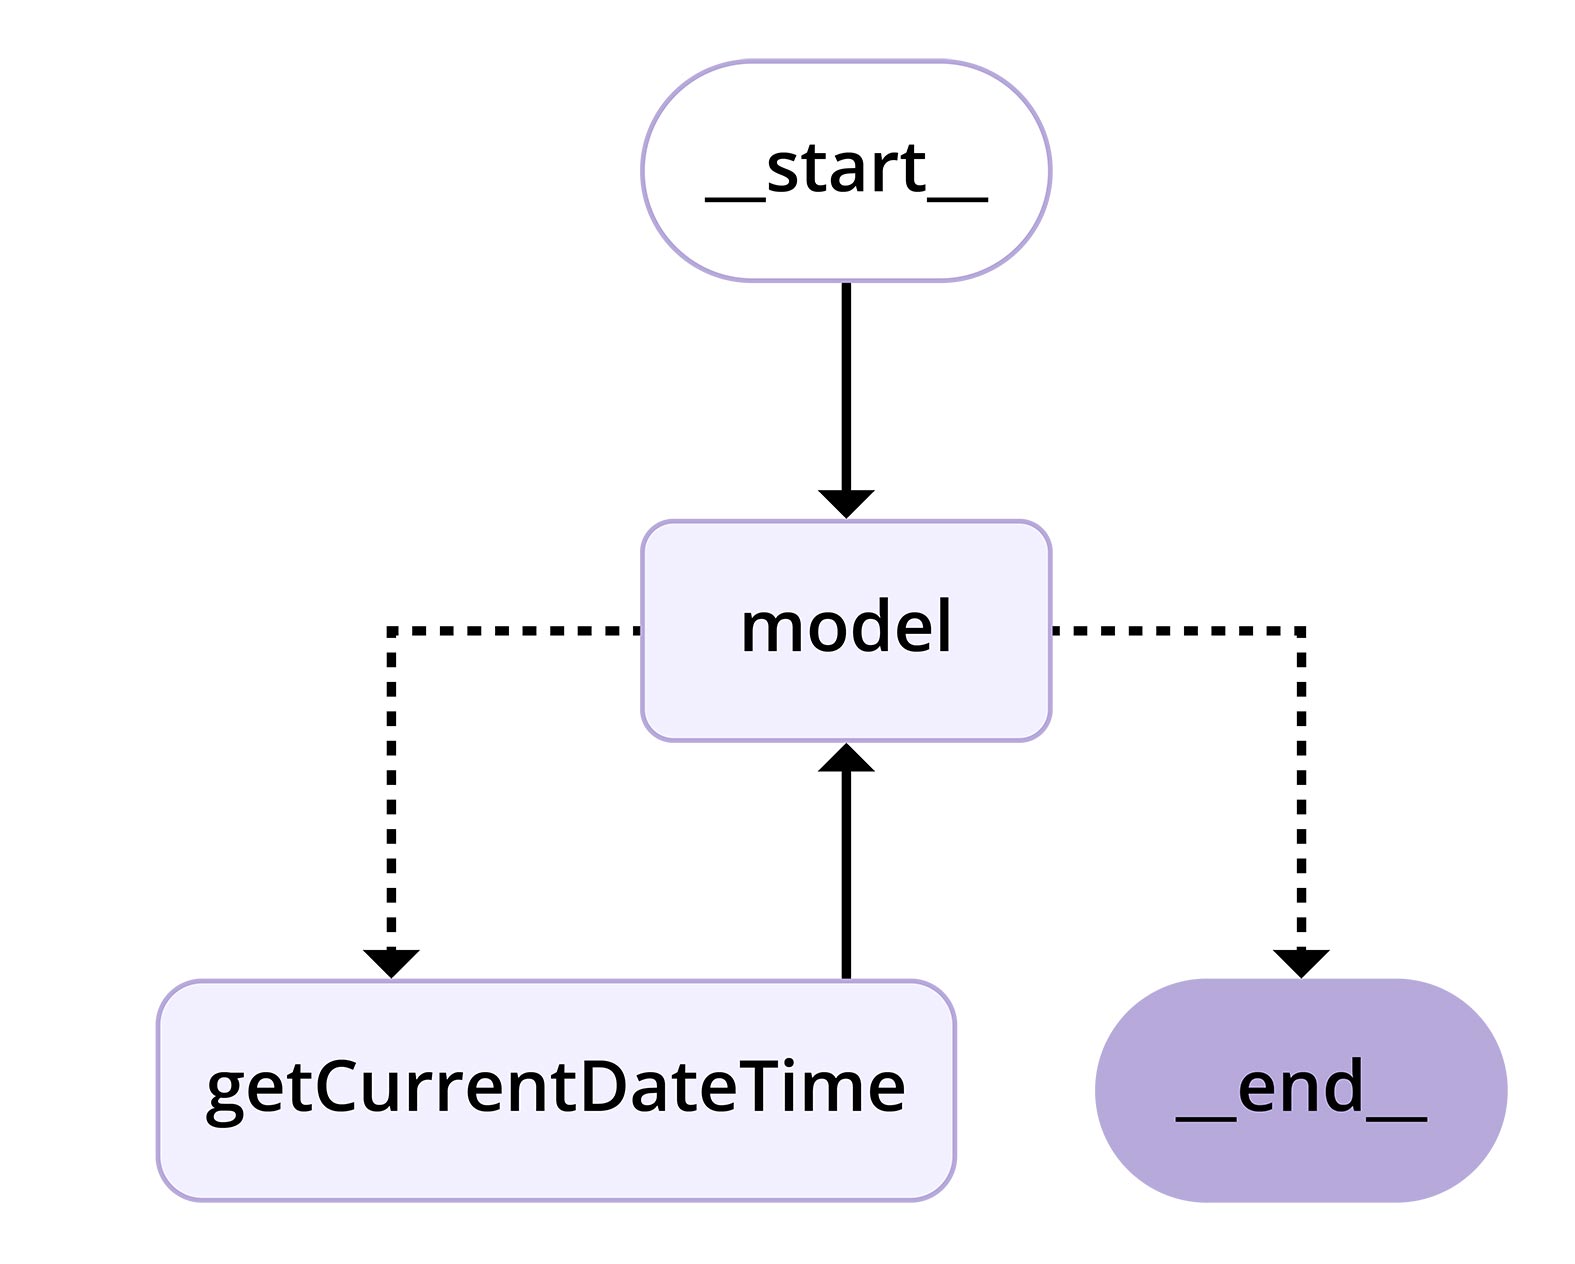
Figure 1: Structure of the application graph
The graphical representation reveals another special feature. You can use the addConditionalEdges method to insert a branch. Implement this in the shouldContinue function. It receives all messages and checks whether the last message from the model contains a Tool call. If this is the case, the process is forwarded to the ToolNode. Otherwise, the run is terminated. A complete run through the graph looks like this:
- The edge labeled start marks the start of the graph and connects it to the model.
- The model node is executed. The model receives the prompt, processes it, and returns the result.
- The edge inserted with the addConditionalEdges method checks whether a Tool call is required. If this is not the case, the run is terminated with end. Otherwise, the edge connects the model to the ToolNode.
- The ToolNode is called and returns the current date and time.
- The edge connecting the ToolNode and the model ensures that the state enriched by the output of the Tool function is made available to the model.
- The model receives the extended prompt and can generate a response.
- The model does not require any further Tool calls, and the application is terminated by the conditional edge.
The compile method of the StateGraph instance creates an executable application to which you can pass any prompt using the invoke method. Assuming you call the application on December 1, 2025, at 3:02 p.m., you will receive the output “It’s currently 3:02 PM on December 1st.” As shown in the example, if you execute the invoke method again and pass the message history, the application does not execute another Tool call and uses the information from the previous run.
This example uses a Tool node to counteract the weakness of LLMs that do not know anything about current or dynamic data. It also shows the essential features of a LangGraph application, but also the limitations you face when integrating smaller language models. The responses are not always consistent. For most queries, the model responds with a correct answer. The time you return here is in the UTC time zone. If you ask for the current time in a different time zone, as in the second prompt, you may get the correct answer, but you may also find that Munich is suddenly in a time zone 6 hours behind UTC. In addition, during testing, the results for German queries were significantly worse than for the English version, even though all prompts were in German. To solve the time zone problem, you could, for example, register another tool that resolves the time zones correctly and uses this information to obtain the correct time. In the next example application, you will learn about another use case for LangChain that differs more significantly from the usual chatbot application.
This example already shows the essential features of a LangGraph application. The application consists of several nodes connected by edges. This architecture allows you to create both simple and very complex applications by assembling them from small, loosely coupled building blocks. The application gains additional flexibility because you can exchange nodes or insert new ones. You can also create conditions and thus take different paths through the graph at runtime. Although the time announcement example demonstrates some basic architectural features of LangGraph, it is still a long way from a real AI agent. For this reason, we will now look at another example of a LangGraph application that will introduce you to further features of an AI agent and show you other possible uses for the library.
Another Example: The Digital Shopping Cart
The following example relies less on an LLM to control the application and instead integrates an LLM to perform a very specific task. The rest of the application consists of a simple graph with a few additional nodes. The application is designed to evaluate images of products and recognize which and how many products are depicted. The products are placed in the shopping cart and the price for the individual products and the entire shopping cart is determined. At the end, the application outputs a tabular list of the shopping cart. The application is based on Node.js and is operated via the command line. The product images are stored in the file system and are read in when used. Communication takes place via command-line input.
One of the most common use cases for a LangGraph application is a chatbot. That’s why LangGraph also provides the MessagesAnnotation, which allows you to implement a message-based system without any further changes. However, you are not limited to this structure, but can model the state as you wish. The basis for this is provided by LangGraph’s Annotation structures. The GraphState of an application is structured like a tree and has a root node that you define with Annotation.Root. This then contains any object structure. Listing 2 shows how the GraphState of the sample application is structured.
Listing 2: Generating the GraphState
const schema = z.object({
  totalPrice: z.number(),
  cart: z.array(
    z.object({
      image: z.string(),
      name: z.string().optional(),
      price: z.number().optional(),
      quantity: z.number().optional(),
    })
  ),
});

type StateType = z.infer<typeof schema>;
type CartItem = StateType['cart'];

const cartAnnotation = {
  totalPrice: Annotation<number>,
  cart: Annotation<CartItem[]>,
};

const State = Annotation.Root(cartAnnotation);
The GraphState contains two fields: the total price in the totalPrice property and the shopping cart in the cart property. You model the details of the state using LangGraph’s Annotation functions. These are implemented as TypeScript generics so that you can pass the type of the respective property. The total price is a simple number, and the shopping cart consists of an array of objects representing the individual products. If you do not specify anything else in the Annotation functions, LangGraph will overwrite the previous value in the state when a change is made. Alternatively, you can call the Annotation function and pass it an object with a reducer function and a default value. The reducer is then responsible for generating the new state of the StateGraph from the previous state and additional data. In our example, the node functions of the application itself take care of updating the state, so no separate reducer function is required.
The state not only represents the current state of the application, but also serves to exchange information between the individual nodes. The nodes do not simply pass information to each other, but store it in the state. This has the advantage that the state of the application can be better understood. This makes the application more flexible, as you are not dependent on fixed interfaces between the nodes. If you persist the state, you can pause the execution of the application and continue at the same point without losing any data.
In addition to the state, the nodes and edges of the graph are the most important building blocks of the application. Figure 2 shows the nodes of the application and their connections. In the following, you will learn about the special features of the individual nodes and how they interact.
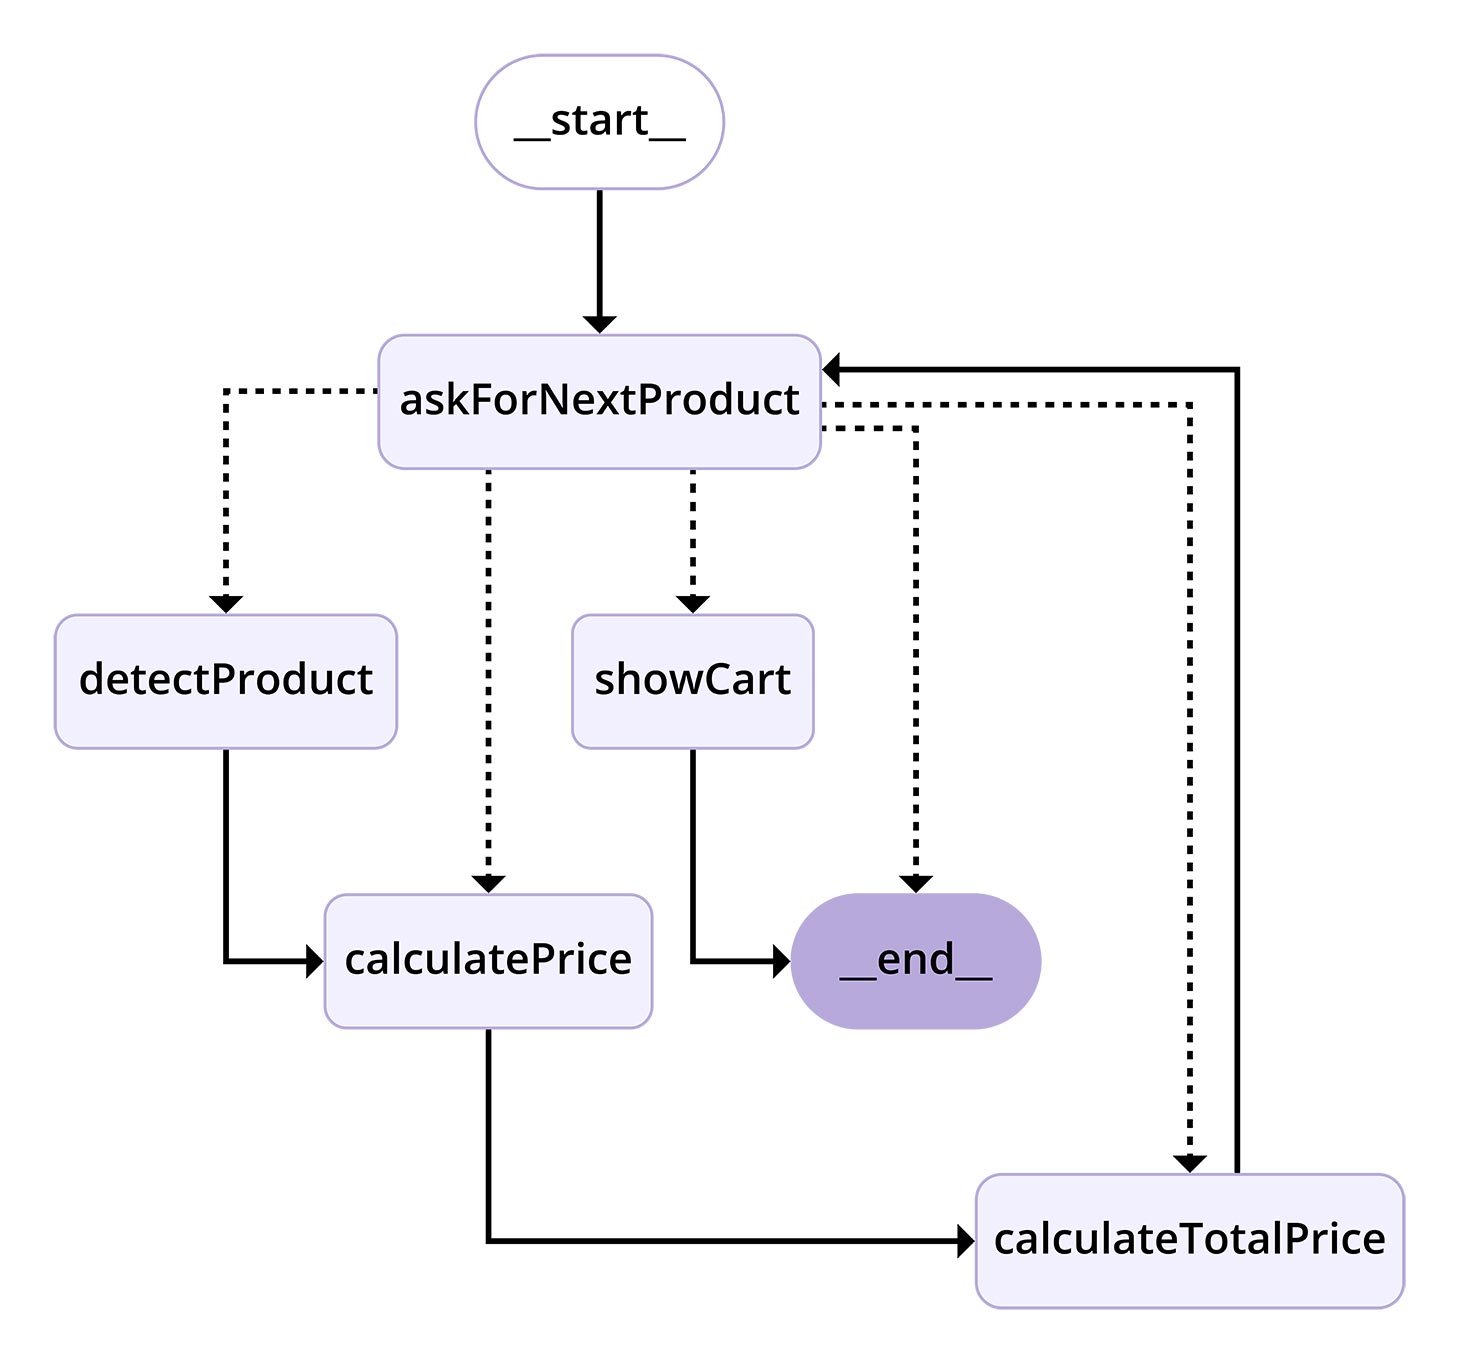
Figure 2: Visualization of GraphState
AskForNextProduct – Which Product Should Be Added?
The askForNextProduct node starts the process. It uses the Readline module from Node.js to query user input on the command line. The application expects the name of a file containing the image of a product. For example, you can enter “DSC_0435.jpg.” A file with this name must then be located in the application’s input directory and will be read in later in the graph. The node only takes care of querying the file name and must pass it on to the next node in the graph. So you need to save this info in the GraphState. To do this, the node adds a new element to the cart array and writes the file name to the image field. Entering a file name is a simplification for this app. At this point, you can implement any image source you want. For example, you can create a front end for the app and upload the images via the browser.
askForNextProduct has a special feature because it is connected to the detectProduct and showCart nodes via a ConditionalEdge. If you enter the string finished, this means that no further products should be added to the shopping cart and the shopping cart should be displayed. In this case, the ConditionalEdge calls the showCart node. In all other cases, the application continues with the detectProduct node to identify the product.
DetectProduct – Product Recognition with a Vision Model
In the example in Listing 3, the detectProduct node uses the llama3.2-vision:11b model for image recognition. The prompt is important here. You specify the context, i.e., that the model is to be used for product recognition and that the number of products found is to be counted. You also specify the output format in the form of a JSON string with a concrete example. You can pass both the name of the file and a Base64-encoded image directly to the Ollama library used here. By formulating the prompt in this way, you have ensured that you will receive valid JSON as a response, which you can insert directly into the last element of the shopping cart array in GraphState.
Listing 3: detectProduct ToolNode
const detectProduct = tool(
  async (state: StateType): Promise<StateType> => {
    console.log('Detecting product...');

    const { message } = await ollama.chat({
      model: 'llama3.2-vision:11b',
      messages: [
        {
          role: 'user',
          content: `You are a vision model for a pet shop. What
            product do you see and how many are there. Answer in
            the following json string structure
            { "name": "name", "quantity": 1}`,
          images: [`./input/${state.cart[state.cart.length - 1].image}`],
        },
      ],
    });
    const visionModelResponse = JSON.parse(message.content);

    const clonedState = { ...state };
    clonedState.cart[clonedState.cart.length - 1] = {
      ...clonedState.cart[clonedState.cart.length - 1],
      ...visionModelResponse,
    };
    return clonedState;
  },
  {
    name: 'detectProduct',
    description: 'Detects a product.',
    schema,
  }
);
CalculatePrice – Read Data from the Database
This is another simplification for our example. The CalculatePrice node reads the name of the product from the last element of the shopping cart array and uses it for a database query. The result is the price of the product you are looking for. You can make the search for the right product as complex as you like. A simple extension would be to normalize the spelling so that it doesn’t matter whether you search for “apple” or “apples.” You can also use a smart, AI-based product search, which significantly improves the application but also significantly increases the response time in most cases.
In the example, we assume that a match was found for the image and the product name derived from it. The calculatePrice function adds the price to the corresponding shopping cart item and passes control to the calculateTotalPrice node configured in the application.
CalculateTotalPrice – Calculate the Sum
The calculateTotalPrice node is an example of a very simple operation. It uses the Array-reduce function to calculate the sum of the prices of all items in the shopping cart. In theory, you could also have a language model perform operations like this, but a calculation in the source code has the advantage that it always works, and you don’t have to worry about the language model starting to hallucinate and adding or omitting products or simply changing prices on its own. The code in Listing 4 also shows a simplification of LangGraph that allows you to update only part of the GraphState.
Listing 4: calculateTotalPrice ToolNode
const calculateTotalPrice = tool(
  async (state: StateType) => {
    console.log('Calculating total price...');
    const totalPrice = state.cart.reduce((acc, item) => {
      return acc + item.price! * item.quantity!;
    }, 0);
    console.log(`Current total price: ${totalPrice}`);
    return { totalPrice };
  },
  {
    name: 'calculateTotalPrice',
    description: 'Calculates the total price of the cart.',
    schema,
  }
);
As with the totalPrice property, if you only specify the structure of part of the GraphState, LangGraph will only update that part. Here, another standard behavior of the library comes into play. If you do not define a reducer function when creating the GraphState, LangGraph will overwrite the value with the update. For a simple number, this behavior is not a problem. However, with an object structure such as the cart state, this can become a problem. Here, you can implement the desired behavior yourself using a reducer.
After updating the total price, the loop in the StateGraph closes and the askForNextProduct node waits for the next input until the cycle is interrupted by the input of finished and the entire shopping cart is displayed.
ShowCart – Displaying the Shopping Cart
Before the application is terminated, the shopping cart is displayed on the console. The showCart node uses the console.table function for this purpose and draws from the GraphState. This node only accesses the state in read-only mode and outputs it unchanged as the return value. This node is also the end of the GraphState and is connected via an edge to the end node, which terminates the application.
The Nodes and Edges of the Application
As in the previous example, you use the StateGraph class, to which you pass the configured state during instantiation. Use the addNode, addEdge, and addConditionalEdges functions to define the nodes and connect them with edges. Call the compile function on the resulting object and then start the application by calling the invoke method, as shown in Listing 5.
Listing 5: Registration of nodes and edges
const graph = new StateGraph(State)
  .addNode('detectProduct', detectProduct)
  .addNode('calculatePrice', calculatePrice)
  .addNode('calculateTotalPrice', calculateTotalPrice)
  .addNode('showCart', showCart)
  .addNode('askForNextProduct', askForNextProduct)
  .addEdge('__start__', 'askForNextProduct')
  .addEdge('detectProduct', 'calculatePrice')
  .addConditionalEdges('askForNextProduct', showCartOrDetectProduct as any)
  .addEdge('calculatePrice', 'calculateTotalPrice')
  .addEdge('calculateTotalPrice', 'askForNextProduct')
  .addEdge('showCart', '__end__');

const app = graph.compile();

app.invoke({ totalPrice: 0, cart: [] });
When starting, you pass an initial state structure and enter the StateGraph. The graph of this application describes a circle. Here, you must be careful not to accidentally construct an infinite loop. LangGraph defines a limit of 25 cycle runs before it throws a GraphRecursionError. However, this only occurs if you do not integrate an interruption. This is relevant for the example because the keyboard input in the askForNextProduct node is not considered a termination condition for the cycle. The size of your application’s shopping cart is therefore limited by this restriction. To mitigate the restriction and increase the shopping cart size, pass an object with the property recursionLimit as the second argument to the invoke method when starting the application and define a value greater than 25. Of course, you can also pass a smaller value to test the effects of the restriction.
Conclusion
If your AI application consists solely of direct communication with a language model, it is usually sufficient to use the appropriate npm package, such as OpenAI or Ollama. However, if you want to integrate the model into a larger application context and use additional information sources or implement your own logic, an additional library is recommended. One example of this is LangChain. This tool allows you to flexibly link the individual components of your application together to form a chain. However, this architecture reaches its limits, especially in larger and more complex use cases. LangGraph, from the creators of LangChain, extends the architecture of an AI application to a graph in which you have the option of branching and looping.
The advantage of this graph architecture is that you can assemble your application from individual nodes. The connections between these nodes and the edges determine the flow of the application, but not the data flow. The data in the graph is stored in the state, an object structure that you can design according to your needs. This central state allows you to persist the state of your application and pause your application if necessary, and resume it at a later point in time.
The nodes are independent of the actual application, so you can move the implementation to a library or package and achieve reusability across application boundaries. All you have to do is make sure that the underlying state structure fits, which is easy with Zod for schema definition, validation, and TypeScript.
🔍 Frequently Asked Questions (FAQ)
1. What is LangGraph and how does it differ from LangChain?
LangGraph is a library for building AI agents using graph-based architecture in JavaScript or TypeScript. Unlike LangChain, which connects components in a linear chain, LangGraph uses nodes and edges to model dynamic control flows including branching and looping.
2. How do AI agents differ from traditional LLM-powered applications?
AI agents act autonomously within defined environments, continuously observe their surroundings, and make decisions based on long-term goals. This is in contrast to typical LLM applications, which respond only to direct prompts without proactive behavior.
3. What are the core components of a LangGraph application?
The three main components are nodes (functions that perform tasks), edges (transitions between nodes), and the state (a shared data object accessible and modifiable by all nodes). LangGraph also supports conditional logic via reducer functions and annotations.
4. Can LangGraph applications access real-time data?
Yes. LangGraph can integrate tools as nodes—for instance, a node that returns the current UTC date and time—allowing applications to supplement static model knowledge with dynamic, real-world data.
5. What role does the ToolNode play in a LangGraph setup?
The ToolNode provides real-time or auxiliary functionality by executing predefined logic, such as accessing current timestamps or running a custom function. It can be triggered by the model when a specific task cannot be completed with its internal knowledge alone.
6. How does LangGraph handle conditional logic and tool invocation?
LangGraph supports conditional edges via methods like addConditionalEdges. These allow the graph to evaluate conditions (e.g., tool calls in the model output) and dynamically choose which node to execute next.
7. How does the digital shopping cart example showcase LangGraph’s flexibility?
The digital shopping cart uses LangGraph nodes for reading product images, recognizing items via vision models, querying a database for prices, and calculating totals. This highlights how LangGraph enables stateful, multi-step applications beyond basic chatbot use cases.
8. Why is centralized state important in LangGraph applications?
Centralized state allows for easy debugging, flexible data exchange between nodes, and the ability to persist and resume sessions. This design makes LangGraph particularly suited for complex workflows that require memory and context retention across multiple steps.